The user tavo left today a tutorial on our forum, tutorial that I publish here because it deserves it 😀
-------------------------------
As promised is debt, yesterday on IRC I promised to KZKG ^ Gaara do this tutorial on how to create our animated userbar in Gimp.
I apologize for the screenshots in English, as I use it in that language because it is practical for me when following tutorials
The first thing we will do is open Gimp and select the foreground color with the following value:
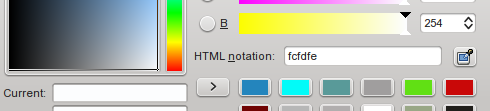
As seen in the screenshot, the value must be fcfdfe In this way, the background will be in tune with the aesthetics of the forum.
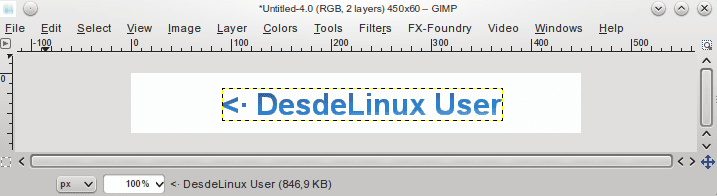
Then we go to the tab File> New and in the window that appears we choose these dimensions:

The horizontal value should be 450 and 60 for the vertical (you can anyway according to your preferences). Also in Advanced Options they must choose foreground color as background.
The next step is to use the text tool to write the content that the userbar will have, in my case I use the phrase: <° DesdeLinux User .when they have written the text on that same layer they give right click> alpha to selection. With the selected text we take the blending tool (gradient), in my case I use blue glow, but they can use the one they prefer. They fill the selection with the gradient, leaving it like this:
Next we will duplicate the text layer 14 times to achieve 15 identical layers:
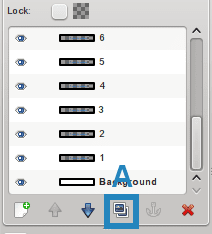
Marker A indicates where you should click to duplicate the selected layer
From now on we will work with those layers, adding filters and transparencies
* The first step is to work from layer 1 to 4 inclusive going to Filters> Blur> Gaussian Blur and the values to use are the following for each layer:
In layer 1 filter settings:
Horizontal: 12px
Portrait: 12px
In layer 2 filter settings:
Horizontal: 9px
Portrait: 9px
In layer 3 filter settings:
Horizontal: 6px
Portrait: 6px
For layer 4 filter settings:
Horizontal: 3px
Portrait: 3px
* As a second step we will work from layer 11 to 15 (inclusive), that is to say with the last five layers.First of all we must align these last 5 layers to the dimensions of the image, this is important to achieve the desired effect, this mode: tab Layers> Align to Image Size. Then we rename the layers with numbers one by one by double clicking on the layer, they change its name to numbers.
The filter that we will use in the layers is Filter> Blur> Motion Blur and we will apply it as follows for each layer and a duplicate that we will create for each of them:
Duplicate layer 11.
Filter settings, for duplicate and original layer respectively:
Copy
Length: 10
Angle: 0Original layer
Length: 10
Angle: 180
A layer 11 and the copy are combined (right click on the copy of layer 11 and choose to combine down)
Duplicate layer 12.
Filter settings:
Original layer
Length: 20
Angle: 0
Duplicate
Length: 20
Viewing angle: 180
A layer 12 and the copy are combined.
Duplicate layer 13.
Filter settings:
Original layer
Length: 30
Angle: 0
Duplicate
Length: 30
Viewing angle: 180
A layer 13 and the copy are combined.
Duplicate layer 14
Filter settings:Original layer
Length: 40
Angle: 0
Duplicate
Length: 40
Viewing angle: 180
A layer 14 and the copy are combined.
Duplicate layer 15
Filter settings:Original layer
Length: 50
Angle: 0
Duplicate
Length: 50
Viewing angle: 180
A layer 15 of the copy is merged.
What we will do now is modify the opacity of the layers with these settings:
1 to 60%
2 to 70%
3 to 80%
4 to 90%
11 to 90%
12 to 80%
13 to 70%
14 to 60%
15 to 50%
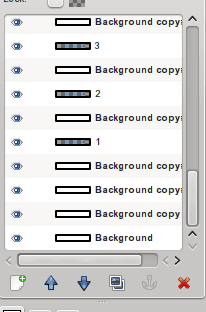
We are going to select our background layer to duplicate it four times, leaving five identical layers. We raise the last duplicate background above our layer 1 (with the arrow pointing up in the layer navigator next to the marker A).
We duplicate again and raise it on top of layer 2 and so on, leaving backgrounds interspersed between the text layers like this:
Now let's file> save as and name the file with the extension . Gif at the end for example:userbar.gif .
In the window that appears, it is important to mark the option:
Save as Animation
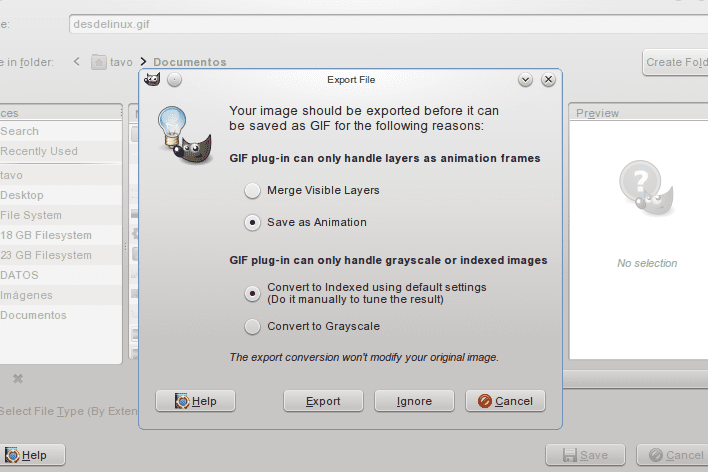
Then we press export and then accept.
We navigate to our file and it should look like this:

I hope you find it useful and it is well understood, any questions do not hesitate to consult me, I leave another example of results that can be achieved:

If you notice in the second banner I edited the dwell times in frames .... I'll add it later, it's not that complex.
Regards!
-------------------------------
Thank you very much to tavo For this excellent tutorial, the result is super cool haha… and, let you know that if you want to put Gimp tutorials here, articles or whatever you consider interesting, it will be an honor for us 😀
Pole !!!!
I have to do that about the Gimp !!!
Let's see if this week I can 😉
What does "pole" mean and in which country (s) do you use it?
Oh, and how do they pronounce it?
pole = soyez le premier = the first to comment
Pole comes from pole position.
https://es.wikipedia.org/wiki/Pole_position
Interesting OO you learn new things around here 🙂
interesting! I did not know that information
And the pronunciation? »Pole», «poul», «pol»?
Thank you very much @ KZKG ^ Gaara for posting it, the honor is mine for having the opportunity to spread the word about Gimp, a great tool that is often unfairly underestimated.
I will try to contribute the odd tutorial on weekends, it is the least I can do in gratitude for this great program. I come from Photoshop and at first it was difficult to adapt to the change but it was worth the effort.
I also do some things in Blender but I'm still a little green… .Lack of practice hehe
I reiterate my congratulations for the work you do on this page.
Thanks Tavo, excellent tutorial. Although I don't know anything about graphic design, GIMP is a very practical tool that has helped me in many situations. Thanks to her, I learned to create simple but very beautiful logos; has many templates and effects for logos. I wish I could learn more about this tool. Hopefully you can continue sharing more knowledge on this blog. Regards.
Thanks to you for commenting Carlos… .with practice you become familiar with the program. I think the point against Gimp is that there is not so much dissemination about the program and few tutorials. You have the possibility to add many plugins that automate the tasks, which in Photoshop is also possible but the extensions that are really worth it are expensive
.
Oops, I didn't even know there were extensions for Photoshop, nor did I imagine that such extensions could be expensive. I hope we can enjoy another of your tutorials, thank you very much.
wow I'll do it right now OO greetings
It is appreciated, it is good for me to practice with the gimp.
Thanks for the guide tavo little is learning how to do things with GIMP
regards
Great 😀 When I have time I try it.
Great when I'm interested in graphic design I try it XD
Good tuto, but there is a but:
The userbars (at least the vast majority) are 350 × 19, so this exceeds the size. Be careful, I am not against the dimensions for the userbar of this tutorial, I just wanted to clarify this point (that I also make userbars).
It is worth clarifying, it is true that the userbar is generally smaller. The animation can be done with any template size, which does not affect the final result. The size would fit more for a banner or signature
Animated signatures for forums, what good memories ...
Good manual, I like the effect that is achieved. I'll tell Ren to make me one of Trisquel xD
Well, maybe and I'll do it myself that I don't lose anything by trying 😉
Greetings.
This great +1