In previous entries in this series of publications, we recalled how to implement a:

And in previous ones, how to implement a Shebang and a BSM (Bash Strict Mode / Strict Bash Mode).
Best practices to create a Shell Script in GNU / Linux - Part 1
Best practices to create a Shell Script in GNU / Linux - Part 2
Here is an example of a Double execution module or failed executions, taking as an example one of my programs (applications) facts in a Shell script called Linux Post Install - Bicentennial Script 8.0:
This should be the module (section) To validate that the script is not actually running and therefore avoid running twice, or failing that the previous time it was run, it ended successfully. I personally add the following lines to create this module:
###############################################################################
# INICIO DEL MODULO DE DETECCIÓN DE DOBLE EJECUCIÓN ó EJECUCIONES FALLIDAS
###############################################################################

if [[ -f  $UBICACION/$FILE_LOCK ]]; then

   setterm -background red
   echo "El Script no podrá ejecutarse!"
   echo "Debido a que el Archivo de Bloqueo de doble ejecución lo impide."
   sleep 5 ; exit 0

 else

  touch $UBICACION/$FILE_LOCK

fi

###############################################################################
# FINAL DEL MODULO DE DETECCIÓN DE DOBLE EJECUCIÓN ó EJECUCIONES FALLIDAS
###############################################################################
===============
Recommendation:
THE EDITOR VI
I suspect that many for ease of use, when it comes to edit your scripts via terminal should use the nano editor which is not only very easy to manipulate but also has the most common default options to perform the necessary editing processes in a plain text file, such as the Shell scriptHowever, my best recommendation in this case is that they learn and use the saw editor, which is not only much more advanced, although complete, but once mastered it will provide the necessary methods to make changes or operations on files in a more effective and efficient way.
In other words, Vi or Vim is a very useful file editor, which provides great flexibility when editing scripts, modifying text files, among many other types of files, but above all, when programming. In my opinion, it is one of the best editors that exists, however, as usual, when nano users start to use it and see a different methodology of use, it usually happens that radically «Either they love it or they hate it. righ now". I think it's worth learning how to use it!
Certainly at first entry it may seem an unfriendly text editor And very difficult learning curve, but that once overcome, making use of its basic functions, productivity increases in a very remarkable way.
It is also true that, saw editor has or works with Difficult shortcuts and lacks menus or buttons. Everything is done through commands and shortcuts that are sequences of letters and signs. And this is very frustrating for many users who forget or do not remember easily, however, it occupies very little disk space and is present in basically almost all Linux or Unix available. And because it is a program that runs in a text environment, it is useful for remote access and editing via terminal. So, we are going to take advantage of this short post to give a brief review of its basic use from scratch, to lose that fear and see how useful it is to learn to use it.
By invoking the saw editor appears on the screen edit mode. In this mode, the cursor position is highlighted, and the blank lines marked with the character ~ and at the bottom of the screen appears the status line, which shows the name of the file and the number of characters it contains. If the saw editor passing the path and name of a file as a parameter at the prompt, its content will appear. When this editor is run with the name of a file that does not exist, it is created automatically.
El saw editor has two modes of operation:
- Edit Mode: To add text to the file.
- Command Mode: To enter orders that perform specific functions.
When proceeding to edit a text file with the saw editor, the changes are not made directly on it. But actually, they apply to a copy of him that the saw editor create in a temporary memory space called buffer. The actual file is modified only when the contents of the buffer are written. This has its advantages and disadvantages. On the one hand, it means that you can quit editing a file and discard all changes made during a session, leaving the disk copy intact. On the other hand, the unrecorded content of the job buffer could be lost if the system crashes. It is best to save your work frequently, especially when making major changes. To save the file being edited without exiting the saw editor, just press the command in command mode :w
To end the execution of the saw editor different methods can be used, always in command mode:
: q -> Close the editor when no changes have been made to the file.
: q! -> Close the editor discarding the changes in the file.
: wq -> Close the editor saving the changes to the file.
IMPORTANT: You should avoid editing the same file with several sessions of the saw editor open at the same time, because there was no way to be sure which is the final copy that will actually be recorded on disk.
In Edit Mode: When the saw editor, always starts in the command mode, so before you can add, modify or delete text within the file you must type one of the input commands of the saw editor, Such as "I" (insert), to insert text at the current cursor position, or "A" (append) to insert text after the current cursor position. To return to command mode, just press the key "Esc". If in a moment X you don't know what mode you are in, simply by pressing the key "Esc" one makes sure that he is in command mode, and you can return to continue with the work.
In Command Mode: When you open a file with the saw editor, opens immediately in the command mode. And in this mode you can execute actions (commands) who carry out a wide range of functions. Many of these commands consist of one or two letters and an optional number related to different functions. Many commands do not require pressing the key Return so that they are executed, but all orders that start with a colon (:) require pressing the key Return for them to run.
MAIN COMMANDS OF THE EDITOR VI
The main commands of the saw editor, according to their usefulness when editing a document are:
01.- Move within the file
02.- Add text
03.- Modify text
04.- Undo modifications
05.- Delete text
06.- Move and / or copy text
07.- Execute commands in EX mode
08.- Search and replacement
09.- Dumping of content from one file to another
10.- Simultaneous editing of files
IMPORTANT: The commands of the saw editor they can be preceded by a counter that indicates how many times the operation should be repeated. For example 3dd delete 3 lines, 2dw delete 2 words, and 4x deletes 4 characters. Counters can also be used for commands to move around the screen, for example 3w o 2Ctrl-F Pressing a "." the last operation performed is repeated. For example, if a line is deleted and the next operation is to delete a line, just press ".".
NOTE: Many of the commands of the saw editor consist of case-sensitiveIn other words, the same command typed in uppercase or lowercase can have totally different effects.
Anyway, for more information you can search the Internet (Google or Youtube) information related to Editor vi, which is extensive and abundant in literature and support.
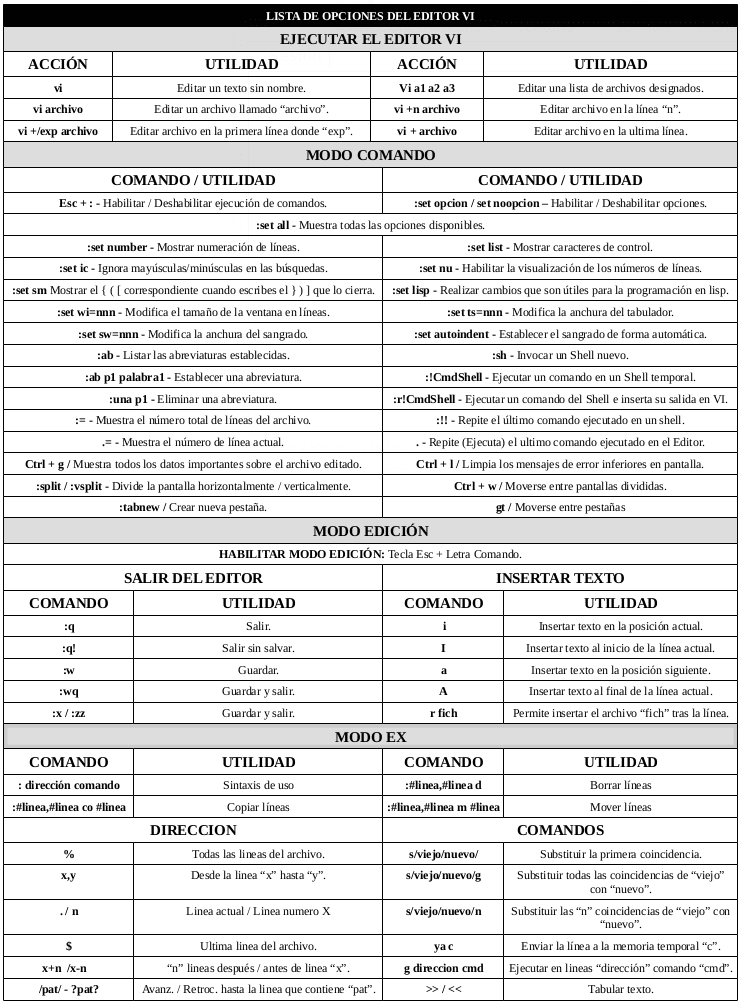
However, I leave you this CHEAT SHEET (CHEAT SHEET) that will be very useful to get started in the saw editor

Later, in future posts we will continue to see an example of modules (sections) that perform functions such as:
- OPTIMIZATION MODULE
- USER AUTHORIZATION MODULE WITH PASSWORD
- MODULE OF DETECTION OF THE ARCHITECTURE OF THE OPERATING SYSTEM
- CODING LANGUAGE CONFIGURATION MODULE
- PROXY CONFIGURATION MODULE FOR THE EXECUTION ENVIRONMENT
Among many others!
And as always, I recommend go learning in a self-taught way about the commands: gksu, dialog, gxmessage, zenity, espeak, play, among many others to create graphical interfaces by Terminal or for the User's Desktop, with sonic or multimedia alerts, and advance knowledge that they will use later.
Remember that these and any other recommendations on some module, function, variable, command or action in general it can be carried out many ways, and what is shown here is only one simple way, Of the many possible and probable ways in which said action can or could be carried out!
Just to finish I leave you, a Screencast made by me, to show you what you would be capable of, after finishing this Shell Scripting online course in DesdeLinux:
(LINUX POST INSTALL - BICENTENNIAL SCRIPT 8.0.0) - Part 2