If like me, you are a lover of Bash and for reasons of habit or whim, you do not feel like using zsh y oh my zsh to give more enhancement to your terminal. Well, in good time, this tutorial shows you how to configure step by step powerline-shell-master and give him a nice appearance prompt your bash shell. In short, this tutorial will make you a master of the Bash Prompt customization
What is bash?
Bash (Bourne again shell) is a computer program, whose function is to interpret commands, and a console programming language. It is based on the Unix shell and is POSIX compliant.
What is prompt?
The character or set of characters displayed on a command line is called prompt to indicate that it is waiting for commands. This can vary depending on the shell and is usually configurable.
Downloading Powerline-Shell-Master
Powerline-Shell-Master is a free project and can be found in https://github.com/banga/powerline-shell

We go to this route and download it as in zip format.
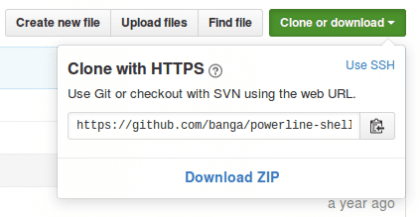
We can also do it from the console with the following command:
git clone https://github.com/banga/powerline-shell.git
Configuring PowerLine-Shell-Master
Once the project is downloaded, we unzip it:
$ cd / Downloads $ unzip powerline-shell-master.zip $ cd powerline-shell-master
We edit the configuration file config.py.dist to load the basic theme
$ nano config.py.dist
    In the last line of the file change the line THEME = 'default' to
    THEME = 'basic'
Exit and save changes

We execute install.py To load the new configuration changes:
$ python install.py
  It should return the following output:
    Created personal config.py for your customizations powerline-shell.py saved successfully
  If the execution was successful, we will notice three more files:
    config.pyc, config.py and powerline-shell.py

Now we only have to locate the folder where it should go or should be for convenience and order, we move the folder to / home / user renaming it as .power-line-shell-master, the point preceding the name is to hide it.
If we are still inside the directory we go back:
$ cd .. $ mv powerline-shell-master $ HOME / .powerline-shell-master

Setting up Bash Prompt
To configure the bash prompt is quite simple since in the powerline-shell manual there is the proper configuration for bash, but however it is somewhat limited, so I will leave the .bashrc configuration for you to just paste it into your file. bashrc as is, replacing the previous configuration.
If we are still on the download route we go to the personal folder
$ cd ~
We make a backup copy of our .bashrc file
$ cp .bashrc .bashrc_old
We open the .bashrc file with a text editor to edit it
$ nano .bashrc
Once open, we delete its content and replace it with the following:
# ~ / .bashrc: executed by bash (1) for non-login shells.
# see / usr / share / doc / bash / examples / startup-files (in the package bash-doc) # for examples # If not running interactively, don't do anything case $ - in * i *) ;; *) return ;; esac # don't put duplicate lines or lines starting with space in the history.
# See bash (1) for more options HISTCONTROL = ignoreboth # append to the history file, don't overwrite it shopt -s histappend # for setting history length see HISTSIZE and HISTFILESIZE in bash (1) HISTSIZE = 1000 HISTFILESIZE = 2000 # check the window size after each command and, if necessary, # update the values of LINES and COLUMNS.
shopt -s checkwinsize # If set, the pattern "**" used in a pathname expansion context will # match all files and zero or more directories and subdirectories.
#shopt -s globstar # make less more friendly for non-text input files, see lesspipe (1) [-x / usr / bin / lesspipe] && eval "$ (SHELL = / bin / sh lesspipe)" # set variable identifying the chroot you work in (used in the prompt below) if [-z "$ {debian_chroot: -}"] && [-r / etc / debian_chroot]; then debian_chroot = $ (cat / etc / debian_chroot) fi # set a fancy prompt (non-color, unless we know we "want" color) case "$ TERM" in xterm-color | * -256color) color_prompt = yes ;; esac # uncomment for a colored prompt, if the terminal has the capability; turned # off by default to not distract the user: the focus in a terminal window # should be on the output of commands, not on the prompt # force_color_prompt = yes if [-n "$ force_color_prompt"]; then if [-x / usr / bin / tput] && tput setaf 1> & / dev / null; then # We have color support; assume it's compliant with Ecma-48 # (ISO / IEC-6429). (Lack of such support is extremely rare, and such # a case would tend to support setf rather than setaf.) Color_prompt = yes else color_prompt = fi fi #config basic prompt #if ["$ color_prompt" = yes]; then # PS1 = '$ {debian_chroot: + ($ debian_chroot)} \ [\ 033 [01; 32m \] \ u @ \ h \ [\ 033 [00m \]: \ [\ 033 [01; 34m \] \ w \ [\ 033 [00m \] \ $ '#else # PS1 =' $ {debian_chroot: + ($ debian_chroot)} \ u @ \ h: \ w \ $ '#fi #unset color_prompt force_color_prompt # If this is an xterm set the title to user @ host: dir #case "$ TERM" in # xterm * | rxvt *) # PS1 = "\ [\ e] 0; $ {debian_chroot: + ($ debian_chroot)} \ u @ \ h : \ w \ a \] $ PS1 "# ;; # *) # ;; #esac # enable color support of ls and also add handy aliases if [-x / usr / bin / dircolors]; then test -r ~ / .dircolors && eval "$ (dircolors -b ~ / .dircolors)" || eval "$ (dircolors -b)" alias ls = 'ls --color = auto' #alias dir = 'dir --color = auto' #alias vdir = 'vdir --color = auto' alias grep = 'grep - -color = auto 'alias fgrep =' fgrep --color = auto 'alias egrep =' egrep --color = auto 'fi # colored GCC warnings and errors #export GCC_COLORS =' error = 01; 31: warning = 01; 35 : note = 01; 36: caret = 01; 32: locus = 01: quote = 01 '# some more ls aliases alias ll =' ls -alF 'alias la =' ls -A 'alias l =' ls -CF ' ## Alias update the operative system alias system-update = "sudo apt-get update && sudo apt-get upgrade" # Add an "alert" alias for long running commands. Use like so: # sleep 10; alert alias alert = 'notify-send --urgency = low -i "$ ([$? = 0] && echo terminal || echo error) "" $ (history | tail -n1 | sed -e '\' 's / ^ \ s * [0-9] \ + \ s * //; s / [; & |] \ s * alert $ // '\' ') "' # Alias definitions.
# You may want to put all your additions into a separate file like # ~ / .bash_aliases, instead of adding them here directly.
# See / usr / share / doc / bash-doc / examples in the bash-doc package.
if [-f ~ / .bash_aliases]; then. ~ / .bash_aliases fi #grep command color activation GREP_OPTIONS = - color # enable programmable completion features (you don't need to enable # this, if it's already enabled in /etc/bash.bashrc and / etc / profile # sources / etc / bash.bashrc).
if! shopt -oq posix; then if [-f / usr / share / bash-completion / bash_completion]; then. / usr / share / bash-completion / bash_completion elif [-f / etc / bash_completion]; then. / etc / bash_completion fi fi #Configuration powerline-shell-master function _update_ps1 () {PS1 = "$ ($ HOME / .powerline-shell-master / powerline-shell.py $?
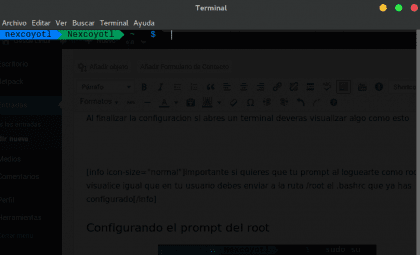
At the end of the configuration, if you open a terminal, it will be displayed as follows.
Setting the root prompt

If you read the alert and you took importance, let's go ahead and configure the root propt, this will not take long, it is just copying the file .bashrc previously edited and send it to the route / root.
Within the path of our personal folder
$ sudo cp -f .bashrc /root/.bashrc [sudo] password for (user):
Once I do this, we check that the /root/.bashrc file has the same configuration
$ sudo cat /root/.bashrc

Thank you for watching this tutorial, and if you are one of those who put it into practice at good time I am glad that it is so, because this manual or tutorial was created with the purpose of being useful. I know that for many this is not such a controversial issue but sometimes it is tedious to work with an unattractive terminal, hehe matter of taste.
Hello!!
I really liked your post, I have tested it in the new Mint 18.1 and when digging the result has not been the same ...
It seems that I do not have the appropriate system fonts to correctly display the prompt with the arrows, since the colors are displayed correctly.
I don't know if someone else happens to it but I would like to know if there is a solution, or a download page from the right sources to make it show up well.
Thank you!!
Hello friend, thanks for commenting, if indeed I forgot to mention that it requires the right sources to improve the appearance. These fonts are Powerline Fonts and you can find them in https://github.com/powerline/fonts
I had to change in the terminal preferences, the option of 'Encodings' to 'UTF-8 Unicode' and solved too.
If in fact I also work with the 'utf-8 unicode' encoding, thanks for comment 😀
Ohm, not only does it look good if it doesn't make reading easier, good Tuto.
Hello, very good post thanks, although it happened to me that all the colors / segments of the bar appeared in gray, and a prompt of this type xxxxxx ~ $ what do I have to do to fix that? Thank you very much, excellent contribution, greetings
I tried and the console worked but I ran out of the prompt, thank goodness it was nothing serious and I could repair it.