
How to create a simple and functional Hot Spot (Hotspot) on Linux?
No matter what «Sistema Operativo» may be installed on some Computer (desktop, mobile or laptop), with wired and wireless connection, surely at some point its user / owner will have wanted to create / configure a «Punto de acceso caliente», that is, a «Hotspot» about him. And so take advantage of sharing your Internet connection wired through your wireless network interface with other devices.
In any case, either with «Windows, MacOS o Linux» you can do a «Hotspot» by Command Line Interface (CLI), that is, a terminal or console. However, in «Windows y MacOS» There are many third-party applications that allow you to create a «Hotspot» in a simple and functional way via Graphical Interface (GUI). About «Linux» they are not abundant, but you can easily create one using the «Gestor de conexiones de red» of their respective «Entorno de Escritorio».

First, let us bear in mind that a «Punto de acceso caliente o Hotspot» it's basically a coverage access offered through a device so that there is a wireless communication, without cables, that is, via WiFi connection, to mainly offer Internet connection, or other resources and services via local network (LAN) o national or global network (MAN / WAN).
And secondly, that the procedure may vary slightly depending on the respective «Entorno de Escritorio» (Gnone, Plasma, KDE, XFCE, Cinnamon, Matte, among others) used on its «Distro GNU/Linux».

For the case of our article, we will use a «Laptop» with a 3 Core Intel i4 CPU and 6 GB of RAM and the «Distribución MilagrOS GNU/Linux 1.2» with the «Entorno de Escritorio XFCE» and «Gestor de conexiones de red» of the same, called «Miniaplicación Gestor de la red», which actually manages the NetworkManager also used in Gnome.
Procedure
Step 1:
Open the «Gestor de conexiones de red» of its «Distribución GNU/Linux»:

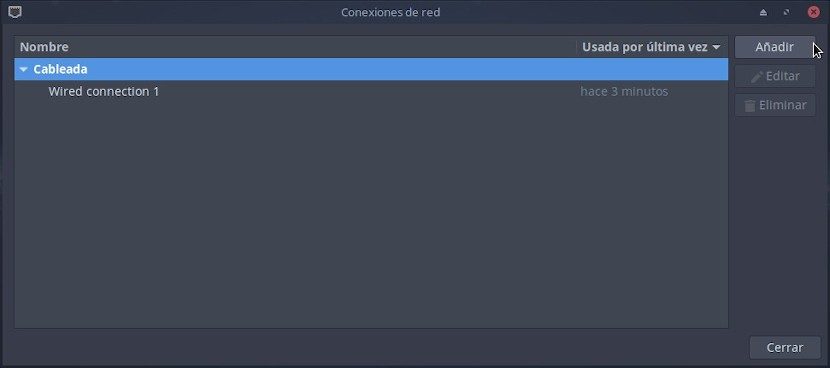
Step 2:
Request to «Gestor de conexiones de red» adding a new «conexiones de red» to «Distribución GNU/Linux» used:
Step 3:
Tell the «Gestor de conexiones de red» that the new «conexiones de red» will be of the type «Inalámbrica»:

Step 4:
Edit the parameters of the new «conexiones de red»:

In the called tab «Inalámbrica» of this new window called «Editando Conexión inalámbrica 1» The following fields must be filled in with the respective suggested recommendations:
- Connection Name: Hotspot (Or the one of your choice)
- SSID: Hotspot (Or the one of your choice)
- Mode: Hotspot or Access Point
- Band: Automatic
- Channel: Predetermined
- Device: Wlan0 (Or the available one)
- PERSON: Automatic

In the called tab «Seguridad inalámbrica» The following fields must be filled in with the respective suggested recommendations:
- Safety: WPA and WPA2 Personal
- Password: Hotspot * 2019 (Or the one of your choice)

And in the called tab «Ajustes de IPV4» The following fields must be filled in with the respective suggested recommendations:
- Method: Shared with other teams

All that remains is to press the button called «Guardar» to finish the configuration and proceed to test the «Punto de Acceso» o «Hotspot». Remember that while the computer where I create the «Hotspot» have the same enabled, it will not show incoming connections from «Wi-Fi» detected and available. Once you disconnect from it, you will see the «Redes inalámbricas», as shown below:

Last but not least, keep in mind that although you can already connect to the «Hotspot»this does not guarantee that you will surfing the Internet, since this could depend on other factors of the type «Enrutamiento», due to among other things, whether or not the computer is directly connected to a «Módem», «Módem/Router», «Router» o «Red local empresarial», and how these means of connection manage all the connectivity (traffic) of the network.

Conclusion
As you have seen, create a simple and functional «Hotspot» using native «Gestor de conexiones de red» of its «Distribución GNU/Linux» It is not something that requires too much or high technical knowledge. But in case you want to experiment with an external graphic application, we invite you to know «Wicd» y «WiFi Hostapd AP». The latter, has its official repository on LaunchPad. And in case you want to try an alternative method we leave you this official link on the subject of the website of DEBIAN GNU / Linux.
And for more information, always do not hesitate to visit any Online library as OpenLibra y jedit to read books (PDFs) on this topic or others knowledge areas. For now, if you liked this «publicación», don't stop sharing it with others, in your Favorite websites, channels, groups, or communities of social networks, preferably free and open as Mastodon, or secure and private like Telegram.
Or simply visit our home page at DesdeLinux or join the official Channel Telegram from DesdeLinux to read and vote for this or other interesting publications on «Software Libre», «Código Abierto», «GNU/Linux» and other topics related to «Informática y la Computación», and the «Actualidad tecnológica».
Very good article .. and .. ABAWIFICANTV ?? Venezuelan detected! XD
It would be good to detail that (although you mention it, I claim to detail) the fact that this makes your Wi-Fi antenna act as a Wi-Fi broadcast for other machines .. perhaps with a little drawing ..
Hello,
Good entry. It would have been nice to explain the same steps from the command console, which in the end is more instructive, at least from my point of view.
regards
Very useful. I was looking for a way to limit Skype's bandwidth on mobile. In this way, I limit the bandwidth that goes through the access point from the computer.
Greetings, Aprilio! I'm glad it was helpful to you.
Thank you very much for reminding me of the steps to follow to create a point of, is that I always forget hehe