
|
Enable the «persistence»Means that any changes you make to the system will be remembered when you start it again the next time. This is something that does not happen in most LiveCDs or LiveUSBs. Tools like Unetbootin and the like allow you to install some distros by enabling persistence. However, few Live distros support this option, here is one alternative what should function using any distro. |
This is the way to install a Linux OS (it shouldn't matter which one) to a USB (which must be in FAT32 format).
Surely you have noticed that in all Live distributions, when they are loaded into memory, any changes made to the system disappear the next time you start it.
Distributions that allow persistence, on the other hand, require the creation of a separate partition on the USB drive to hold the items that we want to be persistent (particularly the HOME folder).
Unfortunately, this is an option that very few distributions support.
The other day, I remembered an alternative that some reader had mentioned far and long ago and that I always wanted to try. I did it and was fascinated. It's so simple that it makes it beautiful: get persistence by installing the system on the USB drive, as if it were a hard drive.
Introduction
As an example, I'm going to use Crunchbang, a Debian-based distribution that uses Openbox and is very lightweight. I have used it to "revive" a machine with just 512 MB of RAM.
Download: Crunchbang official site (excellent distro)
It is possible to install Crunchbang on a 2GB drive, but I recommend using at least 4GB or 8GB in case you want to install extra apps.
Here is a step-by-step explanation so that no one gets lost ...
Step 1:
To start there are several possibilities: boot from a Live CD / USB or from a virtual machine. It all depends on the resources you have. My recommendation: use a LiveCD.
For more information on what is a LiveCD, how to create it, and how to make the system boot from CD, we created an extensive tutorial to help you.
Once the LiveCD has booted, select "Graphical Installer".
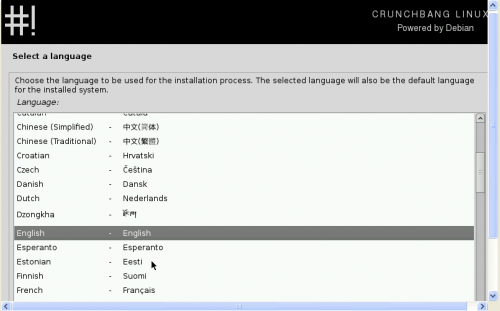
Step 2:
Select the language language.
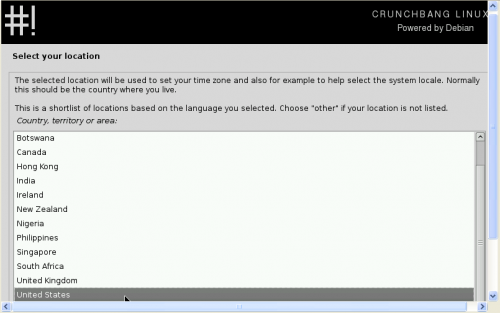
Step 3:
Select your location.
Step 4:
Select your keyboard layout.

Step 5:
Select the host name. The one that comes by default will be fine for 99,9% of people.

Step 6:
Select your username.

Step 7:
Please enter your name. It is the same that will be used by email programs, etc.

Step 8:
Select the password. This is the administrator password that will be used as the password so that sudo can complete the administrative tasks.

Step 9:
Select your time zone.

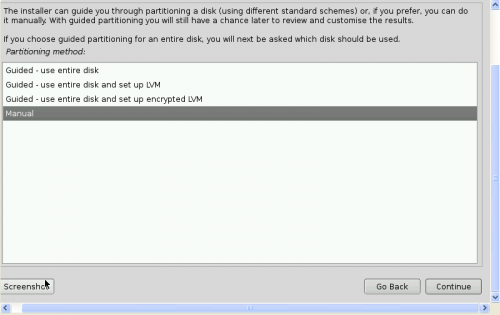
Step 10 (from here things get more difficult)
Now we are ready to split our USB drive. Select the Manual option.
Step 11:
Find your USB drive and select it.
Click continue.

Step 12:
Change the "Use as:" option to ext3 or ext4, make the mount point / (root), and make sure the "boot flag" is set.

Step 13:
Select the option Finish partitioning and write changes to disk. This is your last chance to verify that the data entered is correct and that you are not modifying another disk.

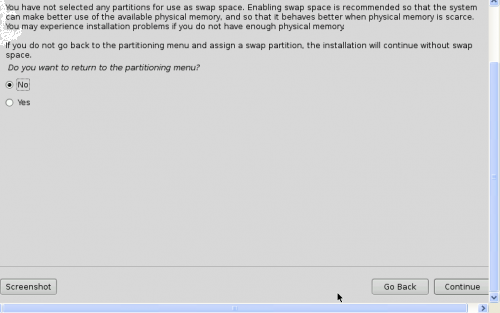
Step 14:
A warning will appear saying that you forgot to create a swap partition (SWAP). I just chose the "no" option. A swap partition only takes up valuable disk space and puts the life of your USB drive at risk. On the other hand, it is possible that it makes the system slower (taking into account the characteristics of the type of installation we are doing).
Step 15:
Select "Yes" to finalize the partition.

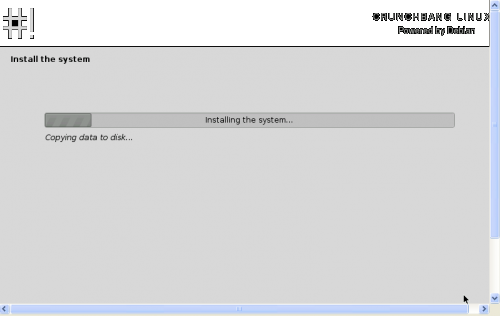
Step 16:
The partition will be made and the system installation will begin. This is the ideal time to have an aperitif. 😀
Step 17:
This is VERY important: select "DO NOT install Grub on my computer's MBR".

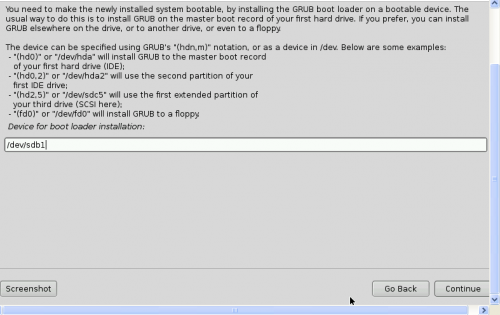
Step 18:
Now you have to let Grub know the location of your USB drive. In general this is usually / dev / sdb1, but it is very possible that it is something else. You have to replace sdb1 with the letters and number that you wrote down in step 11.
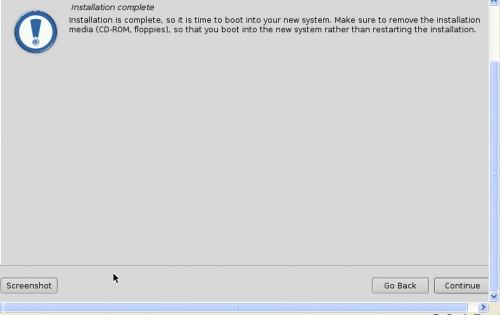
Step 19:
Remove / unmount the LiveCD or LiveUSB. Restart the computer and configure the boot priority for USB in the BIOS.
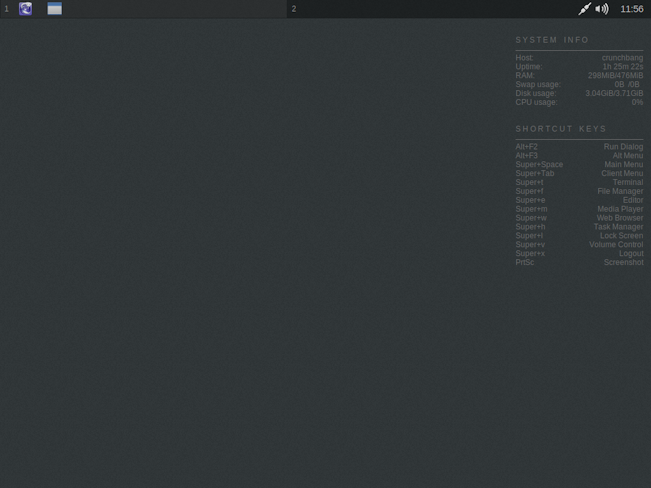
Step 20:
Enjoy your persistent Linux. 😀
This is what my Crunchbang looks like with Iceweasel (and 2 open pages) and mtPaint open. It barely consumes 300 MB. The system loads with 80 MB of RAM, approximately. A luxury.
final recommendations
Disable internet browser cache. In Firefox / Iceweasel that is very easy. I opened the about: config page and looked for the network.http.use-cache option. To deactivate it, double click on it. It should be false.
Facilitate web browsing on machines with few resources. First of all, it is essential to enable the plugins.click_to_play option in the about: config of Firefox. This will disable Flash by default, unless you click on the item.
A second recommended configuration is to change the User Agent to make the pages (Gmail, Google, etc.) believe that we are using a tablet. As you all know, some websites have their "light" versions for better viewing on tablets or mobile devices. We can use this possibility to our advantage changing the User Agent by hand or using one of the many Extensions that exist for Firefox.
Mount partitions at startup. Although it is not essential, since almost all Linux distributions detect the partitions and allow them to be mounted at the time of use, you may want them to be mounted when the system boots (perhaps to establish shortcuts in your file explorer or any other reason). In that case, you have to modify the fstab file.
Assuming the typical case of wanting to mount NTFS partitions, I opened the / etc / fstab configuration file:
sudo nano / etc / fstab
And add a line similar to the following:
UUID = EA7CB00F7CAFD49B / media / win ntfs defaults 0 0
Replacing the UUID with that of your partition (to find out, run sudo blkid), / media / win with the path where you want the partition to be mounted (don't forget to create the necessary folder first using the mkdir command). The rest is usually fine for a traditional setup. In case you need to change the access privileges to the partition, you can.
For more information about fstab I recommend reading an old article posted on the blog.
I'm going to try that myself with Linux Mint Debian Edition.
On the contrary José! For that we are.
I'm glad it worked for you. We test the tutorial before publishing it. 🙂
A hug! Paul.
On May 13, 2013 20:58 pm, Disqus wrote:
How could I put a key to the live usb where I have linux so that it is not used or entered, it asks me for a password when starting it and they cannot explore it, I do not know if I explain myself
If you follow the steps in this article, it will ask you for a password when you start the system, just like any Linux distro. 🙂
hug! Paul.
I am half fan of USB installations. I always use Unetbootin or the like. And it had never installed in the way explained here. So I followed the advice I downloaded Crunchbang 11-20130119 Waldorf, burn it to a DVD and then install it on a 16 GB pen drive. I had printed the instructions, to guide me. All good, until step 10 where things really get fierce. They have changed a lot, they do not appear in textual form. I had to practice 2 times until I found it back. Well, I finished and, pleasantly surprised, the POST INSTALLATION SCRIPT appeared. I update everything to CrunchBang's own packages and with Debian Wheezy. I update everything. Under the latest Iceweasel 20. Under Java and the entire libre-office suite. Total 3 Gb of updates. I had 13 gb free left on the pen-drive, it really flies and a very good distro. With an expense of only 56 Mb of ram.
I come from Linux Mint and it seems to me that now I adopt this one that also has a DEBIAN base. Thank you very much for such a good tuto, that despite having changed a little, it worked completely.
I suppose it is also possible with an HD USB
In a hard disk connected by usb it is a normal and current installation 😀
Excellent contribution, so I only travel with USB and I can boot on any pc, right?
So is…
Hello, very good contribution, thank you, but I have the language and the keyboard in English, how can I change it?
A couple of years ago I installed Linux Mint on an 8gb pen this way.
Impeccable.
Crunchbag is based on Debian, and the Debian isos are very, very sensitive. Have you verified the md5 checksum of the downloaded iso?
If it loads you in Live mode, launch the graphical installer and test. If it doesn't install like this, check the md5 of the downloaded iso. If it is ok, try using unetbootin again with the formatted flash drive to see if unetbootin failed the 1st time.
I have problems in the graphical installation:
Once installed in the memory with UNetbootin, and following the steps graphical installation / language / keyboard, after the detection of the keyboard, in the step «Load debconf preconfiguration file» ... an error appears: «there was a failure when obtaining the preconfiguration file »And I can't continue the installation.
If instead of trying to install it, I start it in live mode, it works without problems
🙁
Great. Clear and complete 😀
I'm already downloading Crunchbang. I will install it in 8gb Kingston memory. Hope it works for me on Asus eee Netbook. Thanks 🙂
Grub fatal error! In the last step. But the method described here has been used to install Bodhi 2.3.0-i386 and it has been a success! I only occupy 2.7Gb already installed with everything necessary for a normal user. I recommend it. Greetings and thanks to all.
I am with you Esteve. I have tried it with CrunchBang Waldorf on an 8 GB pendrive: when booting from the pendrive GRUB comes out and there is no way to continue with #!
Could you be a little more specific? What error do you see? What options appear in the grub?
Cheers! Paul.
Great! Likewise, I recommend NOT to use swap in these cases.
Cheers! Paul.
I've been doing it for a long time for a netbook that I have without a hard disk. Mine is much simpler; I install the distribution (I have tried Ubuntu, Debian and Fedora) from a USB with live version to another that is interpreted as a hard disk. I have used 2GB USBs with Debian, 4GB with Fedora and the new Ubuntus require 8GB USBs, at least. Furthermore, I have also used SLAX for the same purpose. In fact, I usually have several layouts ready in case I need them.
That is exactly what the article is about! 🙂
Although, on this occasion, we recommend using Crunchbang.
Big hug! Paul.
It is an excellent idea, but I do not know if it is viable in the long term, it is because of the read / write cycle, it seems to me that it can greatly shorten the life of the pendrive
It may be, but how much is a pendrive today?
Also, how much can you reduce the shelf life? Even so, they will last for years and have served their purpose.
Cheers! Paul
But what error does it give you? 😉
It happens to me the same as' He sweats .. In an 8Gb pen to which I include swap and / he throws the same fatal grub error at me, it is the last step. It could be a bug. Total that I better install tails on my pen. I clarify that I tried in various ways and reviewed the md5. Hopefully someone can do it. Regards.
The tutor is Pablo's, not mine. 😉
Have you tried installing grub in the USB MBR? / dev / sdg, no number ... Anyway GRUB is editable once installed, in my day I did a few tutorials to create a USB with several distros, I could replay the notes and try to remember something ...
What is that fatal mistake? Grub missing? Sometimes it is advisable to turn off the computer after creating the pendrive, not to restart it directly ... there are many factors. 😉
Thanks for your interest in my problem 🙂
Md5 was fine. So I tried to install it from desktop PC. My flash drive where I would install it was named sdg1 (not like sdb1 usually) Everything seemed to be going fine, but the first difficulty was that I could not prevent the SWAP memory from being installed.
I continued, I did not install GRUB on the computer, as you indicate and when naming the unit to install GRUB I put
/ deb / sdg1 (as it was named in disk drive recognition).
Total that ... fatal error.
I think I will have my persistent drive with Puppy linux, which also allows saving settings and data to the same usb drive
For the next one I do it with Crunchbang, and so the steps to follow will be exactly the same and I will have (supposedly) less or no problem.
I've been too "cool" trying with Linux Mint (Debian Edition). By the way, very good distribution.
I said above, I'll try again when I find time and win. Thanks 🙂
Well, I already did the attempt, but I had a series of problems that have made me give up, mainly the slowness of the pendrive that I have available for these things.
In the end I decided to install Linux Mint Debian Edition on the laptop's hard drive. In half an hour or so I had it operational. It took me several hours to install the pendrive, and since I had problems with the installation, I already let it run.
The main problem with the pen is its slowness, but not the one that put me off, but it did help, because I don't have four hours to test each time. The main problem is at startup. If I uncheck that I do not install GRUB, the pen does not start. If I check it, and select to have GRUB boot to the local hard drive, it would probably work on the computer where I installed it, but it certainly wouldn't work on other computers. And if I check that GRUB is installed on the pen itself, it turns out that if I don't have the drive connected, the computer won't boot (which by the way, I saw them and I wanted them to put everything in its place again: p).
Later I will try again, I keep the link and I will reread it and see how I do it, and with another faster unit.
Greetings and thanks 😉
Everything is done without the slightest problem, it is advisable to run the post installation script early and with power backup if the electrical current is cut.
Thank you very much for this post, it is truly worth gold.
Thank you pablo! It came to me from ten, I shit the rigid disk of the notebook, so I tried it through two pendrives, at the moment it is working jewel.
Thank you very much for the tutorial, not a detail escapes you 🙂
although I would like to know why you chose ext3 over ext4?
Health!
Hello, I think it should not be portable, because during the installation everything is configured for the hardware where it is being installed.
Excellent tutorial, and a very good distro, I had not tried it before but I loved it, excellent for computers that get slow even with windows xp!
So is…
First, CrunchBang (also known as #!) Is fantastic, even 'archers' say that if they had to use Debian they would do it but using CrunchBang 🙂
Thank you very much for the tutorial, graphically very good for us newbies, thanks. But I had no luck, in theory I get well until step 17-18, when I would have to choose NOT to install GRUB. It appears that it will not be possible to have a "boot loader", it will not be possible to install a GRUB, which verifies a possible architectural problem, it was what I half understood. I tried LILO, an alternative to GRUB, because I can go back to a previous point of installation, but neither, I am not understanding that detail very well or I did something wrong before. The question is theoretically should be able to install #! on any USB or external HD ?? In other words, is it worth trying again with some other precaution that I do not know? I must clarify that my motherboard despite being 2006 allows boot from USB in a Boot Menu (I have already used #! In liveUSB but without persistence and CrunchBang launches normal from that boot menu and I have used it in liveUSB mode with all its features )
[Marginal note:
Looking for alternatives to this unfortunate situation, I found the excellent LinuxLive USB Creator (LiLi), which CrunchBang 11 offers me with persistence as long as the isos of #! Waldorf 20120806 or Waldorf 20120924 but you cannot get such previous isos neither on the official website, nor in Distrowatch or anywhere else, or I don't know where to get them.
LiLi far outperforms UNetbootin with the horrible splash that it starts up and a 0.8 GB iso installs it at 2.24 GB, while LiLi (or the Universal USB Installer) respects just 0.8 GB of the iso]
Thanks in advance for the help
Hello, excellent tutorial, but I have a question, you did not show something like how to configure the space to use for persistence, or does it configure itself? please write to my email if you can
all the best
Hello! Look, this is actually an alternative to traditional "persistence." Here what we do is install a distro on a pendrive (as if it were a hard drive). In that sense, the space to use depends on how you have partitioned the pendrive.
A hug! Paul.
Hello! Very Good the post!. I had been thinking about an idea like this for a long time, with the intention of taking the usb with me instead of the laptop (hp 530). It cost me to achieve the installation, because it was left hanging when I formatted the 4Gb usb tdk ext8, which I solved by formatting the usb and this step of occupying 'empty' from 16k to 4k. Some weird file or format would have. Now I write from this system on the usb. I have to say that as expected, sometimes it gets a bit stuck (despite having a fairly low ram and cpu consumption), but depending on what work it is done. It's great for what I wanted (to work on 'my team' without having to carry my machine)
I write to ask; I have tried to start it on my sister's computer (sony vaio) hoping it would work, but it does not start and does something strange. I have recently read in the comments of some other post / blog that it is normal that it does not work on another machine, because 'the installation has been done' for one in particular. But I also read on another occasion that if you plug in a hard drive with linux installed on another machine, it works correctly almost always. Could someone tell me something about this contradiction? And by the way, now that I'm hooked on learning how all this works, do you know of any links to find out about how Linux works with hardware?
It happens that I am a little afraid of the possibility of 'burning' the computer because it makes it work as if it had other hardware.
Sorry for the length of the comment and thank you very much for the work that is done here!
Hello! Look, I have been able to use the same pendrive on different machines without problems. It should work. Now, as always happens, sometimes a particular distro won't boot or has problems with a specific machine. Maybe that's what happens to you.
I insist, I think it should work fine on any machine.
When it comes to "burning" the hardware, don't worry. You are not going to burn anything. There is only one thing you have to know: when running Linux from a pendrive obviously the useful life of that pendrive will be less, due to the large number of accesses to which it will be exposed (as if it were a hard disk). That has nothing to do with Linux, but as I said, with the fact that you are using the pendrive as a hard drive (where your operating system is stored).
A hug! Paul.
It's funny, today I tested it on a new laptop and it didn't go beyond the initial image "vaio, press F2 for setup". However, in mine it starts well. I'll keep playing around to see.
Thanks for the prompt response!
hello, sorry I'm still a winbug user but I created my live usb with kali linux but I want to make it persistent to take it everywhere but without damaging the windows 8 of my home pc because it is not mine, well I would like to know if it will be possible with kali linux without damaging the winbug. thanks.
Hello everyone, I am writing from a Mint 17 installed on a pendrive as if it were a rigid disk, I wanted to share with you some things that I have learned about the different distros, although I do not use Linux daily, I follow its evolution for more than a decade and I've tried hundreds of distros that I still stock on CDs and DVDs. First: Theoretically, if you install a distro on a pendrive as if it were a hard disk, it should work on any computer, as long as it does not have any known problem with the hardware or that, in some distros, in the installation process it asks us if We want to remove unused hardware support, that is to discard unused hardware drivers on the computer you are using to install (I have seen this a lot on Red Hat based distros). Second: Grub ... well I'm not an expert but experience tells me that if there is no bootloader it is very difficult to boot from the pen, particularly I always install it in the MBR of the pen where I am installing and I never had problems, I have done it with Linux Mint and with Mandriva and Mageia in this way without any inconvenience. Third: If they format in Ext they will have a system that will not allow their files to be seen from Windows, if they do it in Fat or Fat32 they will be able to remove or add files from any computer that connects it, be careful because Windows writes with Root or Administrator permissions and when they start the system installed on the Pen, it is likely that they will not be able to access the copied files with the user permissions, this is not difficult to solve, it has already happened to me by passing files through the network from Windows to Linux ... Finally I think the most It is important to be very careful with the Grub because they can leave the computer without being able to load the system without the pendrive in place, not all distros or versions of Grub and their configurations are the same, so if you like to play with Linux like I do, try to do it in a team that can lose a little time to put it back into operation or that is not very interested in leaving it out of service for a few days ... I give you an idea not to run these risks Those who use desktop PCs will open their cabinet and unplug all their rigidity and then experiment quietly.
Thank you very much for sharing your experiences. A greeting.
Once I have installed this linux distribution on my mass storage device (USB), will the system boot as if it were installed or should I start it from the boot menu as "Live" live system?
hello very good post .. I have a question if it is possible to run the liveCD but save user configurations and others on pendrive. Because I have the problem of installing everything on the pendrive, the whole system is too slow, be it fat32 or ext4 .. Greetings
in my case I want to install elementary OS as I would…. I installed other distros with programs like universal installer but it doesn't work for me.
I really appreciate your post since it allowed me to read experiences about something that had occurred to me to do, but that scared me. This is so interesting and so useful that surely if a developer created a Linux distribution with such an original and useful feature as its easy and persistent installation on a USB, it would become very popular.
In fact Unetbootin has that possibility, which I have only tested in Ubuntu-based distributions.
Excellent contribution brother. It works perfect
You solved the burning of DVD's, hard disk partition, or making a Dual Boot menu.
"LiveUSB from VirtualBox I just had to remove the FAT32 format and put NFTS on it", but it still helped me a lot.
Thanks greetings from Mexico, Durango, Dgo.
Something EASIER: use YUMI creator, choose lubuntu, then in the path of finding the iso choose any distro and it allows us to use persistence. Good luck and Thanks.
Hello good afternoon. I am trying to install crunchbag on an 8gb pen drive. It gives me an error in step 16, when I want to partition the pen and go to install. What it tells me is this: 'There was a failure creating the filesystem. Creation of ext4 filesystem on SCSI1 partition # 7 (0,0,0) (sdb) failed. »
I have tried creating the partition with ext3 and ext4 extensions, but both ways it keeps giving me error. What I can do?? Thanks a lot!
I installed Linux Mint 17.1 from USB created with Unetbootin; No major problems, but after the installation, if I remove the USB and configure to boot from the HD it does not boot, the screen remains black without any message, what should I do?
The truth is that I don't know what to tell you ... 🙁
It is very strange what happens to you ... Could it be that you did not choose the partition well to install the system (and instead of choosing the pendrive you chose the hard disk?
Hug! Paul.
Indeed, what I wanted was to install it in the HD, it is also seen that I took out the USB memory at the right moment, because it booted from the HD without problems and is working fine, thanks. Likewise, to install mint on another machine from USB, I do not see clearly how (rather when) the USB memory should be removed, it does not ask for it during the installation, or it did not indicate it to me at least, how would that be? I got very outdated (my last linux was Slackware 8)
Excellent !!
I tested it with Xubuntu 14.04 and it works great.
Thank you.
The tutorial is very clear ... thank you very much! Today I try it !!!
Hi. Very interesting.
I'm about to try it. I wanted to ask something before: regarding the recommendation that Eduardo made on June 11, 14 about the convenience of disconnecting the rigid ones to avoid the eventual inconvenience that the machine will not start if the pen is not connected, would it be possible to disconnect the rigid from BIOS until installation is done just in case and then re-enable them? (I have a notebook and I don't know how to disconnect the hard drive physically) Does this operation have any risk with the BIOS?
Greetings and thanks.
Hello; You can do a tutorial in which two linux operating systems are installed on the same usb pendrive even though the pendrive is partitioned and has some grub to be able to access either of the two linux operating systems and that the pendrive is formatted in ext4 or FAT32 for have persistence.
😀
think about it would be great !!
postscript: I don't know if this comment should go in this post or in an order section
Thank you for your attention. 🙂
Hi. I have tried it and I don't understand why after selecting the keyboard it tries to mount a cd rom unit. Obviously you can't find it because my netbook doesn't have a cd rom.
The same thing happens to me with crunchbang, musix, slitaz. From there you can no longer continue the installation
What can be?
I ask again how to not screw up the hard drive boot.
Greetings.
Laurentius
Good idea, I was looking and knew that linux was able to accomplish something like that with ease. So you just have to put it into practice, I'll test it with Xubuntu, which is a lightweight distro that I really appreciate a lot.
I was going to install Tails, because being a non-installable distro, it carries that possibility by default.
But I prefer Xubuntu a thousand times. I will try it because I was thinking of preparing a usb in case one day I run out of internet or electricity and I intend to use a public computer and I no longer have to limit myself to time restrictions, for example the time limit for use in a library, as it is marked for the OS the problem is over, until they see you a thousand hours there and call your attention xD.
Anyway, it has many more uses.
Thank you
Hello, excellent tutor, but I have a problem.
In the installation in the usb it did not give me any error, but when I start the computer so that it starts in the usb, it says missing operaticon and it starts windows, you can help me. Thank you
a question ... with this tutorial the system would be mounted on the pendrive and could boot it as if it were a hard disk in which I can download files and others? and second: what distros are recommended to boot in this way on a 128 gb pendrive?
Good I come looking for the same thing to install an OS in usb to start it on any pc. I have a 16GB pendrive the possible to partition it to have a partition for the OS and another for the files and use it as a normal pendrive.
Watch out. Only for the computer on which it is installed. And is that we can not forget the issue of drivers. It may or may not work on several. Alternatives?. Of course, it's linux: Puppy and the like (not many, but they start on (almost) any computer. And of course you can save everything you do. Another alternative? Well, any live distro + everything on the internet. Options for everyone.
I have read your post with great attention and I found it enjoyable as well as well written. Do not fail to take care of this site is good.
regards
How good. Years ago I was looking for this option, but unfortunately I ended up installing Ubuntu grub on the laptop where I wanted to do it. In order not to make the same mistake, I ask myself if the process is identical with Ubuntu 16.04. I am not very skilled in linux and I will appreciate any details that you tell me. I want to do it on a 16Gb USB. Thank you!
It is a find to find someone who really knows what they are talking about on the Internet. For sure, you know how to bring a blog to light and make it important. More peña has to read this.
Good evening! I would like to give a huge thumbs up for the valuable information we have here on this blog. I will be back to read you with this website very soon.
Very practical! Crushing criteria. Keep this criterion is a great post. I have to read more blogs like this.
regards
anyone know the difference between persistent USB and this method?
I understand that this method treats the USB as if it were any HD but then which method is better? and which one is less harmful to the USB?
Excellent info.. I was just wondering if this could be done.. Thank you very much for sharing it