
|
If you are a newcomer to Linux, they have probably recommended you to try Ubuntu: a very simple and easy-to-use distribution that, in addition, has a friendly visual aspect (although different from what you are used to in Windows) and that was born with the aim of creating a "Linux for human beings". In this new installment we explain how to install Ubuntu 12.10 Quantum Quetzal step by step ... yes, to dummies. |
Pre-installation
Before you can install Ubuntu 12.10 you have to perform 3 steps:
- Download the Ubuntu ISO image. If you don't know which version to download, I recommend reading this first introduction to some basic concepts that will help you choose any distribution.
- Burn the ISO image to a CD / DVD or a pendrive.
- Configure the BIOS to boot from the CD / DVD or from the pendrive, depending on what you have chosen in the previous step.
Step-by-step installation
Once the BIOS has been correctly configured to boot from the pendrive, reboot the machine with the pendrive in place. After a few moments, GRUB 2, the Ubuntu boot loader, will appear. Here are basically 2 ways to go. It is advisable to first try Ubuntu without installing, to see if the system works correctly; that is, if your hardware detects you well, if you like the system, etc. The second option is to install the system directly.
In this case, we are going to choose the option Try Ubuntu without installing.
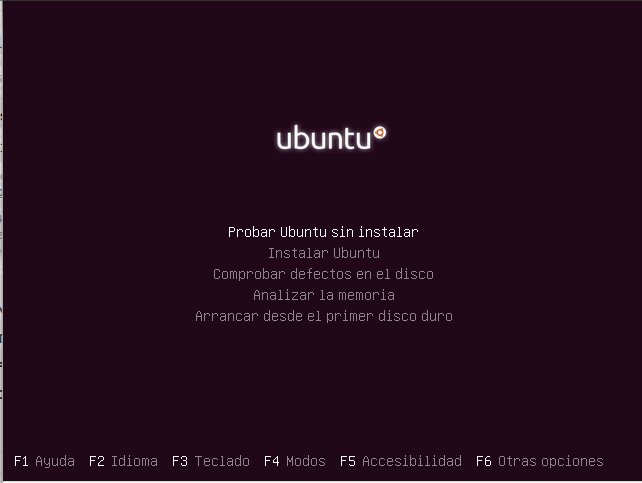
Once Ubuntu boots, click on the icon Install Ubuntu 12.10. The installation wizard will appear.
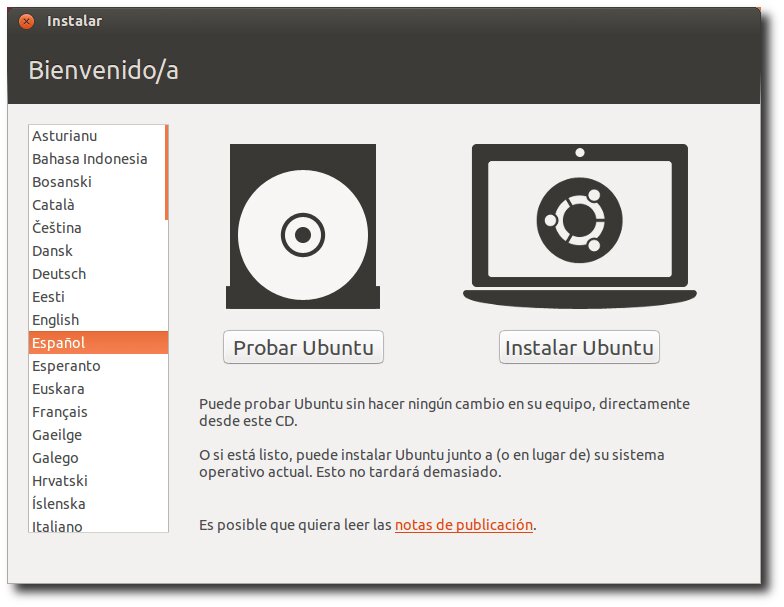
The first thing to choose is the installation language. Choose Spanish, then click the button Install Ubuntu.
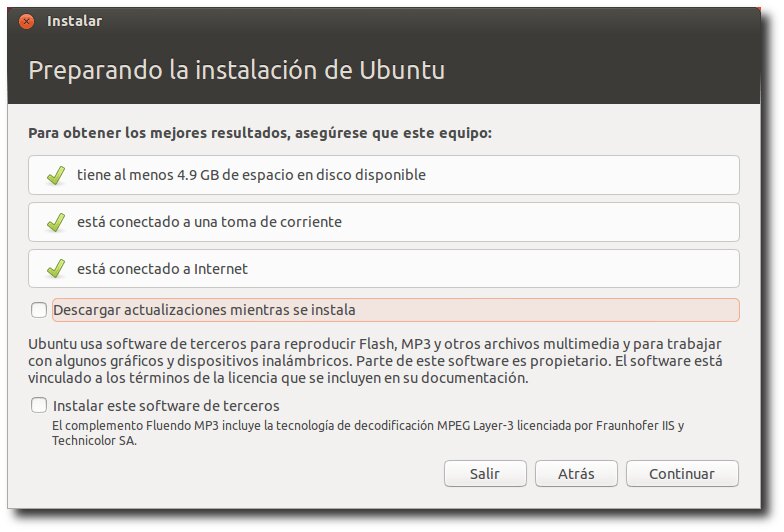
Confirm that you meet the minimum installation requirements by clicking Continue. It should be noted that the only essential requirement is to have the necessary disk space.
Having an Internet connection is recommended but not an exclusive requirement since you will be able to skip the download of packages for when it is more convenient for you.
It is also recommended, although not an exclusive requirement, to be connected to a power outlet. This is especially true if you are using a laptop, since the installation process consumes a lot of energy and it does not take a genius to realize that it is not good for the machine to turn off in the middle of the installation, much less if it It deals with the installation of the operating system.
Additionally, in this part of the installation we are offered the option to choose if we are going to download system updates when installing Ubuntu, an option that I do not recommend checking because it can delay the installation process considerably.
The other option is to download third-party software that allows us to play non-free multimedia content such as mp3 files or view multimedia content on the web developed in Flash, such as some videos on YouTube or games on websites such as Facebook .
I personally prefer to install all this software manually once the installation process is complete, but there is no problem if you want to check this option and do it during the installation process.
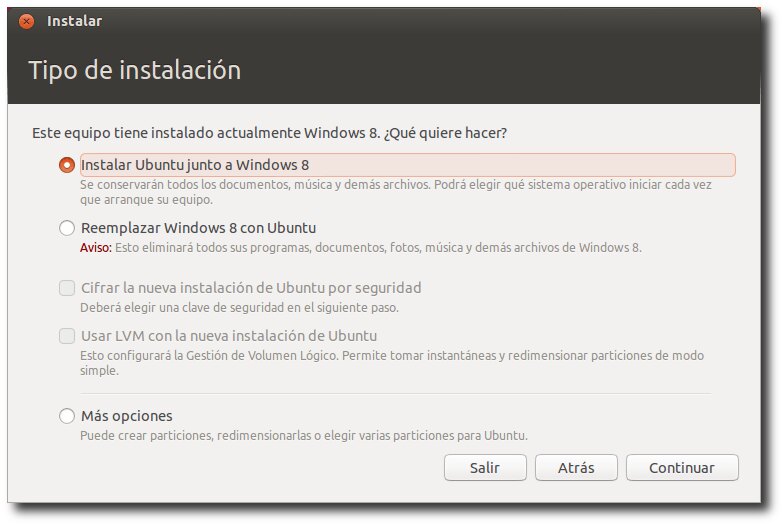
This is the hardest part: disk partitioning.
First of all, it must be clarified that the screen may be slightly different, depending on the operating system or systems that you already have installed on that machine. Thus, for example, if you have an older version of Ubuntu installed, the option to update the system will also be displayed.
In this case, let's assume the typical scenario: you bought a computer, it came with Windows 8, you realized it was crap you want to try something new.
Here are 3 ways to go:
a) Remove the old operating system and install: this is the easiest option: delete everything and install on top. No need to heat your head about partitioning the disk or anything like that.
b) Install Ubuntu alongside Windows: this option allows us to perform a shared installation with a current installation of Microsoft Windows, offering us the option of creating a partition for Ubuntu Linux from the free disk space that our machine has, even being able to resize the size of said partition directly from the installer dialog.
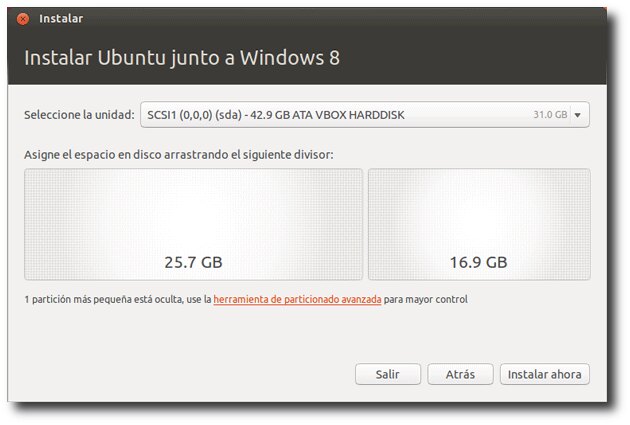
c) Partition the disk manually.
If you select the third option, the disk partitioning wizard will start. Therefore, this step is optional. It is only recommended for intermediate or advanced users who know what this implies. Any wrong step can result in data loss on the disk. If you don't want to risk it, don't do it.
In case you decide on this option, my recommendation is to divide the disk into 3 partitions:
1.- Partition root. Where the system will be installed. You have to mount it in /. I recommend the EXT4 file format. The minimum size must be at least 5 gigs (2gb for the base system and the rest for the applications that you are going to install in the future). I repeat, this is the minimum size, not the ideal one (which can be 10/15 GB).
2.- Partition home. Where will all your documents be. You have to mount it in / home. I recommend the EXT4 file format. The size is a purely personal choice and depends exclusively on how much you are going to use it.
3.- Partition swap. Space reserved on the disk for swap memory (when you run out of RAM the system uses this disk space to "expand" it). This partition cannot be omitted and must exist yes or yes. The recommended size is: a) for partitions of 1gb or less, the swap should be double your RAM memory; b) for partitions of 2gb or more, the swap must be at least 1gb.
When everything is ready, click OK and the system will ask you if you agree with the changes.
Click on Install Now. The first thing will be to choose the time zone:
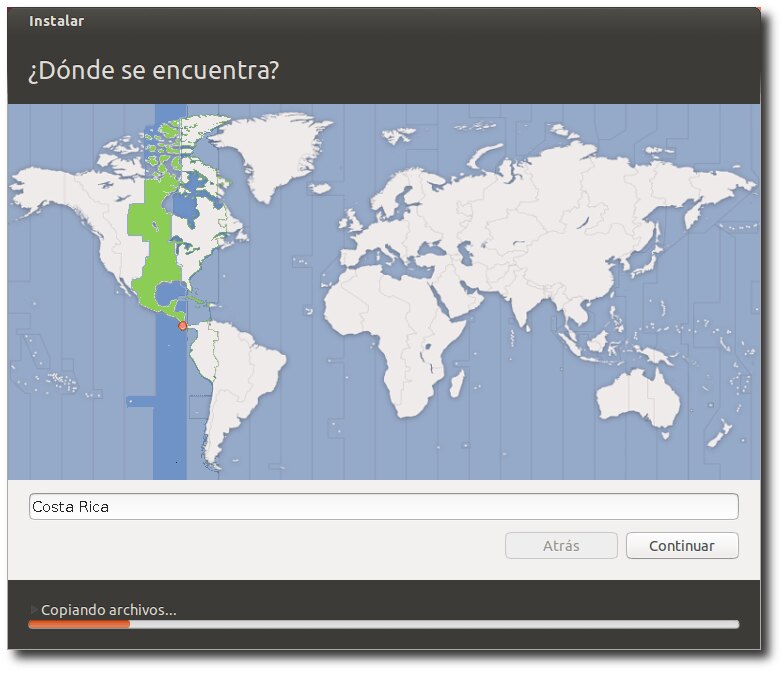
The next thing we will configure will be the keyboard. Don't forget to test your chosen keyboard (especially complicated keys like ñ, ç and Altgr + some key combinations). If it doesn't work properly, try other keyboard layouts.
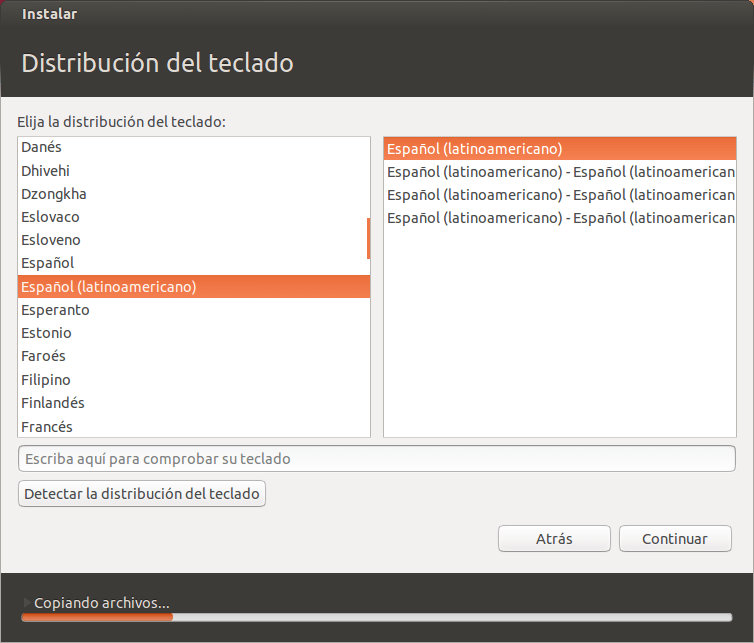
After configuring the keyboard comes the user configuration.
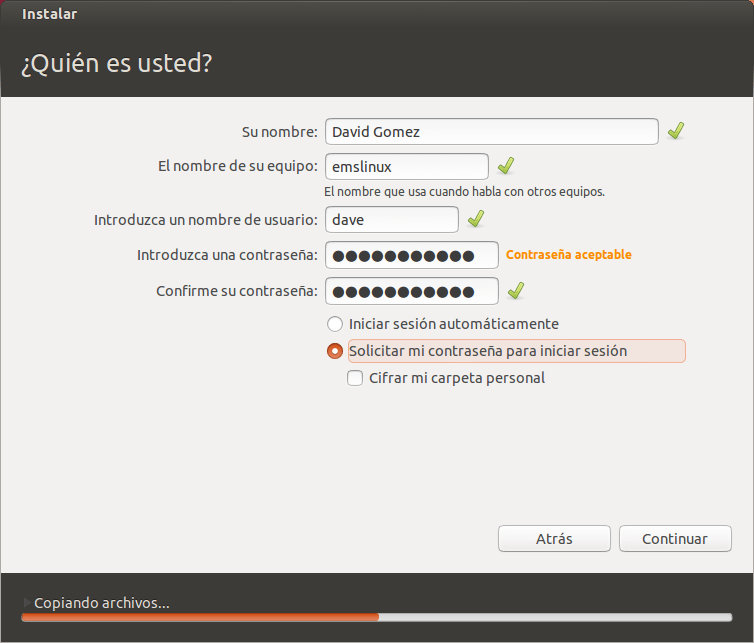
You just have to enter a username and password, a name for the computer and determine if it is necessary to request the password to log in. From here it is also possible to encrypt the personal folder, which I do not recommend (because it can slow down the system) unless you are too concerned about the security of the documents stored on that machine.
After a few moments, the file copy will finish. Meanwhile, you can enjoy some images that show some of the benefits of Ubuntu.
Once everything is ready, you can reboot or continue testing the system.
Finally, reboot and remove the disk or pendrive that you have used.
I need help with Ubuntu :(, at the time of installing copy files and download updates, but at the end everything I had installed returns it is as if I reverted the installation my laptop is Hp 420 2gb of ram memory, 320 hard disk, processor Intel Dual Core T4500 2.33gHz, graphics is 64mb
I just have a question, is there another system with linux or is it just ubuntu?
see yourself http://commons.wikimedia.org/wiki/File:Linux_Distribution_Timeline.svg
but to start in linux ubuntu is simple enough good on personal pc read this http://www.slideshare.net/zer0/debian-vs-ubuntu
there must be a reason it may be that you do not have the administrator privilege ... sudo and your installation password seek help from a group of linux users
To subscribe go to the site:
http://ctg.caribenet.com/mailman/listinfo/champetux/
Colombia
http://www.slcolombia.org/
Free software
http://bachue.com/colibri/grupos.html
google uses free software is not a compatibility problem even its chrome so is a modified ubuntu
That's the worst thing you can do, Carlos. Installing Ubuntu through Wubi is simple, but it has certain associated problems, such as the day you want to format a partition ...
The boot thing AFTER the bios works install it as you install it.
that is true but they want to prove that is what counts after that they themselves will know what to do without having to tell them everything
that option is bn be free of the entanglement of the partitions by installing it together with windos or inside windows that like any other program = winan or excel
In the case of already having a partition made exclusively to install Ubuntu, which option should you choose?
Or before that lets choose which partition of the disk we want to install?
Thank you!
look at Oscar Morales' answer I forgot to say that it is only because of greater confidence in Ubuntu beginners. - the other is that with the iso installer cd they have to format in ext3 or change mount points to partitions. you can also do them with the cd iso
your pc is a super machine
If I install ubuntu on a partition and then I want to see files from ubuntu that I have on the windows partition, is it possible ????
Try it, how it goes and you can even clean. the usb folders recycle that in windows, access denied
And if I make a partition with Partition Magic it is not better, or being the partition, will not the other operating systems come out? what I do??
Can I make a partition, or should I give it next to windows 7?
if it is good I recommend creating the three / "minimum 8 gb", swap "twice the ram of your pc", home "minimum 3 gb", in D: from back to front "so you don't damage your files"
Blame it on gmail or webapp, don't be so arrogant to assume that the same thing happens to all of us.
STFW!
Why are you attacking her? Maybe he just wanted help.
I have a question, I have an old HP PC with these specifications: 4Gb ram DDR2, Intel core 2 duo processor at 2,66 Ghz, 1 Gb of Nividia 8400Gs video card, 250 Gb of hard disk, with these specifications can I install Quantal Quetzal? (Without having fluency problems?)
That is not a team at all, nothing old. I work with a 3 year old laptop, less powerful than that and with a 512MB ati and I record low latency audio and play fairly new games under quantal.
When I restart I don't get the grub to choose which system to enter, you know how?
when you are in the partitioning make sure that below it says where to install the boot loader, make sure it is in dev / sda (it is usually the first option)
How do I know which is which, if Windows or Ubuntu, when resizing in Install Ubuntu next to Windows
the tutorial to install ubuntu is very good ... The only thing that does NOT seem correct to me is; to say that windows is crap, that you don't like it doesn't mean it's bad. It could be the reverse appreciation and get screwed.
The colors of the partitions are different and it also says the name
But he refers to the part where it is installed next to windows8, the two boxes that can be resized appear ... the problem is that it doesn't say which box belongs to which.
If it's like ubuntu 12.04, the one on the right is ubuntu and the one on the left is windows.
I don't want to risk it, I'll keep looking.
this version is good
I want to install ubuntu on a HP L110 mini laptop, it has no CD or DVD only USB, how do I install the quetzal?
Thank you
I suggest you read https://blog.desdelinux.net/distribuciones
Keep on helping those of us who started with this free LINUX software who do not seek to get rich like Microsoft, which mercilessly gets rich and this Bill Gates has so much money and is not aware knowing that the prices of the software developed by them is very expensive there are the results so much money and for what ???? The US should sue him for that illegal enrichment based on the need of the users.
Good luck!
I have a question ………… and it is that when I try to install Ubuntu Windows 8 does not recognize me, what do I have to do to make it recognize Windows 8, it was already pre-installed on my computer …… Thank you
Thanks for your advice, I would like to know if I can mount it in XP since they say that this system has little time to live. Infinite thanks.
ONCE INSTALLED, I DON'T KNOW HOW TO INITIATE THE LINKS WITH THE INTERNET SERVERS AND HOW I HAVE TO TRANSFER THE INFORMATION THAT I HAVE IN MY WINDOW MAIL AND THE MUSIC THAT I HAVE SELECTED IN YOUTOBE AND HOW WILL I BE ABLE TO TRANSFER IT ALSO IN UB?
How to install Ubuntu 16.04 from scratch?
https://www.youtube.com/watch?v=j_mLds03Bl4