|
Virtualbox it is a virtualization software that allows us to run an operating system (called guest) and its applications within another operating system (called host). Thanks to this powerful tool, in addition to running the "guest" OS and its applications, we can share folders between both systems, thus greatly facilitating interaction between them. Here is a mini tutorial to learn how to share folders between Ubuntu and Windows using Virtualbox. |
Windows as host (receiver) and Ubuntu as guest (guest)
First of all, make sure you have Virtualbox and Ubuntu installed as a guest.
Step 1: Install the "Guest Additions"
To install the "Guest Additions", go to the menu Machine> Install Guest Additions.
What you are going to do is download and mount a virtual CD in / media / cdrom. Now, I opened a terminal and wrote:
sudo sh /cdrom/VBoxLinuxAdditions-x86.run
Note: the path where your cdrom is mounted will depend on your distribution.
Finally reboot the virtual machine.
Step 2: Define the shared folders
In the Virtualbox menu, select Machine> Shared Folders.
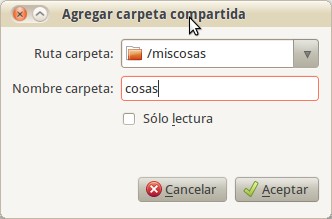
A window will appear. Click the button
and specify the path of the folder you want to share. Don't forget to name it.
Step 3: Mount the Windows folders in Ubuntu
First we have to create a mount point for the folder. I opened a terminal and wrote:
sudo mkdir / media / windows
Note: the name of the folder can be any other, I chose "windows".
Mount the shared folder in that path:
sudo mount -t vboxsf Share / media / windows
Note: note that Share is the name that we had assigned to the shared folder in the previous step.
Step 4: I want this folder to self-mount every time I start the virtual machine
To do this, we have to edit the /etc/init.d/rc.local file. I opened a terminal and wrote:
gksudo gedit /etc/init.d/rc.local
add the following line
sudo mount -t vboxsf Share / media / windows
Remember that you have to replace "Share" and "windows" by the names you have chosen. Save the file.
From now on you will be able to access the shared folder from the assigned path. 🙂
Ubuntu as host and Windows as guest (guest)
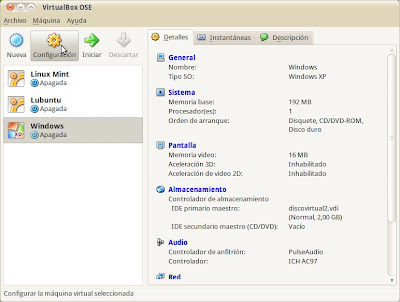
First and foremost, make sure you have VirtualBox and Windows installed as a guest. If you have doubts about how to do this, I suggest you read this guide.
In your Ubuntu I opened VirtualBox (Applications> Accessories> VirtualBox OSE).
Choose your Windows and then click the Options button.
Step 1: Define the shared folders
On the left, click Shared folders. Then on the icon
which is on the right. Select the folder you want to share. Don't forget to give it a name.
Click OK and the Options window will close.
Restart your Windows (on the guest machine).
Step 2: Install the "Guest Additions"

Restart Windows once more.
Step 3: mount the shared folders
I opened the Windows Explorer. In Windows Vista or Win 7 click Add network drive (in English, Map Network Drive).

In the text box that appears I wrote:
vboxsvr sharename
Note: "Sharename" is the name of the folder you added to VirtualBox earlier, in our case "things". Make sure the option Reconnect at startup is enabled. Click on Finalize.

In Win XP you can access a window very similar to the previous one by right clicking on the My Computer icon> Map Network Drive. The rest of the steps are identical in all versions of Windows.
Once this is done, you can access the shared folder as if it were a network disk.


Just in case, do not delete it, today May 01, 2013, it helped me to do this on my Ubuntu 10.04, if 10.04 because my netbook is low on resources. Thank you
hahaha, virtualize Linux on Windows, how practical ...
Very useful and clarifying. Thank you.
thanks!
Hey friend, a little help, I want to porner the ubuntu but the thing is that I use a usb tv kworld receiver and then I can't find how to install it in ubuntu nadmas that is what I would lack of everything else I think it has everything, or some instructions that me you will pass the link thanks
greetings.
Host OS: ubuntu
Guest OS: wxp
I have followed the steps, although the step to install the guest additions has been more complex and, in fact, I think that is the problem.
1. I download guest additions for virtualbox 4.1.12 from here http://www.innerzaurus.com/distribuciones-de-escritorio/comunes/61-liberacion-de-virtualbox-4-1-12#mozTocId925110
and I follow the steps exactly and without problem.
2.I share the folder in question through the virtualbox interface.
3. Start windows in the virtual machine.
4. I follow the steps that you. indicates:
-right on my pc, connect to network drive
- \ vboxsvr xx_xx_xx etc
-OK tries to find but says Can't find the network path.
In the bar of the virtual machine window, some icons appear. In the one that interests us, secondary in shared folders but it tells me that the guest additions do not seem to be available, that I install them by devices> install guest additions.
The problem is that I have already installed them. May they not work? Do you know any other way to share files? I've done a thousand laps and nothing….
thanks, very clear,
buenisimo
Hey Thanks, you explained it very well and it was very simple 😀
Thanks for the tutorial, I find it very clear and useful.
When I try to follow the steps the terminal does not recognize the vboxsf files, has it happened to them?
If I have Ubuntu on the host operating system and Ubuntu on the guest system, would they be the same steps? thanks
In principle yes ... although you would have to do a combination of the two examples (since it would be between 2 ubuntus and not between win-ubuntu or ubuntu-win, as shown in the post).
Cheers! Paul.
Teacher thank you very much for the manual. It served me 100%. Successes
Very good, many versions of ubuntu and windows and the same VirtualBox, it is still useful and functional with minimal adjustments
Thank you! It served me well. I have Windows with virtualized Ubuntu and I needed this to be able to move forward with the U project.
Thank you very much for sharing this information…! a greeting
Great, I didn't remember how it was done and I was already going crazy.
A greeting.
Thank you ... it helped me
this procedure will work with a solaris OS
Thanks., It worked perfect on a windows 8 host and with guest Elementary. Cheers
You're welcome! Hug! Paul.
THANKS!! you don't know what it cost me to find this
how to make a folder in virtual box
excellent if you served me the info very well explained
Hello, the article is very good, and to disassemble folders? what happens is that previously I had shared folders from another laptop that petó, they keep appearing and I would like to unmount them. Thanks in advance.
Hello again, I have already managed to delete the directories using the "rmdir" command, Thanks anyway.
Hello, I answer myself, since I posted another comment and it does not appear, I managed to delete the directories with the command "rmdir". Thank you anyway.
hi i have a problem can't auto mount shared folder, my ubuntu version is:
"Ubuntu 16.04 LTS"
the following is the exact path:
sudo mount -t vboxsf Downloads / media / windows /
When saving the edited file "rc.local" in the terminal it shows me the following errors / alerts and it does not self-mount when starting the virtual machine:
** (gedit: 4590): WARNING **: Set document metadata failed: Setting the metadata :: gedit- spell-enabled attribute is not supported
** (gedit:4590): WARNING **: Set document metadata failed: Establecer el atributo metadata::gedit-encoding no está soportado** (gedit:4590): WARNING **: Set document metadata failed: Establecer el atributo metadata::gedit-position no está soportado
Hello,
In Ubuntu 16.04 LTS the folder is not self-mounted, modifying the file does not give an error but it does not seem to do anything either. Help?
Thanks ^^
hi, won't you change the folder permissions ?? 16.04 lts
I have shared a folder on Ubuntu 16.10 so I can add things from Windows.
If active
Allow other people to create and delete files in this folder
Y
Guest access (For people without user accounts)
From Windows I can access without problems. But I need access to be with username and password.
When removing Guest Access from windows, it asks me for a username and password but I don't know how to put it, I have written it in several ways the user.
Username + password
User @ ComputerName + password
ComputerName \ username + password
ComputerName / user + password
Does anyone know how to put the credeials to access from Windows?
Thank you
Great! Excellent explained. Here from Pop OS in Virtualbox, 2021. Thanks, it was very useful!
thank you very much I was able to copy back and forth, just in this version, 6.1.32 the windows client window has the option in Devices / Shared Folders. Thank you !