Originally I had the plan to create some tutorials on the functions and tricks that we can use in Inkscape, but in the long run I saw that it was better to create a series of articles on the basic handling and its qualities.
It is alarming to realize the little documentation in Spanish that exists, and we think that nobody (myself included) is born knowing the use of these programs, and it can be useful to anyone who wants to venture into the world of digital design with Open Source technologies. So as «mini-manuals» and most of all practical post (because we don't like to study theory ~ _ ~) let's go deeper into using this wonderful design software.
About Inkscape
good to start this you should do a basic intro (elementary school teacher style) of what is Inkscape.
as it says verbatim on its website:
Inkscape is an open source vector graphics editor, with capabilities similar to Illustrator, Freehand, CorelDraw or Xara X, using the standard of the W3C: the file format Scalable Vector Graphics (SVG). Supported features include: shapes, strokes, text, markers, clones, alpha channel blends, transformations, gradients, patterns, and groupings. Inkscape also supports meta-data Creative Commons, editing nodes, layers, complex operations with strokes, vectorization of graphic files, text in strokes, text alignment, direct XML editing and much more. It can import formats such as Postscript, EPS, JPEG, PNG, and TIFF and exports PNG as well as many vector-based formats.
Basically it is an editor of vector graphics multiplatform, with a wide range of functions that make Inkscape a powerful tool and all this under a GPL license.
Once your presentation is done, we are going to know the basics of its interface, in order to better manage ourselves in the following posts.
The default interface is made up of the following elements:
- Menu bar
- Command Bar
- Control Bar
- Rules, Guides and Grids
- Toolbox
- Adjustment Bar
- Color palette
- Status bar
- Zoom
- Work Area (although the space is practically infinite)
It is also possible to add or remove bars to our liking, we can change several parameters of this in File> Inkscape Preferences> Interfaz.
Menu and Command Bar
Inkscape like many applications GTK, has by default a menu with the most essential functions such as archive, edit, etc… Also contains menus related to design and drawing.
The command bar is the one that appears below the menus. It contains shortcuts to common commands that we could otherwise execute with an intricate combination of keys, it contains controls to manipulate documents and objects in the drawing. typical commands like open, save, new, undo, redo and others are located here.
Toolbox
This section contains a basic set of utilities to make our drawing. Utilities for drawing painting and manipulating shapes and objects seems like a very rudimentary selection, but amazing things can be accomplished with these simple tools. Here these tools and their functions: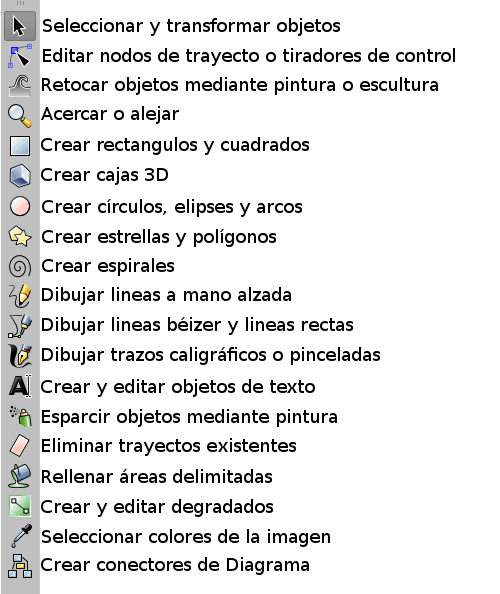

This bar changes content depending on the tool, showing different options associated with said utility and the possible manipulation capabilities of an object.
Work area
It is the area where all the action happens. In it appears an A4 size sheet and where the user creates, so it is the most important area of the interface. Note that the "page" is an attempt to demilitarize an area to be able to export or print; these borders in no way restrict the SVG image we are working on. we can configure the page size (or even delete the page) from File> document properties.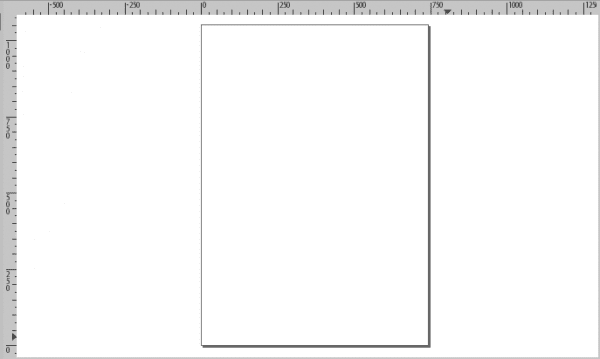
They are graduated sections at the top and left of the work area, arranged to measure the area vertically and horizontally, the unit of measurement can be defined in File> Document Properties tab Página, we can also define the page size and others.
Guides
They are user-defined "magnetic" guides, which can be easily created by clicking on a ruler and pulling to the desired position. To remove a guideline we simply "return" it by pulling it towards the ruler.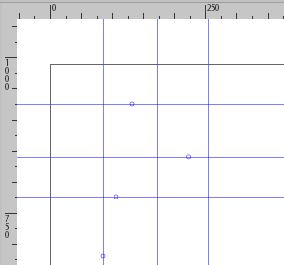
Guide lines can be helpful, but if we need a lot of them, it is more useful to use a grid. We can activate it by pressing # (Shift + 3 or AltGr + 3 generally) or in the menu View> Grid. There are 2 types of grids:
rectangular
is the common grid in which horizontal and vertical lines intersect
axonometric
This type allows the user to define the angle of the lines, which can be interesting for technical and / or architectural drawing. We can define its angle in File> document properties, In the tab Rack.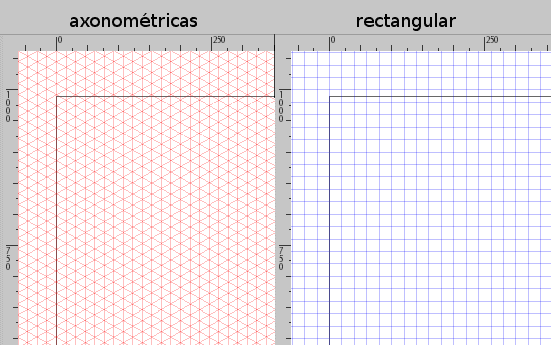
It contains different settings for objects and images, especially useful when using the tool to edit path nodes or control handles.
it is the fastest way to apply color to shapes and objects. It is located at the bottom of the window and we can select the desired color in combination with the tools Fill, Freehand Stroke, BrushEtc. ...
is the bar that appears at the bottom of the window and contains various information such as:
- object color indicator
- layer selector
- notifications
- pointer coordinate indicator
- and the zoom factor

And so concludes this small introduction to Inkscape, with this we already have a basic image of how the interface is built, and in future installments we will make use of these tools in a practical way.
Source: FLOSS Manuals
Where do I get a serial? or a keygen?
emmm this is linux there are no keygens or serials.
hehe, very good answer
I'll assume you mean it as a joke 😛
http://inkscape.org/download/?lang=es
of course it's a joke, I already have the DLL xD
What a bad joke.
I do not give you the keygen because I did not find it, but I leave this to you to alleviate nostalgia ...
http://youtu.be/2gF_HrAw_Fw
A greeting.
sarcasm?
Hello Helena_ryuu and you will excuse me for having to call you as your nickname but I wanted to thank you very much for this good introduction to Inskcape, pure Free graphic design, I hope you continue to publish many more so that I can finally release the core or the illustrator. Thank you.
What a shame INKSCAPE hahaha for writing fast.
Tutorials never hurt, you always learn something. I encourage you to continue it.
A greeting.
Good friend guide 😉
As always, applause and ovations, your design tutorials were already needed 😀
Infinite thanks. I was just using inkscape for the first time now and your article has helped me. Great. 🙂
Muito bom work. I'll be joining you to learn a little more about Inkscape.
What a good tutorial !! I just have to do a subject for teachers that are pure graphics and it will come in handy.
Very good introduction to Inkscape. Although I have been using this application for several years, its potential still amazes me 😀
regards
Great! .. ..an example that you can share ?? ..
Well, I think that mcder has plenty of RAW examples, with which you review his plasma themes, or the walls he has made. Just check out Hellium and I think you'll see it 😛
helena_ryuu .. ..thank you for taking the time and the desire to want to rest us in front of our lack of graphic orientation in every sense .. xD
I am distant with inkscape, simply because of the fact that it does not print my work done in this vector design software.
What did I not print?
Excellent!!
Very good info.
Although I have to use CorelDraw in my work, I sometimes do some little work in Inkscape, such as a part of a flaming 18 meter canopy, among other things.
It is true that there is not much info in Spanish, so your effort is worth double.
Yesterday I forgot to comment that for those interested in using this formidable tool Joaclint Istgud (joaclintistgud.wordpress.com) published a book of more than 150 pages where he collects in detail the steps to be taken to execute many logos known in the world of graphic design.
Highly recommended and very affordable for all levels.
[img] http://i230.photobucket.com/albums/ee124/joaclint/logo_a_logo_pdf.png [/ img]
Download: https://joaclintistgud.wordpress.com/2011/04/14/inkscape-logo-a-logo-2%C2%AA-edicion/
A greeting.
codealb, this great I will take a look at it, thank you very much for adding this type of material, they make the blog experience more enjoyable (^ - ^)
You're welcome helena, thanks to you for the article.
Greetings.
I told you hehe… I told you Helena, many like this type of article, there is a lot of frustrated designer among us geeks HAHAHAHA.
Great tutorial, excellent post (as always) 😉
I wait for the 2nd part ha ha ha
"Frustrated designer" xD comment flamer !!
I do web and mobile development, but I would like to learn more about design so as not to depend on third parties in my personal projects.
I use Gimp, Inkscape, Scribus and LibreOffice so these articles are a gem, I hope the second part and the third and so on ...
regards
Great. In this way I can take advantage of this application, which I have been installed in Chakra for a long time. Thanks a lot!!!
It will really serve me well since I have little with Inkscape and I want to get all the juice I can and thank you very much !! 🙂
Merci, for the tutorial. Let's see if you upload more things.
Thank you very much for the tutorial.
I join in the congratulations and I encourage you to continue deepening.
I have a mini press where I ONLY use Free Software with Kubuntu Linux.
Specifically for Design use:
INKSCAPE
SCRIBUS
GIMP
LIBRE OFFICE
I do not consider myself a Designer, I consider myself a Printer Diagrammer who among many other things does Design.
I do not dare to put together tutorials, because I am not an expert in these programs either and the use I give them is quite basic.
Any technical consultation about real production for printing, to the orders.
Hello dear friend, you arrived like fallen from the sky xD, how do you do to print in inkscape because I only print a part and not all 🙁
Export it to PDF and the printing will be perfect.
I printed a piece of furniture that I designed for myself without having much trouble.
O_O Damn, great .. It does not lose any quality ...
Hello again MOL, you are an idol, it worked excellent, now I have another question (a thousand apologies if I am wondering but it shows that you know the subject) I have a design made in inkscape, which guidelines should I follow so that they print it for me in the printers for have a larger size or that you recommend.
I have had problems with Inkscape because it is seen that the operation of its tools is completely different from CorelDRAW and Adobe Illustrator (the latter is my favorite because its tools are quite intuitive from my point of view) and I have not been able to get used to this good editor of SVG.
I've been looking for an open source Illustrator equivalent, but couldn't find one. Anyway, I hope they release Freehand and then work with a decent Illustrator equivalent.