Greetings community. I recently came across the need to install and configure the latest version of WordPress with the possibility of having more than one website in a single installation and what better than in debian jessie 🙂 This time I will share with you how I did it so that if at any time it is useful or interesting, do it without taking too long and that everything works properly for the expected purpose. This is an installation on a local server and through subdirectories.
We will start with the installation of our GLAMP server, using MariaDB instead of MySql (for personal taste but it can be with MySql if you prefer):
- We log in to our terminal as root and start the installation of our Apache web server:
# aptitude install apache2
- We continue with the installation of the server and the database client:
# aptitude install mariadb-server mariadb-client
- Later we install PHP and some packages for MariaDB support in PHP:
# aptitude install php5 libapache2-mod-php5 php5-mysqlnd php5-curl php5-gd php5-intl php-pear php5-imagick php5-imap php5-mcrypt php5-memcache php5-pspell php5-recode php5-snmp php5-sqlite php5-sqlite php5 tidy php5-xmlrpc phpXNUMX-xsl
- We restart Apache:
# systemctl restart apache2
- If we want to increase the speed of the pages in PHP a little more, we install APCu PHP Cache and restart Apache again:
# aptitude install php5-apcu
# systemctl restart apache2
Since we have our GLAMP server ready, now we continue with the installation of the latest version of WordPress (the 4.5 at the moment):
- We enter MariaDB as administrator from our user session or as root, to create the databases, the users and apply their privileges:
$mysql -u root -p
CREATE DATABASE bdwp1;
CREATE USER wpususer1 @ localhost IDENTIFIED BY 'password';
GRANT ALL PRIVILEGES ON bdwp1. * TO wpususer1 @ localhost;
FLUSH PRIVILEGES;
exit
- We restart Apache and MariaDB:
# systemctl restart apache2
# systemctl restart mysql
- We install WordPress in a practical way through the terminal:
# cd / tmp
# wget -c http://wordpress.org/latest.zip
# unzip -q latest.zip -d / var / www / html /
If we want to identify the wordpress directory with a name different from our preference to the default, we change it as follows:
# mv / var / www / html / wordpress / var / www / html / wpmultisite1
And we continue with the assignment of privileges for the user www-data:
# chown -R www-data.www-data / var / www / html /wpmultisite1
# chmod -R 755 / var / www / html /wpmultisite1
# mkdir -p / var / www / html /wpmultisite1/ wp-content / uploads
# chown -R www-data.www-data / var / www / html /wpmultisite1/ wp-content / uploads
Now we create and edit the main configuration file to define the values of our database and user previously created in MariaDB:
# cd / var / www / html / wpmultisite1
# cp wp-config-sample.php wp-config.php
# I saw wp-config.php (or with the editor of your choice emacs, nano, gedit, leafpad or some other)
Changing this section of the original content:
// ** MySQL settings - You can get this info from your web host ** //
/ ** The name of the database for WordPress * /
define ('DB_NAME', 'database_name_here');
/ ** MySQL database username * /
define ('DB_USER', 'username_here');
/ ** MySQL database password * /
define ('DB_PASSWORD', 'password_here');
As follows:
// ** MySQL settings - You can get this info from your web host ** //
/ ** The name of the database for WordPress * /
define ('DB_NAME', 'bdwp1');
/ ** MySQL database username * /
define ('DB_USER', 'wpususer1');
/ ** MySQL database password * /
define ('DB_PASSWORD', 'password');
We save the changes and close the file. Now we go to our web browser and in a new tab we open the WordPress installer with the following URL:
http://localhost/wpmultisite1/
In the screens that will appear below, we choose the language of the installation, the title of the website, the user name, your password, an email address and in this case we do not mark the last box of "Allow site indexing" since It is a local installation.
Now we can log into our WordPress installation. Finally we are going to do the necessary configuration for our WordPress to be multisite:
- We activate the multisite network by adding the following line through our preferred text editor in the wp-config.php file, just above the line that says «/ * That's all, stop editing! Happy blogging. * /«:
/ * Multisite * /
define ('WP_ALLOW_MULTISITE', true);
Leaving that section of the file as follows:
/ **
* For developers: WordPress debugging mode.
*
* Change this to true to enable the display of notices during development.
* It is strongly recommended that plugin and theme developers use WP_DEBUG
* in their development environments.
*
* For information on other constants that can be used for debugging,
*visit the Codex.
*
* @link https://codex.wordpress.org/Debugging_in_WordPress
/
define ('WP_DEBUG', false);
/ multisite /
define ('WP_ALLOW_MULTISITE', true);
/ That's all, stop editing! Happy blogging. * /
/ ** Absolute path to the WordPress directory. * /
if (! defined ('ABSPATH'))
define ('ABSPATH', dirname (FILE). '/');
We save the changes and close the file.
- We activate the Mod_Rewrite module of Apache:
#a2enmod rewrite
- We edit the Apache file /etc/apache2/sites-enabled/000-default.conf through our preferred text editor, adding the following content:
Options Indexes FollowSymLinks MultiViews
AllowOverride All
Order allow, deny
allow from all
To allow changes from the WordPress .htaccess file that we will edit later, leaving that section of our content in /000-default.conf as follows:
#Include conf-available / serve-cgi-bin.conf
Options Indexes FollowSymLinks MultiViews
AllowOverride All
Order allow, deny
allow from all
- We restart Apache
# systemctl restart apache2
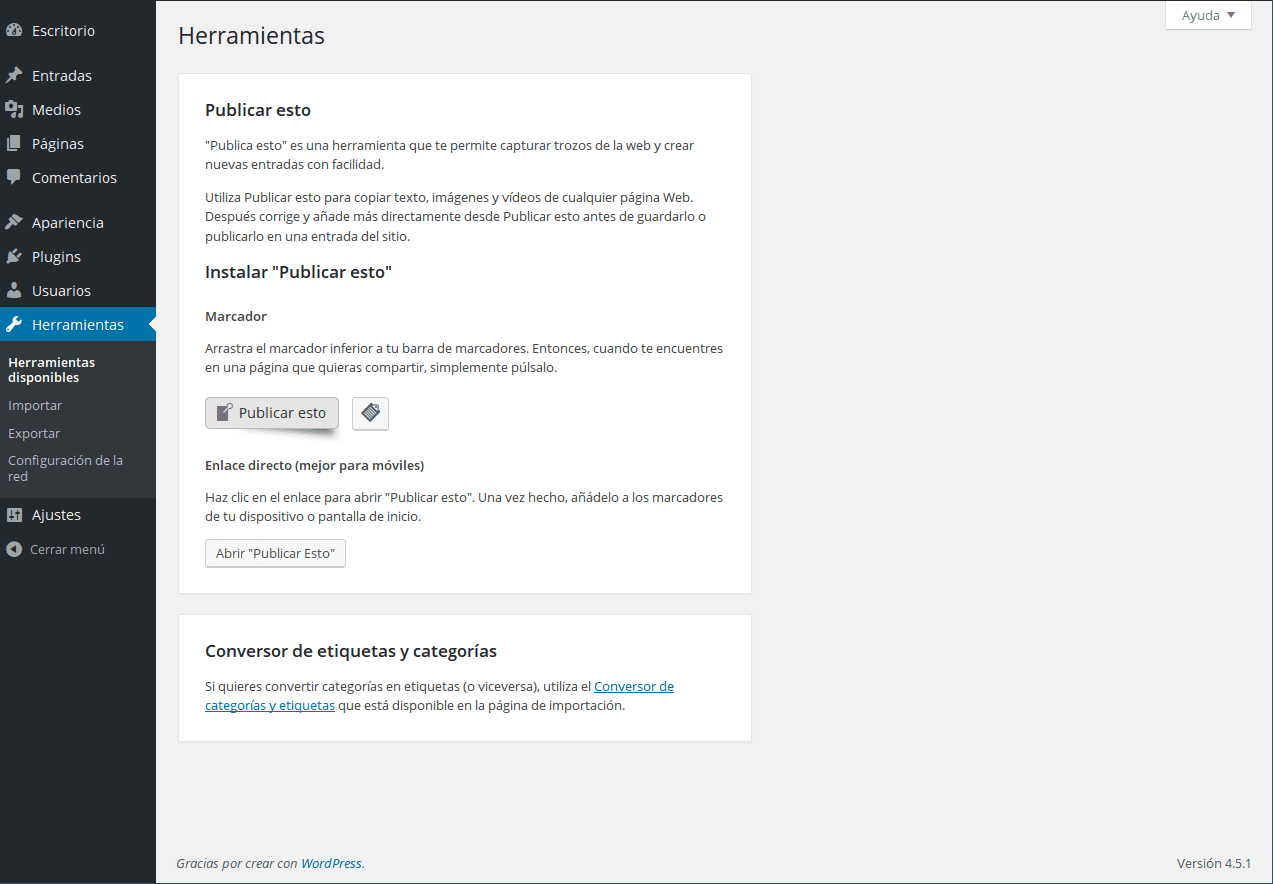
- Now we go to our WordPress dashboard and in the main panel on the left side, we select the option «Tools» and within this «Network configuration»:
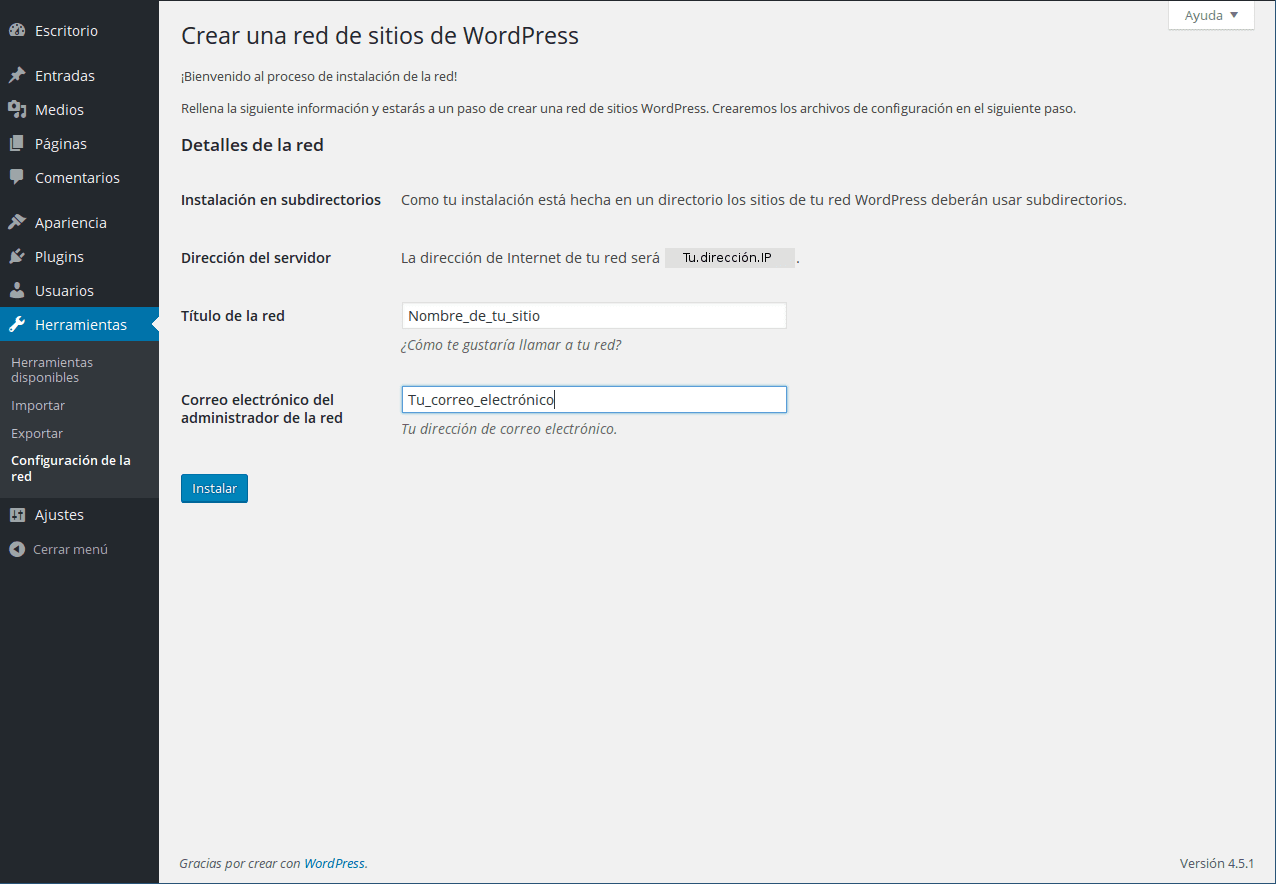
Once the title of the network and your email have been entered, we click to install and then the following screen will appear:
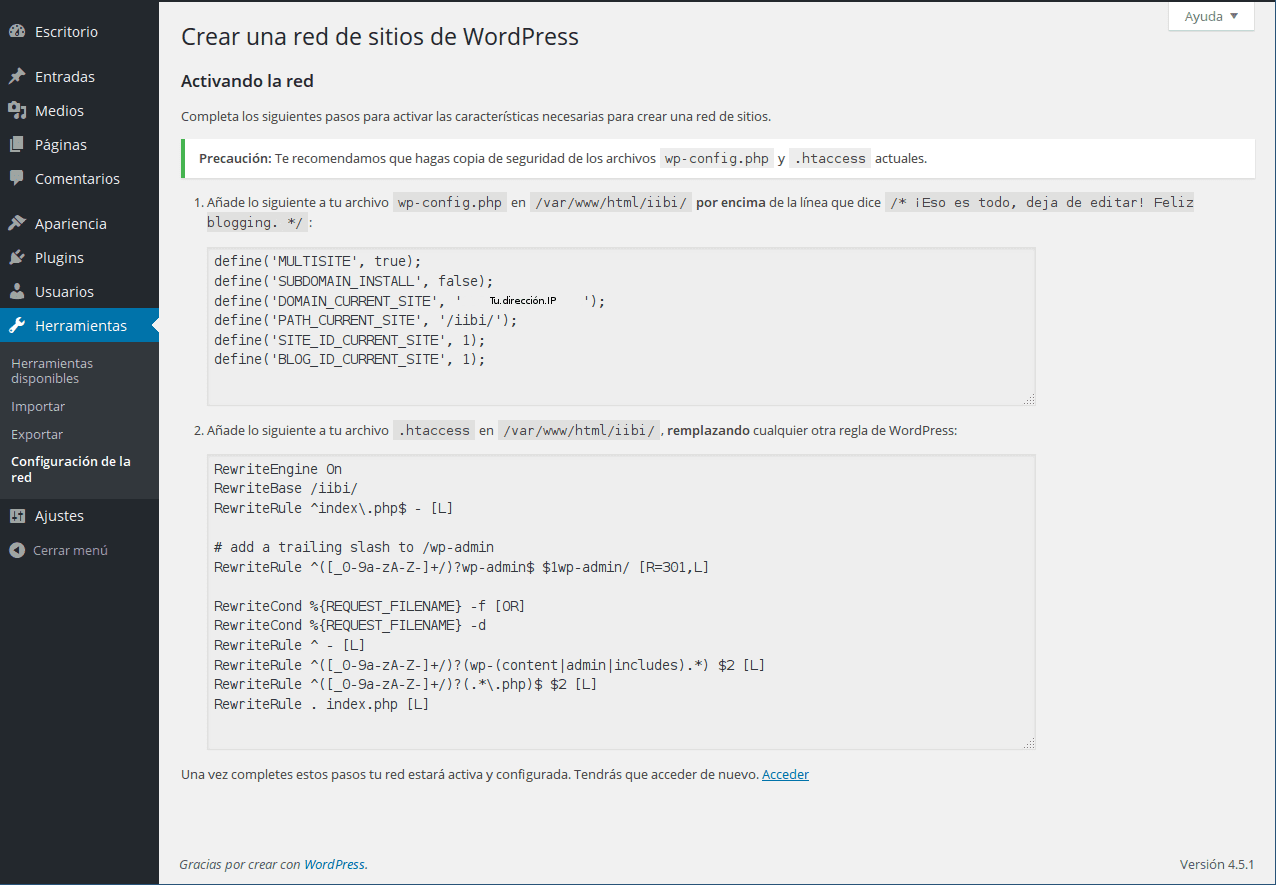
In which in my case the values corresponding to / var / www / html / wpmultisite1 are shown in relation to the name that I chose for my WordPress directory called iibi instead of wpmultisite1: / var / www / html / iibi. Now following the instructions in this window, we are going to copy the content of the first step or box to our wp-config.php file through our text editor above the line that says «/ * That's all, stop editing! Happy blogging. * /»Being as follows:
/ **
* For developers: WordPress debugging mode.
*
* Change this to true to enable the display of notices during development.
* It is strongly recommended that plugin and theme developers use WP_DEBUG
* in their development environments.
*
* For information on other constants that can be used for debugging,
*visit the Codex.
*
* @link https://codex.wordpress.org/Debugging_in_WordPress
/
define ('WP_DEBUG', false);
/ multisite /
define ('WP_ALLOW_MULTISITE', true);
define ('MULTISITE', true);
define ('SUBDOMAIN_INSTALL', false);
define ('DOMAIN_CURRENT_SITE', 'Your.IP.address');
define ('PATH_CURRENT_SITE', '/ iibi /');
define ('SITE_ID_CURRENT_SITE', 1);
define ('BLOG_ID_CURRENT_SITE', 1);
/ That's all, stop editing! Happy blogging. * /
We save the changes and close the file. We do the same with the content of the second step or box but now editing the .htaccess file through the path:
# vi /var/www/html/iibi/.htaccess
Deleting all its original content and pasting the one in the box, being as follows:
RewriteEngine On
RewriteBase / iibi /
RewriteRule ^ index.php $ - [L]
# add a trailing slash to / wp-admin
RewriteRule ^ ([_ 0-9a-zA-Z -] + /)? Wp-admin $ $ 1wp-admin / [R = 301, L]
RewriteCond% {REQUEST_FILENAME} -f [OR]
RewriteCond% {REQUEST_FILENAME} -d
RewriteRule ^ - [L]
RewriteRule ^ ([_ 0-9a-zA-Z -] + /)? (Wp- (content | admin | includes). *) $ 2 [L]
RewriteRule ^ ([_ 0-9a-zA-Z -] + /)? (. *. Php) $ $ 2 [L]
RewriteRule. index.php [L]
We save the changes and close the file. We log out of WordPress and re-enter it.
- Finally we test our WordPress already with the fully enabled and configured multisite functionality. For this we go to the upper left corner, select "My sites", "Network administrator" and "Sites". We select the option «Add new» at the top and on the next screen we define in the text fields «Address of the site (URL)» (a name for your new sub-site), «Title of the site», «Language of the site» , «Administrator email» and we click «Add site». Now the sites you create will appear in "My Sites" and you can customize them in the same way through your own desktop. Anything do not hesitate to ask or share your comments. Regards.
Very good tutorial !!
Thank you very much Alejandro. Just a detail. When I was creating the article the lines that have the apostrophe character (') did look like this, but now they have been changed to single quotes (' and ') in some lines like the following: define('WP_ALLOW_MULTISITE', true); and I have tried to correct it by trying to edit the article but only "View" appears. Please if any of the editors or administrators of Desde Linux See this comment, tell me how I can edit the article to correct that detail or please make that change. Greetings.