Greetings to all. This time I'll show you how to put the finishing touches on Slackware, as well as install additional tools to be able to manage our applications easily.
In the previous article, I had taught install Slackware and to be able to configure our Slackware repository to the stable branch, although also in the document in which the mirrors are available, there is also the current branch for those who want to have the latest, although I must warn you that it may have certain problems with some programs, but itself does not affect casual users like us.
Well, after clarifying that point, let's continue with what I had left pending: the final steps.
1.- Add normal user
To do this step, what we must do is type the following command in the console:
# adduser
This allows us to add a new user, which will guide us through a form in which we must fill in the most important data such as the session name (or Login User) and the main directory (Home Directory) with the shell to use. The rest is given Enter if you don't want to touch anymore.
For what is personal data, just ask for some additional information such as your name, your telephone number and / or your work telephone number. Both are optional. Obviously, the password is mandatory. Here is a copy / paste from my console so you can see what I did to add in my adduser.
For those of you who have gotten used to using SUDO (personally, I don't really like using it so it tends to be uncomfortable), we will give our brand new user partial superuser permissions with these commands:
usermod -a -G
And to be able to confirm the ROOT permissions, we go by editing the sudoers file using Nano (or if you prefer, type visudo if they are lazy):
nano /etc/sudoers
We start looking for the following line to uncomment it:
#%wheel ALL=(ALL) ALL
We save with Ctrl + O and we went out with Ctrl + X, in addition to leaving the session with exit (If you have run the graphical interface, log out and then type exit).
2.- Change the language in the interface, in the keyboard layout and in the console
If you have chosen KDE, you can go to Preferences >> Locale and choose the Spanish language with the respective distributions. If neither the Spanish language nor the language options appear, we go to the terminal and write the following:
slackplg install kde-l10n-es
Immediately, a box will appear in which the selected package will appear. We give it enter to install it.
To make our selection, I suggest you restart the session and run again startx in order to make our previously established changes.
Obviously, when working only with the console and not with the graphical interface, it is a problem, since it is with the US distribution and not with the Latin American distribution that we had previously done during the installation. To solve this problem, we execute the following in our console:
sudo nano vim /etc/profile.d/lang.sh
In my case the configuration I used is as follows (you can find more languages in locale-a):
export LANG=es_PE

export LANGUAGE=es_PE.utf8

export LINGUAS=es_PE.utf8

export LC_ALL=es_PE.utf8
If you don't use Bash then you edit the file /etc/profile.d/lang.sch, besides that we replace the word export by settenv.
3.- Activate the desktop manager
When we start Slackware, we just get a console asking for our username and password, and we have to manually activate the graphical interface by typing startx. However, you can enable the automatic launch of the graphical interface when starting Slackware by running the following:
nano /etc/inittab
We start looking for the following line:
id:3:initdefault:
And we add this line followed by the one already shown before:
id:4:initdefault:
We save and go out.
4.- Reduce the LILO waiting time
When we turn on our PC, the LILO starter always leaves us a waiting time of 2 minutes. For those people who are not to be expected, let's do the following:
We execute the following as root:
nano /etc/lilo.conf
Next, we look for the following entry:
timeout=1200
Since it is configured at 1200 thousandths of a second (or two minutes to be clearer), we will reduce it so that it gives us just five seconds to be able to start our system quickly, changing the number 1200 to 500. We save the modification and to confirm this change, we execute:
/sbin/lilo
And that would be the most essential thing for Slackware to be functional.
Before finishing this part of the final procedures, I must thank DMoZ for these tips that they have shared with us.
Now, we will start with the additional utilities that will help us to enjoy Slackware in a more pleasant way.
4.- Add backports to Slackware
Many times we want to install applications to Slackware. However, that is not possible because the main repos do not have the applications that it should have. For this we will use the backports in Slackware (Yes, Slackware has backports like any other distro), although we will use the most important ones to be able to enjoy applications such as LibreOffice or Google Chrome.
To do this, we must add the Slacky.eu and Alienbase repos to our / etc / slackpkg / mirrors file using our preferred text editor, depending on the architecture you have on your PC:
# BACKPORTS http://repository.slacky.eu/slackware-14.0/ http://taper.alienbase.nl/mirrors/people/alien/sbrepos/14.0/x86/
And as always, we save and execute slackpkg update and voila: we have our backports working ready.
5.- Install and / or configure Slapt-get
Many of us who have heard of Slackware say that it is like Gentoo and that it is a pain to solve dependencies. However, what really bothers us is the use of the Slackpkg front-end, which depends on pkgtool, since it does not solve efficiently (or simply does not solve) the dependencies of the applications that we want to install.
Fortunately, there is another apt-get inspired front-end called slapt-get, which solves dependencies based on the .md5 files that the .txz packages included in the repos have.
To install this miraculous front-end, we must execute this and the following commands as ROOT:
cd /usr/bin

wget http://software.jaos.org/slackpacks/14.0/slapt-get/slapt-get-0.10.2p-i386-1.tgz
installpkg slapt-get-0.10.2p-i386-1.tgz
If they have 64-bit Slackware, we run:
cd /usr/bin

wget http://software.jaos.org/slackpacks/14.0-x86_64/slapt-get/slapt-get-0.10.2p-x86_64-1.tgz
installpkg slapt-get-0.10.2p-x86_64-1.tgz
Next, we will edit the following file so that we can use Slapt-get without any problem:
nano /etc/slapt-get/slapt-getrc
Then, we add our previously chosen main repos below the following line and with the same format:
SOURCE=ftp://ftp.slackware.com/pub/slackware/slackware-14.0/:OFFICIAL
and we add the previously chosen backports below the lines that we add in the main repos in the following way:
# Base url to directory with a PACKAGES.TXT.

# This can point to any release, ie: 9.0, 10.0, current, etc.

SOURCE=ftp://ftp.slackware.com/pub/slackware/slackware-14.0/:OFFICIAL

SOURCE=http://mirrors.us.kernel.org/slackware/slackware-14.0/

SOURCE=http://repository.slacky.eu/slackware-14.0/

SOURCE=http://taper.alienbase.nl/mirrors/people/alien/sbrepos/14.0/x86/
We save, exit GNU Nano and run the following in our console:
slapt-get --update

slapt-get --upgrade
And so we update our repertoire of applications that we have ready to install.
In case of installing an application, we write in our console (with sudo or as ROOT):
slapt-get --install {nombre-de-paquete-de-programa-a-instalar}
For more information, I recommend reading the documentation that is running this command:
slapt-get -help

slapt-get -man
6.- Slackbuilds: Installation and configuration of SBOPKG
Slackbuilds are a repository of source codes ready to be compiled to be able to run applications at their latest version or to run a script that allows us to run a script that allows us to download / update proprietary software.
This is quite useful if one wishes to take the next step to install. Many prefer to do the manual procedure which explains DMoZ on this page, but for this tutorial I will rescue the easy procedure that is to use the Slackbuilds source code package manager called sbopkg, which seems simpler and more practical to install.
To install the SBOPKG front-end, we must execute the following in the terminal:
wget http://sbopkg.googlecode.com/files/sbopkg-0.36.0-noarch-1_cng.tgz

installpkg sbopkg-0.36.0-noarch-1_cng.tgz
And we already have SBOPKG installed. To synchronize your repository database, we must run the following in our console:
sbopkg -r
And it is ready to use.
In order to install any package with SBOPKG, it is quite essential to take into account that in order to install a program, we have to install its dependencies as well, which is quite tedious.
To install an application, in the case, the game SuperTuxCart, we write the following in the terminal:
'sbopkg -i "OpenAL irrlicht supertuxkart"'
The first two packages are the dependencies to compile and install, and the last one is the program to compile and install. Obviously, to know what dependencies we need, we must go to slackbuilds.org and write the program or package to compile and install automatically.
And that's all, for now. I hope you enjoyed reading this tutorial on how to put the finishing touches on Slackware without suffering. If I forgot one step or another, I will add it in my next post about Slackware.
See you in the next post.
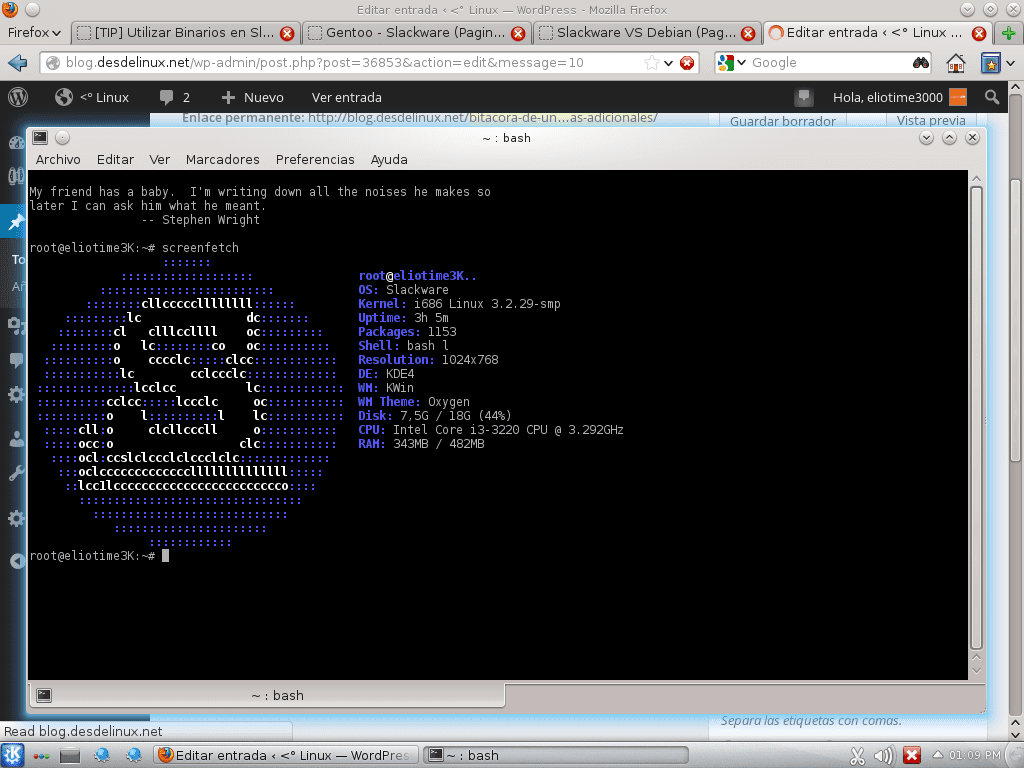
PS: Here is a screenshot of Slackware 14 with screenfetch (sorry if I did it in VirtuaBox, but as soon as I can, I will test it on a real PC as soon as I can):
Great brother, thank you for continuing to complement the saga, many grateful people must remain after this, especially the Backports and Slapt-get.
Cheers !!! ...
You're welcome. The truth is that since I am lazy when it comes to using bash, I use backports that have made me forget that I require slackbuilds and obviously the slapt-get is wonderful.
As soon as I can, I will install Slackware on my Lentium 4 with XFCE (the hardware it has is bad enough to explode with KDE Full).
Oh, and the slapt-get website (which I forgot to put it on), is this.
It really works wonders on a real PC, at the time when I installed it I used sbopkg only, I did not use third-party repos and I got a fully functional and very agile system, all that could be missing is in the slackbuilds, and it is one of The few Distros that are faithful to Lilo, maintain their essence through the years, but at the same time it is very modern (some users tend to confuse this Distro as if it were obsolete, because of the type of installer, something spartan, or its little diffusion in the GNU / linux environment), but this is slowly changing. Only the one who tries this system will realize the robustness, power, stability and recognition of Hardware that it possesses, apart from the excellent integration of KDE.
Very good contribution @ eliotime3000.
Greetings.
You're welcome. Slackware is really somewhere between Arch and Gentoo, so you can use it as Arch using slapt-get or using slackbuilds if you want to do manual builds and installs.
And for Slapt-get and the backports is the reason why I love Slackware, which is the friendliest KISS distro I've used so far.
@ Percaff_TI99
In fact, that's why I was dubious with Slack, because of the support. But I love using sbopkg.
I installed it and found its hardware recognition horrible, sometimes the mouse stops working and the windows suddenly go all black. Another problem I see is that most of the software is in the slackbuilds, but I can't use slapt-get with the slackbuilds, so I have to resolve dependencies anyway.
So Gentoo here I go
Anyway I was wrong, it seems that I was getting those problems because I was logged in as root, anyway, I don't understand why people like this distro so much when there is something like Gnetoo or Arch, any good reason to prefer Slackware?
regards
Speaking of repositories, on alien bob's blog this appeared last month, it's called slackpkg + (with a plus sign at the end): it's an extension to handle unofficial repositories using slackpkg
http://alien.slackbook.org/blog/introducing-slackpkg-an-extension-to-slackpkg-for-3rd-party-repositories/
http://slakfinder.org/slackpkg+/src/repositories.txt
It would be necessary to prove it. For the moment I will be a little busy with my classes and by the way, giving Arch + KDE a taste, but I will be installing Slackware on my other PC that deserves to be using a KISS distro like Slackware.
Just one question! Is it possible to update the kernel to a more current version? That 3.2 doesn't quite convince me. 😀 Excellent post, appreciated.
Using the current repository it is possible to update the existing one (which would be 3.10.7), but it is more advisable to install it separately and keep the old one in case the new one does not work quite well. And be careful with updating lilo if you get to.
For my part, I have no problem with the 3.2 kernel, but in Slackware, it feels like Arch.
Great, great, great. With your posts and those of DMoZ I am left over for when I install Slackware.
Well, go ahead. Enjoy it as soon as you can.
Try it, you don't regret it, this one takes away "distrohopper."
Hi, I just installed slackware for the first time (I am usually a debian user). I have activated runlevel 4 for the automatic start of the graphical interface. So far everything is correct. However, it won't let me log in with any of the users I have created (or as root). To log in I have to exit graphic mode, login and start the graphic system with startx ...
What can be caused this?
Thanks in advance and greetings.
Ma tean, kuidas suhted on meie elus olulised ja kui palju me tahame pot õnnelikud armastatud inimesega, mõnikord pole see lihtne. Me kõik näeme vaeva oma armuelu parandamisega ja oleme lihtsalt õnnelikud.
E-post: (info @ spelloflife.org)
või Külasta: www .spelloflife. org
Kui vajate oma suhetes abi.