I do not deny anyone my habit of playing, a vice inherited from my adventures on Windows systems that I have not used for more than 6 years unless it is about repairing some little thing on my Father's PC that although it hurts, I must admit which is "Atheist to everything that looks like a penguin."
A friend of mine asked me about emulating Warcraft (he was actually interested in how I played DOTA) en GNU / Linux and I gave him the whole tour (using the same Wine as Crossover) to which he replied with a real saber: What if I have Warcraft on a Windows PC and I want to use it on mine with Linux? Today after a small but fruitful search in San Google I am about to bring you the answer on how to answer my friend's question:
To emulate a game of Windows in systems GNU / Linux well-known applications such as Wine, CrossOver, Cedega etc ... I will not repeat that part but things get complicated if those applications are not physically on our HDD and much more if they are on a Windows PC that we must access through the local network. To access these resources the SMB protocol is used but this does not allow us to emulate remote applications so searching and searching I found how to do it through remote SMB units (what in Windows it says shared resources) mounted on our PC.
To mount a remote SMB unit on our pc we need the smbfs module and the smbclient client, so we install it from the repository
#apt-get install smbfs smbclient
Once these modules are installed, we can list the things that are shared on any PC on the network thanks to the smbclient and the syntax:
#smbclient -L Nombre_PC -U NombreUsuario
Needless to say, the Name of the PC can be replaced by its IP and the user name must be the SAMBA user or (if they are in the same as my friend having things on a Windows PC) the name of the user with access to that share. Here is an example of what it looks like when we list the shared resources of a Windows PC:

Once we know what resource the PC has shared then we move on to mount it on our PC. To mount a shared resource on our PC we can use 2 ways: or using the module smbfs or using CIFS (Common Internet File System) which some call the successor of SMB and that also allows us to use a little more freedom, in this article I will put how it would be from the 2 ways and it is worth clarifying that both are effective.
1- Using smbfs:
To mount a share remotely using the smbfs module the syntax is used:
mount -t smbfs -o username=nombreUsuario //nombre_PC_o_IP/Nombre_Recurso /Punto_de_Montaje -o Opciones
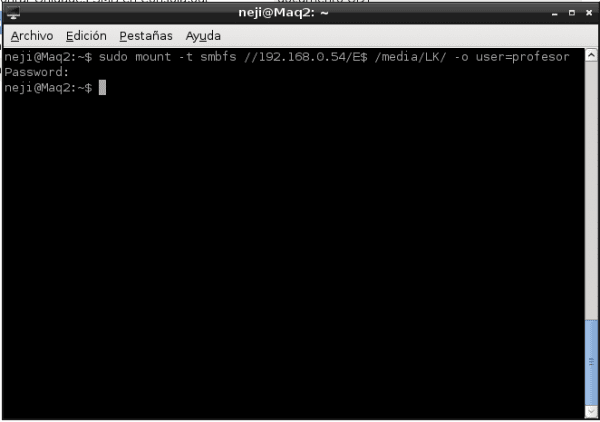
Clarifying the options:
The smbfs options are several, one of them is user = value which can also be username = value both are valid and represent the SAMBA user or the windows user with access to that shared resource
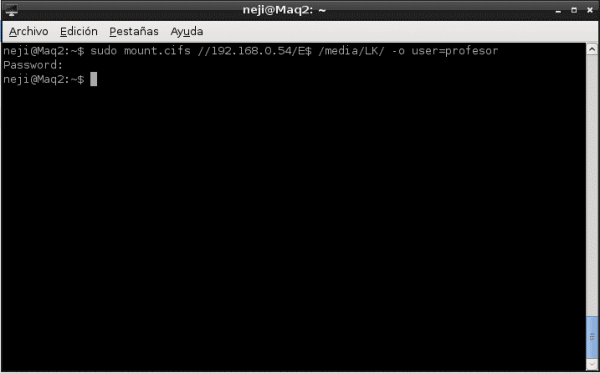
2- Using CIFS:
CIFS it is a tool part of the suite cifs-util which is invoked indirectly by the mount command and can be used in several ways or we can do it with the option "-t cifs" or we can directly use it with the statement "mount.cifs" in the 2 ways it works the same, in general the syntax it would be something like
mount -t cifs //recurso /punto de montaje -o Opciones
I chose the mount.cifs option and passed the user with access to the resource as part of the options:
As additional information I will tell you that we can also make our system do this by starting the PC by creating a credentials file and then writing the following line in the fstab file:
#
//Recurso /Punto_de_Montaje cifs uid=Usuario,credentials=Ruta_credenciales 0 0
In this case, the credentials file is just a text file that contains the credentials options:
username = Value
password = Value
At the end of these processes, whatever we have chosen when we access the folder that we designate as the mounting point, we can use those applications as if they were really on our PC:
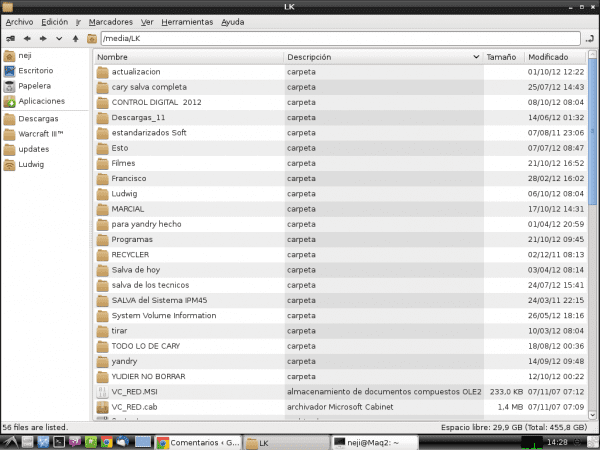
As can be seen in this last figure in the folder / mean / LK E $ share is mounted (corresponds to partition E $ of Windows) and in this way we can run Warcraft as my friend wanted. I hope this has served you well and before some troll starts their chatter, here I leave you where I get the information from.
Additional documentation:
That such.
Good tuto and tips, thanks for the information and I will save it for future reference or I need to link to the network in this way. You are well and kind regards.
Thanks for that support, I really had no idea how they were going to take it
The contribution is great!
I did not know this way of mounting from the terminal, I always do it from Thunar and Nautilus by pressing Ctrl + L and typing smb: // IP-Address. The truth is that a very good tutorial and very well explained. Greetings and long live SAMBA!
If you can access it from the File Manager but as I said ... at least it doesn't work for me to run things with Wine or Crossover that are in SMB: // IP addresses, that's why I looked for doing something like «connect to Winbugs Network »drive and in this way a reference to the real .exe file of the other PC is created allowing the use of Wine and Crossover in the traditional way. It even helps you with video players that no longer have to load buffers because they play the videos as if they were located on the same PC.
Friend, I also have the same problem with the File Manager, it's something that I forgot to put in the comment, that's why the post seemed tremendous to me, since I had always had problems executing files and they became inaccessible putting a path from the terminal, I had never looked for the solution either, but with this post you have enlightened me, hehe, and now I can even run scripts on a remote Windows partition. Cheers!
It works for me with:
mount -t cifs // resource / mount point -o Options
where the path of the resource has space and I put «word \ sigword» so that the space recognizes me. AND IT WORKS, but I have to do it every time I reboot.
When I put it in fstab, IT GIVES ME AN ERROR, and it is because of the spaces, I have tried to leave the spaces normal, and change them to "\" but there is no way. suggestions?
fixed, replace spaces with «40»
You have tried to quote the path of the type directory:
"/ This is a / directory"
?
A tutorial, to read, follow the steps, and mount -a without incident
Thank you very much
Good work
good tuto, it was a can to start the X to copy files from my server
Yes, of course, it is really easy but with the firewall above I had no connection, in the windows I had the Zone alarm installed and it brought me problems.
Thanks for the info
Genius consumed a lot of your material, on Facebook with Naruto Shippuden, and I didn't know you were an expert in Linux, Thank you very much! I will use it to program ionic and compile from ubuntu! Thank you