
Often we want to know the details of our team Among which we need to know what system we are using, what version of it, what version of the Kernel we are using, desktop environment among other other information.
All this can be obtained through different commands that we can execute in the terminal, but, this can be somewhat tedious and even waste a lot of time in the search for this information.
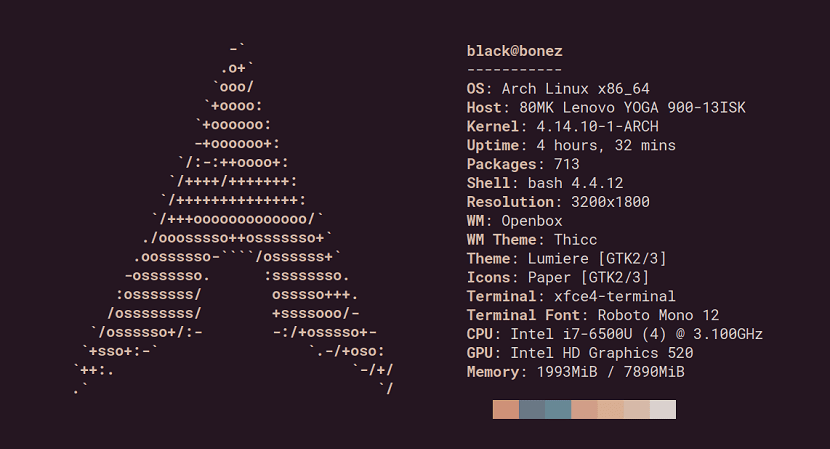
For this we can make use of an excellent application that can display this information to us and above all in a great way that can fascinate more than one.
About Neofetch
Neofetch is a CLI system information tool written in BASH. Neofetch displays information about your system alongside an image, your operating system logo, or any ASCII file of your choice.
The main purpose of Neofetch is to use it in screenshots to show other users what system and version you are running, what theme and icons you are using, etc.
neofetch it is highly customizable by using flags on the command line or the user configuration file.
There are more than 50 configuration options to customize the output of this application when executed in our system and also includes the function print_info () which allows us to add our own personalized information.
neofetch it can be used in any operating system that has or is supported by BASH.
Neofetch currently supports Linux, MacOS, iOS, BSD, Solaris, Android, Haiku, GNU Hurd, MINIX, AIX, and Windows (with the Cygwin / MSYS2 subsystem).
How to install Neofetch on Linux?
Si do you want to install this utility on your system, you must follow the following steps according to your Linux distribution you are using.
For those who are Ubuntu users or some derivative of these we must add the application repository. We do this by opening a terminal with Ctrl + Alt + T and executing the following commands:
sudo add-apt-repository ppa:dawidd0811/neofetch
We update the list of packages and repositories with:
sudo apt update
Y finally we install the application with:
sudo apt install neofetch
Si you are a user of Debian 9 or some system based from this you can install Neofetch from the official Debian repositories. We only open a terminal and execute:
sudo apt-get install neofetch
For the case of users of Fedora, RHEL, CentOS, Mageia or derivatives we must install the following:
sudo dnf-plugins-core
Now we are going to proceed to enable the COPR repository on the system with this command:
sudo dnf copr enable konimex/neofetch
Finally we install the application with:
sudo dnf install neofetch
If you are Solus users, install this application with:
sudo eopkg it neofetch
For Alpine Linux users can install the application with this command:
apk add neofetch
Finally, for Arch Linux, Manjaro, Antergos, or any Arch Linux-based system users we install this application with:
sudo pacman -S neofetch
How to use Neofetch on Linux?
Done the installation we can launch this application by running the following command in a terminal:
neofetch
With which will display the current information of our team, as well as the system we are using.
Neofetch will create by default a configuration file in the route $ HOME / .config / neofetch / config.conf in this first run.
This file contains options to control all aspects of the information output that will be shown on the screen when the command is executed.
Neofetch also installs an editable configuration file on the system at / etc / neofetch / config.
In which we can edit the way Neofetch shows us the information.
As well we have the possibility to run Neofetch without a configuration file using the following arguments
neofetch --config noney
Or also we can specify a custom configuration location using:
neofetch --config /ruta/a/config.conf
If you want to know more about this application as well as information about the parameters that are inside the configuration file you can visit its wiki at the following link.
I am using linux mint 18.2. When trying to add the repository it gives me the following error:
Cannot add PPA: <>
I am using linux mint 18.2. When trying to add the repository it gives me the following error:
Cannot add PPA: No JSON object could be decoded