General index of the series: Computer Networks for SMEs: Introduction
In May 2013 we published in this blog, two articles dedicated to the installation of Qemu-Kvm in Debian 7 «Wheezy«. They are still valid. As the landscape of installation and configuration in Debian 8 "Jessie" has changed a bit, we want to update the procedure.
It would not be other than before immersing yourself in reading this How to do it, they will visit the previous article Virtualization in Debian: Introduction - Computer Networks for SMBs, to have a little background on the subject.
Sites we suggest visiting
- Kernel-based Virtual Machine
- hypervisor
- Red Hat Documentation Index
- Virtualization Getting Started Guide
- Virtualization Deployment and Administration Guide
- Virtualization Tuning and Optimization Guide
- Virtualization Security Guide
- Converting virtual machines from other hypervisors to KVM with virt-v2v
- Libvirt Project
- Virt-Manager Organization
- Linux KVM Organization
- Qemu Organization
Comment
- We copy the output of the commands, as they are much more educational than any other composition written by us. We suggest that you carefully read the messages of the different mandates, since it is one of the best ways to learn without having to go to an Internet search. At least that's our opinion.
Installation
We start from the basic installation of a Debian "Jessie" as we saw in Workstation Installation - Computer Networks for SMEs. Then, we install the Desktop or Desktop of our preference as we saw in 6 Debian Desktops - Computer Networking for SMEs.
For this article we chose the Cinnamon Desktop. We selected it because many readers love this desktop environment. 😉
The general data of our workstation are:
Domain Name: desdelinux.fan
Name of the team : sysadmin
FQDN: sysadmin.desdelinux.fan
IP adress : 192.168.10.3
SubNet: 192.168.10.0/24
Normal user: buzz
User full name: Debian First OS Buzz
We check support for virtualization
In a console we execute:
buzz @ sysadmin: ~ $ egrep -c "(svm | vmx)" / proc / cpuinfo
2
In our case, the command returns us that we have 2 CPUs with due support.
Packages we will install
First of all, we find out that we are going to install using the following commands:
buzz @ sysadmin: ~ $ aptitude search kvm
p ikvm - Java virtual machine for the CLI
v kvm                             - p libicsharpcode-nrefactory-ikvm5 - C # Parsing and Refactoring Library - IKVM p libikvm-native - native library for IKVM.NET p nova-compute-kvm - OpenStack Compute - compute node (KVM)
p qemu-kvm - QEMU Full virtualization on x86 hardware

buzz @ sysadmin: ~ $ aptitude show nova-compute-kvm
Package: nova-compute-kvm New: yes Status: not installed Version: 2014.1.3-11 Priority: extra Section: net Developer: PKG OpenStack Architecture: all Uncompressed size: 50.2k Depends on: adduser, dpkg-dev, qemu-kvm | kvm, libvirt-daemon-system, nova-common, nova-compute, python-libvirt Dependent on: dpkg (> = 1.15.6 ~) Recommend: guestmount Has conflicts with: nova-baremetal, nova-compute-lxc, nova- compute-qemu, nova-compute-uml, nova-compute-xen Provides: nova-compute-hypervisor Description: OpenStack Compute - compute node (KVM) OpenStack is a reliable cloud infrastructure. Its mission is to produce the ubiquitous cloud computing platform that will meet the needs of public and private cloud providers regardless of size, by being simple to implement and massively scalable. OpenStack Compute, codenamed Nova, is a cloud computing fabric controller designed to be modular and easy to extend and adapt. In addition to its "native" OpenStack API, it also supports the Amazon EC2 API, and it supports many different database backends (including SQLite, MySQL, and PostgreSQL), hypervisors (KVM, Xen), and user directory systems (LDAP, SQL ). This is a dependency package for compute nodes using KVM. Main page: http://www.openstack.org/software/openstack-compute/
- We are not going to install the package OpenStack, because we do not need a whole virtualization infrastructure for the Cloud - Cloud,
buzz @ sysadmin: ~ $ aptitude show qemu-kvm
Package: qemu-kvm New: yes Status: not installed Multi-Arch: foreign Version: 1: 2.1 + dfsg-12 + deb8u1 Priority: optional Section: misc Developer: Debian QEMU Team Architecture: amd64 Uncompressed size: 60.4 k Depends on: qemu-system-x86 (> = 1.7.0 + dfsg-2 ~) Has conflicts with: kvm Break: qemu-system-x86 (<1.7.0 + dfsg-2 ~) Supersedes: qemu-system-x86 (<1.7.0 + dfsg-2 ~) Provides: kvm Description: QEMU Full virtualization on x86 hardware QEMU is a fast processor emulator. This package provides just a wrapper script / usr / bin / kvm which run qemu-system-x86 in kvm mode for backwards compatibility. Please note that old qemu-kvm configuration files (in / etc / kvm /) are no longer used.
Main page: http://www.qemu.org/
We install the virtualization platform Qemu-Kvm
buzz @ sysadmin: ~ $ sudo aptitude install qemu-kvm libvirt-bin bridge-utils
The following NEW packages will be installed:
  augeas-lenses {a} bridge-utils dmeventd {a} ebtables {a} ethtool {a} hdparm {a} ipxe-qemu {a} libaio1 {a} libapparmor1 {a} libaugeas0 {a} libboost-thread1.55.0 {a } libdevmapper-event1.02.1 {a} libfdt1 {a} libiscsi2 {a} liblvm2cmd2.02 {a} libnetcf1 {a} libnuma1 {a} librados2 {a} librbd1 {a} libreadline5 {a} libseccomp2 {a} libspice-server1 {a} libvdeplug2 {a} libvirt-bin libvirt-clients {a} libvirt-daemon {a} libvirt-daemon-system {a} libvirt0 {a} libx86-1 {a} libxen-4.4 {a} libxenstore3.0 { a} libxml2-utils {a} lvm2 {a} netcat-openbsd {a} pm-utils {a} powermgmt-base {a} qemu-kvm qemu-system-common {a} qemu-system-x86 {a} qemu -utils {a} seabios {a} vbetool {a} 0 packages updated, 42 new ones installed, 0 to remove and 0 not updated. I need to download 8,422 kB / 14.8 MB of files. After unpacking, 53.3 MB will be used. Do you want to continue? [Y / n /?] And
Important
- As we are installing on a Desktop, we will need an interface to manage the KVM. If we were installing on one or more servers, both the Desktop installation and the installation of the Virtual Machine Manager, that we will install later. Con a single instance of this graphical interface, we can manage all the servers in which we have installed the packages qemu-kvm, libvirt-bin y bridge-utils.
- The main demon - daemon of virtualization is the libvirtd. To know its status we execute:
buzz @ sysadmin: ~ $ sudo systemctl status libvirtd
buzz @ sysadmin: ~ $ sudo service libvirtd status
- If in the output of any of the previous commands, we read some lines in red, it is healthy to restart the service libvirtd and check again, or restart the computer and check. He scriptlibvirtd.service who drives systemd, is found in /lib/systemd/system/libvirtd.service. Note that we can invoke that demon in the old way too, that is:
buzz @ sysadmin: ~ $ sudo service libvirtd
Usage: /etc/init.d/libvirtd {start | stop | restart | reload | force-reload | status | force-stop}

buzz @ sysadmin: ~ $ sudo service libvirtd restart buzz @ sysadmin: ~ $ sudo service libvirtd status
● libvirtd.service - Virtualization daemon
   Loaded: loaded (/lib/systemd/system/libvirtd.service; enabled)
   active: active (running) since Sun 2016-11-27 11:23:53 EST; 8min ago Docs: man: libvirtd (8) http://libvirt.org Main PID: 1112 (libvirtd) CGroup: /system.slice/libvirtd.service └─1112 / usr / sbin / libvirtd
- El script located in /etc/init.d/qemu-system-x86, is in charge of inserting the necessary modules for the correct operation of the Qemu-Kvm. After it does its job successfully, it is done. If we check its status, it will return that it is 0 or successful.
buzz @ sysadmin: ~ $ sudo systemctl status qemu-system-x86 ● qemu-system-x86.service - LSB: QEMU KVM module loading script Loaded: loaded (/etc/init.d/qemu-system-x86)
   active: active (exited) since Sun 2016-11-27 11:18:17 EST; 18min ago Process: 172 ExecStart = / etc / init.d / qemu-system-x86 start (code = exited, status = 0 / SUCCESS)
- If we are curious and want to know which are the modules and their location, we execute:
buzz @ sysadmin: ~ $ sudo updatedb

buzz @ sysadmin: ~ $ locate kvm | grep ko
/lib/modules/3.16.0-4-amd64/kernel/arch/x86/kvm/kvm-amd.ko
/lib/modules/3.16.0-4-amd64/kernel/arch/x86/kvm/kvm-intel.ko
/lib/modules/3.16.0-4-amd64/kernel/arch/x86/kvm/kvm.ko

buzz @ sysadmin: ~ $ ls -l /lib/modules/3.16.0-4-amd64/kernel/arch/x86/kvm/
total 1016 -rw-r - r-- 1 root root 97120 17 Jul 2015 XNUMX kvm-amd.ko
-rw-r - r-- 1 root root 223680 Jul 17 2015 kvm-intel.ko
-rw-r - r-- 1 root root 715920 Jul 17 2015 kvm.ko
We install the Virtual Machine Manager
buzz @ sysadmin: ~ $ sudo aptitude install virt-manager
[sudo] password for buzz: The following NEW packages will be installed: gir1.2-gtk-vnc-2.0 {a} gir1.2-libvirt-glib-1.0 {a} gir1.2-spice-client-glib-2.0 { a} gir1.2-spice-client-gtk-3.0 {a} libvirt-glib-1.0-0 {a} python-ipaddr {a} python-libvirt {a} python-urlgrabber {a} virt-manager virt-viewer {a} virtinst {a} 0 packages updated, 11 new ones installed, 0 to remove, and 0 not updated. I need to download 2,041 kB of files. After unpacking, 12.5 MB will be used. Do you want to continue? [Y / n /?] And
- After installing the package, we consult:
buzz @ sysadmin: ~ $ cat /usr/share/doc/virt-manager/README.Debian
Access Control ============== Access to the libvirt socket is controlled by membership in the "libvirt" group. If you want to manage virtual machines as non root you need to add your user to that group or you have to use the session uris like qemu: /// session. See also /usr/share/doc/libvirt-bin/README.Debian. - Guido Guenther Thu, 04 Jun 2010 11:46:03 +0100
- The above indicates that we must make the user buzz a member of the libvirt group to access the newly installed interface:
buzz @ sysadmin: ~ $ sudo adduser buzz libvirt
Adding user `buzz 'to group` libvirt' ... Adding user buzz to group libvirt Done.
- Now we close the session and start it again. After entering our Cinnamon Desktop, we go to Menu -> Administration -> Virtual Machine Manager, and we access the administration interface of our KVM.


Virtual Networks in the Virtual Machine Manager
Despite the fact that the Virtual Machine Manager is easy to use and that with daily practice we can obtain a Master's degree in its use, we offer a Tip: on how to modify the virtual network that Qemu-Kvm installs by default.
We navigate your Menu -> Edit -> Connection details, and we go to the tab «Virtual Networks«. If we click on the link IPv4 configuration, the Red, and also informs us that the DHCP server is activated for it. That server runs thanks to the package dnsmasq-base, which is installed.
For more information, see the file: /usr/share/doc/libvirt-bin/README.Debian.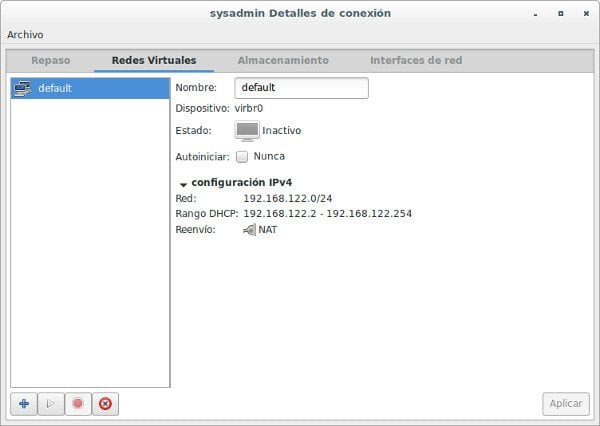
If we want to change the network configuration «default«, We will proceed as follows:
buzz @ sysadmin: ~ $ sudo cp /etc/libvirt/qemu/networks/default.xml /etc/libvirt/qemu/networks/default.xml.original
buzz @ sysadmin: ~ $ cat /etc/libvirt/qemu/networks/default.xml.original
default

buzz @ sysadmin: ~ $ sudo nano /etc/libvirt/qemu/networks/default.xml
default

buzz @ sysadmin: ~ $ sudo systemctl restart libvirtd
buzz @ sysadmin: ~ $ sudo systemctl status libvirtd
If we had not closed the Virtual Machine Manager before restarting the demon libvirtd, we will receive the following error message, which is normal for this to happen: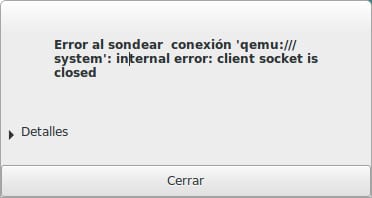
We just have to close the Virt Manager and reopen it. We return to the part of the Virtual Networks configuration, and we verify that the network default, you already have the modified parameters.
We suggest enabling the automatic start of the Network default, by checking the box «Autonicize«.
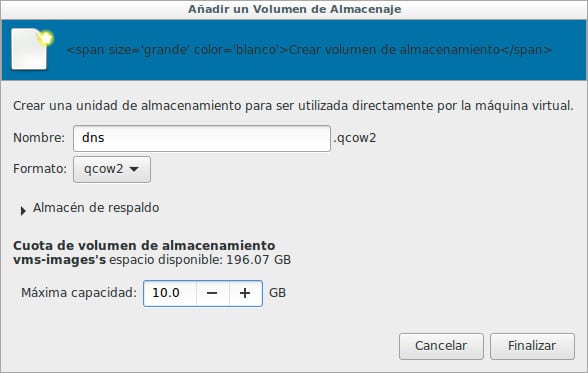
Storage in Virt-Manager
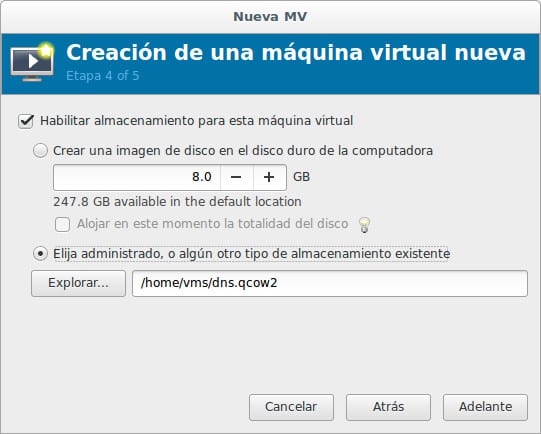
Another aspect we want to touch on is Storage - Storage in the Virt-Manager. By default, the system folder to save all the virtual machine images is located at / var / lib / libvirt / images. Suppose we have a hard drive totally dedicated to that function, and we have it mounted on / home / vms. To add it to Virt Manager, we navigate through its Menu -> Edit -> Connection details -> Storage. In the lower left corner we click on the button «+«. Then a Wizard for «Create storage bucket«:
Let's take a look at the different types of storage we can choose from. Detailed documentation we will find in Virtualization Deployment and Administration Guide, from Red Hat. We will select the first «dir: File System Directory«.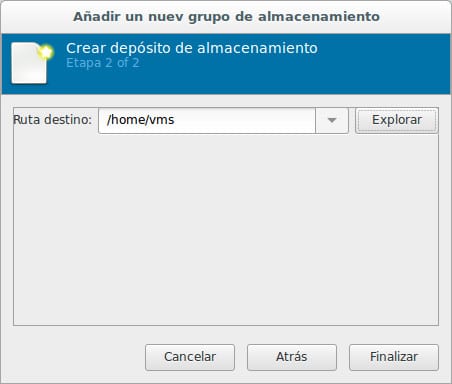

At the end of the wizard, the new storage tank is Active and with its start automatically.
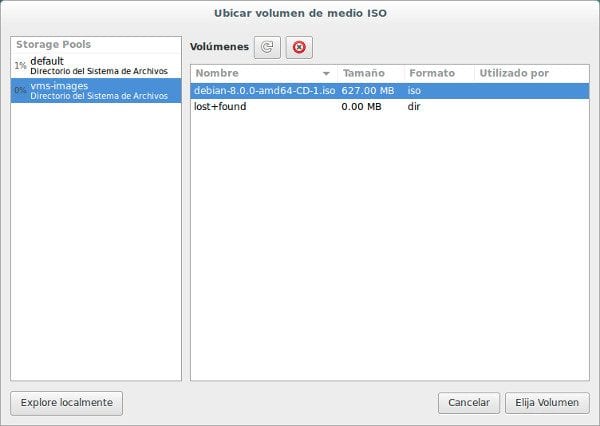
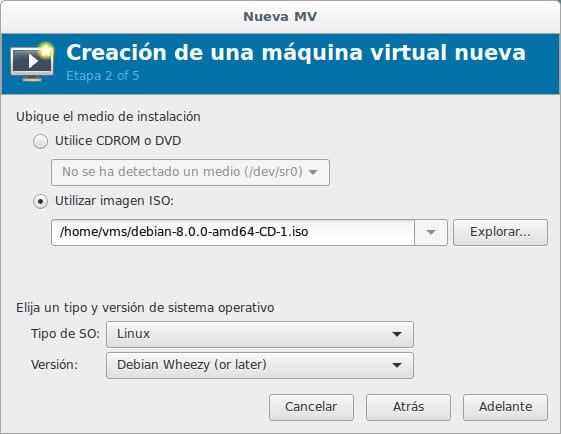
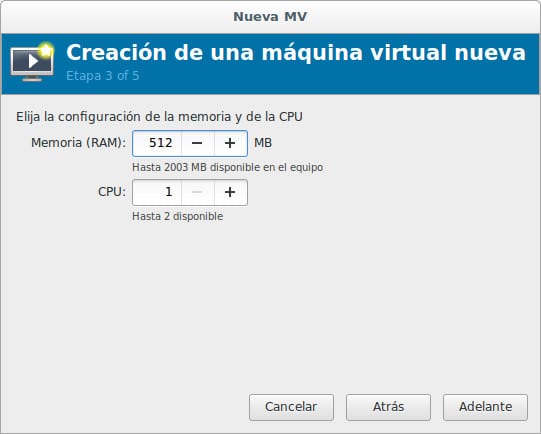
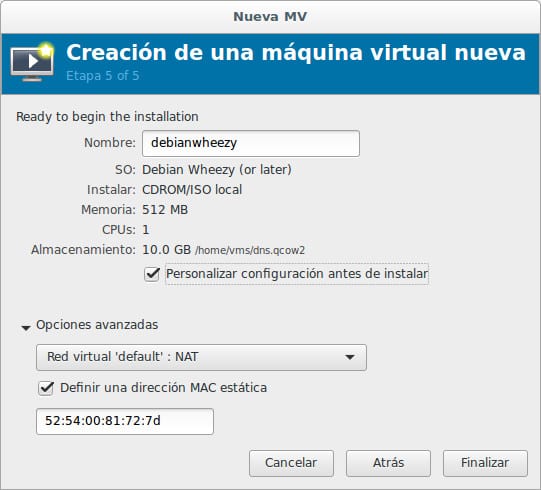
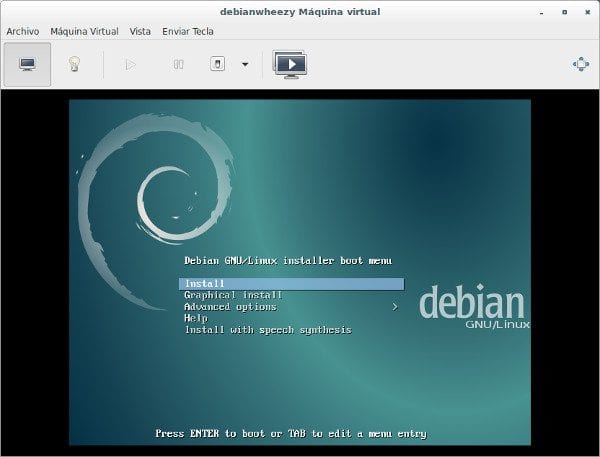
First virtual machine
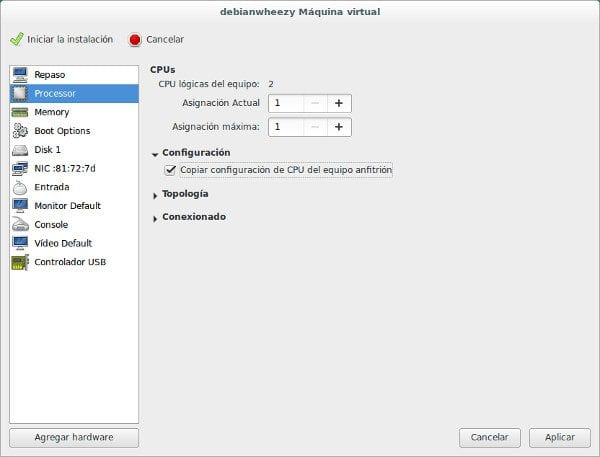
We must navigate through, and read the different options offered by the Virt-Manager. Let us observe in the penultimate image of those shown later, that when we get to the edition of the newly created virtual machine and before Start the installation, in the option «processor«, We mark the box "Configuration" Copy host computer's CPU configuration. It may not be necessary to do so, but we stick to the Debian recommendation and our HP server practice.
For more information, see the file: /usr/share/doc/libvirt-bin/README.Debian.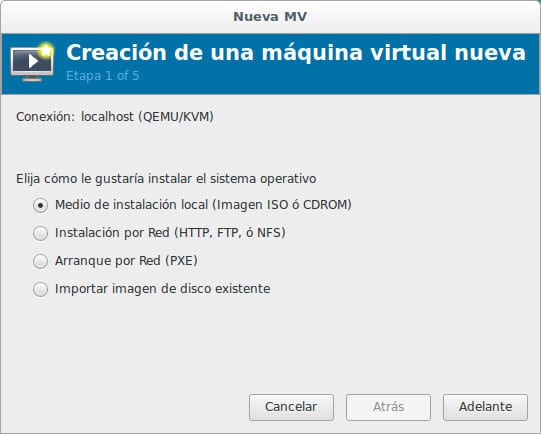
We will only add that for more than three years, we have had this virtualization platform in production in two companies. Despite power failures, normal computers «adapted»To function as servants, and of all the difficulties that may exist in an underdeveloped country like ours, the Qemu-Kvm it has always worked correctly, as well as the virtual servers that run on it.
We hope this article is useful for you.
Next delivery?
«Virsh on Debian«
Remember that this will be a series of articles by Computer Networks for SMEs. We will be waiting for you!
Didactic article that will help me in my implementation of my pair of servers with Qemu-KVM. Thank you very much Federico and we will continue to wait for your posts.
Very good article for any initiation in Qemu-KVM.
It would be very interesting that in future articles you explain the XML files of the virtual machines and the thin provisioning of the hard drives, thus achieving a very efficient deployment.
Greetings and thanks for contributing.
Thank you very much for your comments!.
Alberto: the main objective of our articles, as we have already written in many of them, is to offer an Entry Point to the topics covered. Sometimes very concise and sometimes a little more explicit. It depends on the complexity of the topic. For this reason, we give a whole series of links to other sites so that readers, whether they are initiated or not, find more literature to enrich their knowledge. I top that list of readers. 😉
From your comment, I see that you are not an initiate on the subject. You ask me to explain a fairly technical feature such as the "Thin provisioning", although we use it in some way or another in our daily work.
"Thin Provisioning", for practical purposes, is when we employ virtualization technologies to give the appearance that we have more hardware resources than we actually have. If a system always has the necessary hardware resources at its disposal to support all virtualized resources, then we cannot speak of having Light Provisioning implemented in that system.
I try that the necessary memory resources, hard disk space, number of processors, etc., for the execution of the virtual servers or Guests, do not exceed the resources of the Host itself.
I try to have a Heavy Supply or Tick Provisioning. I organize virtualization -when I can- so that the totality of the resources used in the Guest, approximates the totality of available resources.
It is suggested that the efficiency of the type of provisioning depends on how we use it and not on the virtualization technology. Heavy Provisioning is most efficient when the amount of hardware resources used approximates the amount of available resources. Thin Provisioning is more efficient when the amount of hardware resources used is much less than what is available.
For more information on Procurement, visit in the first instance: https://en.wikipedia.org/wiki/Thin_provisioning.
By the way, I will tell you that in the document "Virtualization Deployment and Administration Guide" mentioned in this article, it only refers to Thin provisioning once, and it is to tell us that this type of provisioning is not supported by Storage Depots or Storage Pool, with LVM or Logical Volume Manager.
Finally, I want to draw your attention that a post cannot cover or replace specialized literature on a certain topic. For example, the old Red Hat document is 565 pages long.
Luigys, I have difficulty receiving the comments posted.
We work on it
Because in Desde Linux Has there been no talk about release 25 of the popular Fedora distribution? I get the impression that this blog only specializes in Debian and Ubuntu... How sad that I am an avid reader and at the same time a Fedora user
My dear Marty, without a doubt we have something forgotten about Fedora, it is not by pleasure, but by necessity. The GNU / Linux and free world is constantly moving and our abilities to test, learn, and communicate are limited. We would like to have 48-hour days, to be able in one way or another to be able to contribute more and on more topics.
At some point, we will write about Fedora, sorry if it is not now, we are working on reaching more and more collaborators to help us create content, in this way there will be more points that we can cover.
Everyone is invited to collaborate in DesdeLinux, for this there is the Guide for Editors and Editors Guide https://blog.desdelinux.net/guia-redactores-editores/ We therefore hope, at some point in time, to have much more material to offer.
Would you like us to also publish about CentOS?
Special article, we are used to it. Thanks for this delivery brother, you are already playing much more interesting topics, which does not take away from the rest of the posts, I say it that way from my point of view because my follow-up to Qemu-KVM began a few years ago and since I met him I have no complaint about it.
I hope that Qemu-KVM will remain strong and continuing for Debian in the future.
If you are an observer Crespo88, in these new articles about Qemu-KVM, I delve deeper, as you saw in the next one, and you will see in the two more that I will publish soon. In today's world virtualization is an essential technology. It is worth delving into its use. Thanks for comment!!!.
Very good article on how to put into practice in a simple and affordable way the theory about virtualization based on KVM (or Kernel-based Virtual Machine), that is, this is all the basics to start:
1st) Install the virtualization platform Qemu-Kvm.
2nd) As the host has a graphical interface, we need the Virtual Machine Manager to manage the KVM virtualization.
3rd) Very good TIPs to add our user buzz to the libvirt group to have access to the Virtual Machine Manager interface; to modify the virtual network interface and the default storage in Virt-Manager to another "mounted" partition of a 2nd hard disk.
4th and final) The creation of the 1st MV.
Thank you for sharing this information "selflessly" to better us in the world of Linux.
Thank you very much for your comment, friend Wong. Messages like yours are what make me continue writing for the Community DesdeLinux and for all Linux lovers