Hello,
Here you will see how to connect to a PC remotely by SSH just entering the password the first time, then even if we restart both computers, we will not be asked for the password again.
But, let's first see a brief explanation about what it is SSH:
SSH it is a protocol, a means of communication between two computers. It allows us to manage a team remotely. When we access another computer by SSH, the command that we enter in that terminal will be executed on the other computer, in this way we manage / control it.
Everything that is transmitted by SSH, it is encrypted and with a considerably good security.
Now, we will see how in just three steps we will configure PC # 1 to access PC # 2 without entering password:
We have the following situation:
PC # 1 - » You want to connect to PC # 2, without having to enter a password every time you try to connect to this other PC.
PC # 2 - » You have the SSH server installed. This is the one PC # 1 will connect, and will do so without entering a password. On this PC there is a user named root.
Let us begin…
1. En PC # 1 we write the following:
- ssh-keygen -b 4096 -t rsa
This will generate a public key. In order not to get too confused with "public and private keys", I will explain it very simply.
Suppose you have two keys to your house in your pocket, one you give to your girlfriend since you live together, and with the other you are left alone, you do not give it to anyone. Well, that key that you gave your girlfriend will allow her to enter your house without telling you, without asking your permission, right? that is a public key, a "key" that allows one PC to access another without having to ask for your permission (that is, without entering username + password)
When they put that command, that will appear:

2. Just press [enter], a second later we press again [enter], and a second later we press once more [enter]. I mean, we would press [enter] a total of three (3) times, we only press it ... we do not write anything : )
When we do this, something very similar to the following will appear:
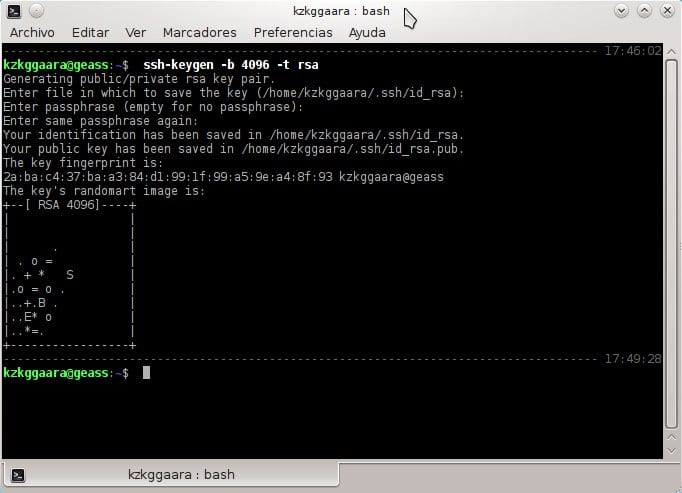
Ready, we already have the public key ... now we need to give it to whoever we want (like the example, give it to our girlfriend haha)
What we want is that PC # 1 connect to PC # 2already in PC # 1 we did all of the above, in PC # 2 We have not done anything. Good, PC # 2 has an IP address for example 10.10.0.5.
3. We put in PC # 1 following:
- ssh-copy-id root@10.10.0.5
What this does is simply give you the public key of PC # 1 a PC # 2, that is, it gives to PC # 2 the public key of PC # 1While PC # 1 he keeps his private key, you know; that key that is not given to anyone. It is important not to make mistakes with the user, that is, if the user “root"It does not exist in PC # 2 will give us an error, it is important to be clear in which user we will use for this, in addition to the fact that that user with which we configure access without password, will be the same with which we will have to access in the future. Once this is done it should look like this:
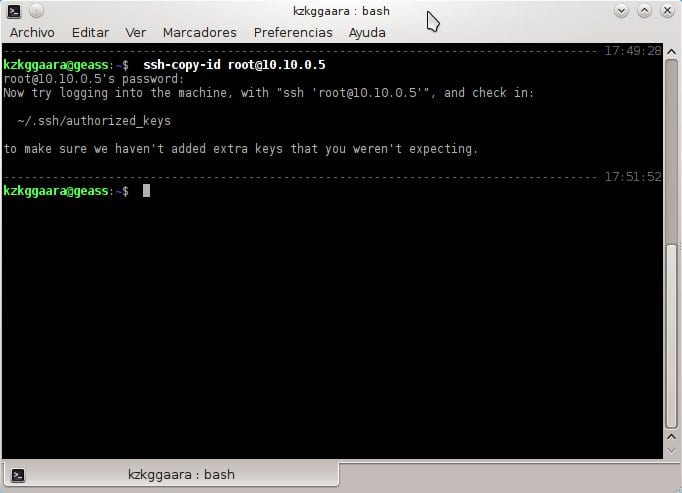
In the previous step, they must put the user's password in PC # 2.
And voila ... everything is configured 😀
As well it appears to us in the terminal, let's test if everything really worked 100% OK. To test, we put:
- ssh root@10.10.0.5
If they want to access another computer also without always entering a password (PC # 3 for example), we simply give it our public key and that's it, that is, once we have done the step #1 y #2 we won't have to do it anymore. If we want to access PC # 3 for example, which has by IP 10.10.99.156 we just put:
- ssh root@10.10.99.156
So far the tutorial.
Explain that the security level when we talk about SSH is really high, the metaphor with which I explained some steps (giving the key to our girlfriend) may not be the most appropriate haha, since our girlfriend could give the key to someone else. When we talk about SSH, the security principles are easy to explain, when we try to access our computer (PC # 1) checks if in PC # 2 there is a public key of our computer (in this case there is, because we configure it that way), then, if there is one, it is simple, check if that public key is identically the same as our private key we didn't give it to anyone). If the keys are identical it allows us to access, otherwise and as a security measure, it does not allow us to remotely access the other computer.
So now you know ... giving our girlfriend the house key is not the safest thing, but sharing keys and accessing another computer remotely via SSH is safe ^ _ ^
Doubts or questions, complaints or suggestions let me know.
Greetings all.
I really don't understand how you being so paranoid about security make such a mistake. If in the step where it says:
Enter passphrase (empty for no passphrase)We do not write anything, we are lost if a user manages to access our PC and open a terminal, since it automatically executes:
ssh root@10.10.0.5It will enter without asking for a password.
If someone gains access to my laptop, yes, they can access PC # 2 without having to enter its password, however, as you say, I am paranoid about security, do you really think that gaining access to my laptop is something so simple? HAHA.
When I always get up, I always lock the screen, otherwise after 30 seconds there is no activity on the laptop's mouse or keyboard, it will still lock 😉
If someone steals your laptop, no matter how much the session is blocked, gaining access to the files is trivial, a matter of 5 minutes with a Linux bootable from USB. And once the files are accessed, as the private key is unprotected, you can use it directly, or better copy it and access any of your servers comfortably from your home. Actually, the process is so fast that you wouldn't even have to know. In 5 minutes you go to the bathroom or whatever, everything can be done.
The safe way is to put a password on the private key, and then use ssh-agent so that it remembers the password for the whole session (just ssh-add). In this way, it would only ask for the password the first time, and in practice you would have a connection without a password 90% of the time, in addition to being protected against theft or intrusions.
Is it trivial to access the files? Have you ever heard of full disk encryption? (luks + cryptsetup)
Yes, of course, if you have the entire disk encrypted it is another story, but 90% of users do not do it because they do not know how to do it and in many cases it does not even compensate them. In contrast, not saving unencrypted passwords or unprotected private keys to disk is something everyone can do, and generally good practice.
Saving unprotected private keys on an encrypted disk is like parking your car with the doors open, but hiring a security guard with a Doberman to protect it. It works, yes, but it is much easier and more efficient to directly lock it.
MMm do not do so much to the blowjob, although they can create a virtual interface, assign an IP and connect with that virtual IP, so even if they remove the key they will not be able to find the machine because the key only works for a certain IP. It also depends on what they want, it works perfectly for me as the comrade describes it, I have a private server in my home I do not need to increase security because it has a VPN configured.
And can all this apply to a windows terminal that has to connect to multiple * NIXs?
I have putty but I can also use Securecrt (now I have it scripted)
In the Windows terminal (cmd) I am convinced that no, it will not be possible there.
However if you use Putty you could try it, it could work.
Greetings and welcome to our site 😀
Putty already accepts the -pw parameter in additional commands. (ex: -pw12345)
In fact, Super Putty is cooler than just plain Putty. (It's a frame for Putty)
So you don't have to be putting it.
Thanks for the post, very useful. It is a bit boring to log in to SSH for everything.
Hello and thank you very much for your visit and comment 🙂
Nothing friend, a pleasure to know that it was helpful ... if we can help you in any other way, we are more than delighted 😉
Greetings and welcome to the site.
I need to connect to a windonws pc from my linux as I do from my terminal
Excellent .. it really inspires to see this type of tutorials, it makes me want to also contribute my already simplified experiences so that the community can take advantage of them. Thank you really from El Salvador.
I am connecting with a machine with ubuntu to one that has debian but it gives me an error in which it cannot authenticate and therefore it asks me for the password .. why will this happen? Will the versions of the ssh-keygen differ or what is happening?
Put here the error that gives you to be able to help you better 😉
Also, you can try putting this in a terminal:
sudo mv $HOME/.ssh/known_hosts /opt/What this does is clean the connections (connection history) SSH that you have had.
And if I wanted to use the same public key for several servers, could I do it, or do I have to create a key for each server that I want to access? I'm going to try it anyway, but on some useless server so as not to ruin something useful.
Gracias y saludos.
As I have made it on my laptop, it is a different key for each server, in fact, I think it is not possible to use the same key for several ... because the ID of each server is unique, like a fingerprint 🙂
regards
Hello lord of the sand. I have been reading keys and found that the pair of keys (public and private) serve the server-client to send and receive challenges and thus identify each other, so it has nothing to do with the password you use to access the server, the latter is used to "paste" the public key in the trusted ones of the server. So you can use it in as many as you want or need.
I don't know if I explained myself, but the joke is that in order to use your key pair on other servers, after having followed your tutorial, you just have to do:
ssh-copy-id other.user@otra.ip
write your password for this other server
And ready.
regards
Hello, thanks for the guide, it was the only one that helped me. Now that I want to do it on another pair of computers I get the following:
$ssh-copy-id -p 4000 lm11@148.218.32.91
Bad port 'umask 077; test -d ~ / .ssh || mkdir ~ / .ssh; cat >> ~ / .ssh / authorized_keys'
Thanks for your help.
I did what you told us, but it keeps asking me for the password. I clarify this connection I am making between two linux red hat servers ... What else could it be?
I already looked at the / etc / ssh / sshd_config
I already restarted both servers
PC2 = linux red hat 6.4
PC2 = linux red hat 5.1
The ssh service must be correctly configured (/ etc / ssh / sshd_config file on PC2) for it to work.
correction…
PC1 = Centos 6.4
PC2 = Red Hat 5.1
Hello colleagues, I have the need to establish a trust relationship between 1 Linux Centos 5.3 server and a Unix Sco5.7 but I have the problem that when doing step 3 of copying the key from Linux to Unix I get the message / usr / bin / ssh-copy-id: ERROR: No identities found, why could it be?
Thank you
I have followed the tutorial step by step. It doesn't give me any error, but in the end when I connect from PC1 to PC2 it keeps asking me for the root password every time I connect.
Does anyone think what it could be?
It seems that after generating the key you have to execute ssh-add so that the authentication agent can use it.
As I delete the access key, it does not recognize anything, I was hacked, help, it does not enter anything
Thank you very much, it worked perfect
Thank you very much for the guide! It is very easy and it comes in handy for when you have your servers out there walking and not having to be entering keys and thus automate things 😀
Thank you.
I was unaware of the use of ssh-copy-id and it has been quite automatic.
The truth is that I was up to the point of writing the password, so what I do is save it with a DEFAULT paraphrase, which is maintained during the session.
I don't mind writing it once every time I turn on the PC, the roll is having to put it every time it disconnects or things like that 😀
SSH No Jutsu!
Hello
good tutorial ... but if I want to pass information ??? how can I do it?
Hello, your contribution is very interesting, but I have a couple of doubts about a similar topic
Hey.
Try the steps above, but when trying to copy the key to server 2 (PC2) it tells me that the command does not exist.
bash:ssh-copy-id:command not found
Can I copy the key manually?
Excellent!! I was looking for an explanation that simple and it worked perfect
thanks!
Excellent contribution.
Thank you very much, it has helped me a lot.
Hi, I wonder if there is a way to do this ssh-copy-id command. Since I install Open ssh for Windows, ssh works for me in DOS but it doesn't have this ssh-copy-id command. I would like to know how to send this public key to the other linux server (linux server). Thanks a lot.
Hi. I need to establish a trust relationship between a linux server and a Windows machine. Install the SSH for Windows and it works for me. But this ssh-copy-id command is not available in this tool.
They know of some other way to do it without using ssh-copy-id.
Thank you very much for your comments.
But the question of this is to be able to connect without a password, if we put a passphrase it would ask us for that pass to connect and it was not the objective of this
It has been very useful to me for my computer fp module, thanks 🙂
Thank you!!!
Some worry about how annoying it may be to have to enter the password (passphrase), for that, as mentioned above, it is «user-Agent» and that I also have it configured with Keepass and its Auto-Type function, so I just I invoke the terminal and with the combination of keys that they have configured ready, I also have "aliases" for each request and everything is very easy.
Good tutorial.
Have a lot of Fun !!
Very good info 🙂 but I have a question ...
I have PC10 which is where I keep the information, the information is sent from pc1 - pc2 - pc3, to PC10, how can I make pc1, pc and pc3 use the same key to access PC10 without a key.
Regards…
How can I list what is in machine1 in the bash of machine2 without going to put ssh ip @ hosts to the bash of machine1. I do not know if I understand xD
10 years have passed since this publication and I keep visiting it whenever I need it. Like some other tutorials on here they have stood the test of time. Thanks and regards!