And now, the juiciest part of this little tutorial.
4. We create our project
We create a directory that contains all the files related to the project. For example, within the HOME of our user we create the folder Hello World.
~ $ mkdir HelloWorld
We enter the newly created folder using the command cd.
~ $ cd HelloWorld /
We create the file of our program «Hello World«. We can use the text editor that we like the most. Now to simplify things simply what we are going to do is execute the following command:
~ / HelloWorld $ echo "print (\" Hello World \ ")"> helloworld.py
In this way it simply creates the file helloworld.py inside the folder Hello World with the instruction that will print the greeting.
We can test our brand new program with the following instruction:
~ / HelloWorld $ python helloworld.py Hello World ~ / HelloWorld $
Thus we have created our first version of the program. Now it's a matter of starting Go for you to check our future releases.
5. We start Git
To start using Go we can configure some of the general options, in the book in the section 1.5 some of these options are detailed. In this case I want to show you how to configure only the options for the local repository.
~ / HelloWorld $ git config --local user.name lecovi ~ / HelloWorld $ git config --local user.email colomboleandro@bitson.com.ar ~ / HelloWorld $ git config --local core.editor vim
With these options I am defining that my username for this project is «lecovi«, That my email for this project is«colomboleandro@bitson.com.ar»And that the default editor I want to use when I run c is vim.
The advantage of using Go is that it runs locally in the work directory of our project. That is why we have to initialize it in the project directory with the command init.
~ / HelloWorld $ git init Initialized empty Git repository in /home/leo/HolaWorld/.git/ ~ / HelloWorld $
Now we are going to create the file .gitignore what will you say to Go what files and directories you don't have to follow. For more information you can consult the book. In this case we are going to tell you to ignore the same file .gitignore and all files ending with .pyc.
~ / HelloWorld $ echo .gitignore >> .gitignore ~ / HelloWorld $ echo * .pyc >> .gitignore
6. Adding files
Now we have to add the files (in this case we only have one file the helloworld.py, but I think you get the idea, right?). Using the command add we will tell it to add all the contents of the directory (except what we have written in the file .gitignore).
~ / HelloWorld $ git add.
7. Creating our version
Once we have configured Go and added all the files that we wanted to have controlled by our version control system we have to do the famous c.
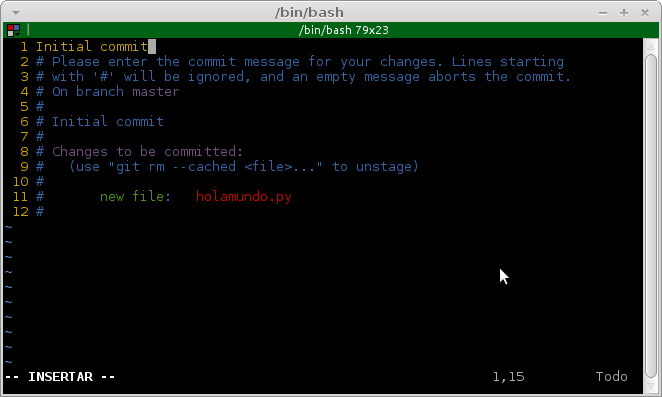
With this instruction we will be establishing a point in our development history. For the first case it is usual to do a c with the description «initial commit«. I usually omit the state staged and I just run the command c with the option -a.
~ / HelloWorld $ git commit -a
This will open the editor that we have set by default, in my case vim, and we can write the detail of the c. In this case, I am simply going to write the aforementioned. Once we save the file with the editor, Go will take care of doing the c.
8. Adding a remote repository
Now is the time to tell our Go local that has a remote repository. At book We have described the procedure to create the repository in GitHub. In this section we are going to use what we left pending in section 3 of the previous post.
To add the remote repository we have to use the command git remote add where a name or alias is passed to the repository and its URL as an argument. In this case we are going to use the one from the project you create in Google Code.
~ / HelloWorld $ git remote add gc https://code.google.com/p/lecovi-hello-world/
Now finally to upload our local repository to the remote one we execute the command push.
~ / HelloWorld $ git push gc master
As in section 3 we had created the file .netrc it will use the parameters that are stored in that file to connect to the server. And the branch will rise master to the repository that we save as gc.

On the page of our project Google Code, we can see in the section Source in section Browse the content of our project.
Soon…
So far we have completed the tutorial on how to start a project with Go y Google Code.
In the next and last installment of this mini-tutorial we will be reviewing how to make changes in our project and that they are reflected in our version control system.
Regards!
why do you add the .gitignore file to the .gitignore?
It doesn't make sense: P, that file should also go in the repository.
Regards!
You're right, it doesn't make much sense to do it. It was simply as an example to see how it works and be exemplified. It is that I had not put many files and did not want to complicate it too much!
Thank you for your clarification.
Hug!
Excellent series! I congratulate you!
Hug! Paul.
Great Pablo, a great pleasure to participate!