It seems that I have done a lot of praying and it is that until today I do not put a millimeter of settings. As I have been promising for a while today I will tear apart my xmonad.hs that I prepared especially for this occasion. This and other configuration files are in the Paste, specifically the colors of the console, window settings y the top bar.
You can download them from there and open them in your favorite text editor.
Before
In case you were wondering, my desktop was a small Openbox on Debian stable. Skipping the distribution installation process for the moment, you should verify that the necessary packages are in the repositories. Let's do this (remembering that I'm on Debian):
sudo aptitude install ghc xmonad xmobar gmrun dmenu
And ready. We just installed, in order of appearance; the Glasgow Haskell Compiler, which is in charge of compiling and interpreting Haskell; XMonad, the window manager, XMobar is a bar that presents information about the system and some program launchers, dmenu and gmrun; that kindly already come configured so that XMonad launches them with Mod + P and Mod + Shift + P.
And this is what my desktop looked like. I put it so that we have a point of comparison and emulate some of the things that I already had configured in a more minimalist environment.

But surprise. XMonad welcomes us like this. In the capture I have already opened gmrun, to show that it is not broken:
And we want it to look like this, already configured and everything:
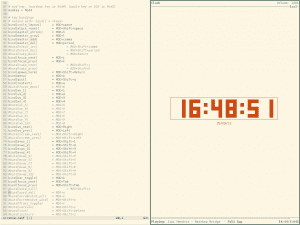
The screenshot shows a terminal running ncmpcpp, an MPD client for the terminal; and a GVim session, both with the colors of the palette SolarizedLight. Getting this was not really difficult and even Vim and urxvt were already ready on my system.
The xmonad.hs, how scary!
Not at all. The configuration you are about to see is extremely simple and basic. It should work on all systems with XMonad 0.9.1, even though 0.10 is already available. Well, be afraid, very afraid:
- Xmonad configuration - As you can see, it is quite simple import XMonad import XMonad.Util.EZConfig import XMonad.Util.Run wrk = ["A", "C", "G", "T"] main = do xmproc <- spawnPipe "xmobar" spawn "nitrogen --restore" spawn "urxvtd" spawn "mpd" spawn "xfce4-volumed" xmonad $ defaultConfig {modMask = mod4Mask, terminal = "urxvtc", borderWidth = 2, normalBorderColor = "# fdf6e3 ", focusedBorderColor =" # 002b26 ", workspaces = wrk}` additionalKeys` [((mod4Mask, xK_v), spawn "gvim"), ((mod4Mask, xK_c), spawn "mpc toggle"), ((mod4Mask, xK_a) , spawn "mpc prev"), ((mod4Mask, xK_s), spawn "mpc next")] - End of configuration. Simple, easy and clean.
What happened here?
If they already recovered from the scare, we can see that our configuration barely reaches 30 lines of code. I will explain part by part, why if you copied and pasted this, XMonad will compile the program we just wrote. Ready?
The dependencies section
Near the beginning of the file there are three lines that start with the keyword import. As in other programming languages, it sends the compiler to find the module it wants and it gives it the functions of the lucky module. Let's see it again:
import XMonad import XMonad.Util.EZConfig import XMonad.Util.Run
Our program uses three dependencies. The first brings us the XMonad functions, the second and third will help us later to define keyboard shortcuts and to run programs. Let's keep going.
Variables
That thing is wrk and what is it for? Let's appreciate the code more closely:
wrk = ["A", "C", "G", "T"]
wrk is a variable, which is equivalent to a list of four elements, all strings; because Haskell lists only accept one item type. If you're wondering why I chose those four letters for my desktops, I remembered the four nucleic bases of DNA.
The name is just an abbreviation, and we could put it myWorkspaces, pepitoRojo or whatever, as long as it starts with lowercase and we specify it in the next section.
Here begins the good thing about having a complete programming language at our disposal, because we could define the color of the window from a variable:
windowColor = "#FFFFFF"
Or even create a function that returns a color with respect to our mood:
moodColor m | m == "Sad" = "# b0c4f6" - Something like blue | m == "Angry" = "# ba3f3f" - Something like red | m == "Happy" = "# 8bff7e" --Something like green | otherwise = "#FFFFFF" - White, for neutral days
And much more. Do you already feel the power on your fingers? One thing. If you don't understand what happened, think that this is a Haskell's own structure that we call guard and it's basically like an if-then-else tree, but more organized and pretty. And don't worry, the code was written by me and it works fine.
The main section
From the line that says main = do we started to specify the behavior of XMonad. Let's see it calmly.
Kicking things off at the beginning
This can be achieved in many ways, but to stay short of dependencies and make code cleaner, albeit clearly more caveman, I opted for this:
xmproc <- spawnPipe "xmobar" spawn "nitrogen --restore" spawn "urxvtd" spawn "mpd" spawn "xfce4-volumed"
The first line starts the XMobar, whose configuration file we will see later.
Then we started some essential things for me, a nice wallpaper (the same as the one in the first screenshot), a demon that makes urxvt run like the wind, the demon of mpd -which plays my music from the beginning and I never close - and a volume control. Yeah, that's it. The syntax is the same if you want to start what you need.
Final adjustments
Here we define some things that are usually just personal preferences. For example, I like to use the normally useless Super key (effectively the windows one) instead of Alt, but that's my preference. If you want to go back to Super, remove the first line.
- ... xmonad $ defaultConfig {modMask = mod4Mask, terminal = "urxvtc", borderWidth = 2, normalBorderColor = "# fdf6e3", focusedBorderColor = "# 002b26", workspaces = wrk} - ...
Then we define our terminal, urxvtc, because that's what we call a client of the demon that we ran earlier. Other things, like the list of workspaces, that we could have put in things like:
, workspaces = ["H", "O", "L", "A"], workspaces = ["A", "R", "C", "H", "L", "I", "N "," U "," X "], workspaces = [" 1: web "," 2: music "," 3: unused space "," 4: Ufff "]
And other things that Haskell's string list processing allows us to do.
The thickness of the border is just a whole number and if we want to change the color of the window focused by the function moodColor that we just created, because we leave the variable like this:
--..., focusedBorderColor = moodColor "Happy" - ...
The $ on the line xmonad ... it is only an application of right associative functions, that is, we save a few parentheses. 😀
Keyboard shortcuts
At the end of the file we have a list of tuples that contain some shortcuts, in this case, they launch GVim, pause or play the music, and advance or delay it. That's it. The additionalKeys function comes in the second module we import and the back accents make it execute in the style of the div (/) function like 1/2 and not div 1 2, making it easier to read. So it is:
- ...} `additionalKeys` [((mod4Mask, xK_v), spawn" gvim "), ((mod4Mask, xK_c), spawn" mpc toggle "), ((mod4Mask, xK_a), spawn" mpc prev ") , ((mod4Mask, xK_s), spawn "mpc next")]
The .xmobarrc
Config {font = "- * - monospace-9 - * - * - * - * - * - * - * - * - * - *", bgColor = "# fdf6e3", fgColor = "# 657b83", position = Top , lowerOnStart = False, commands = [Run Com "echo" ["$ USER"] "username" 864000, Run Com "hostname" ["-s"] "hostname" 864000, Run Com "mpc current" [""] "mpd" 10, Run Date "% a% b% d" "date" 36000, Run Date "% H:% M" "time" 10, Run StdinReader], sepChar = "'", alignSep = "} {" , template = "'username' @ 'hostname'} {'mpd' | 'date' - 'time'"
This should work, and it actually does. The syntax is a bit more complex and it is best to analyze it yourself to understand it. So I will just limit myself to telling you that we are describing the commands, their options and some extra settings, which will be shown in XMobar.
The template line has all the action and I came up with a trick to show the song I'm listening to. This trick and the one to change the song for keyboard shortcuts require mpc, an mpd client executable from the terminal.
Conclusions
That's it, I think. We already went through the main XMonad file and started learning Haskell whether we like it or not. If you want to continue there is a very good guide to start with.
In the next installment we will explore non-programmable managers, specifically Spectrwm / Scrotwm. See you.
!Fantastic!
Spectrwm next time? !Yes sir!
Very good guide, it looks very interesting, I'm wanting to take a look, even though I'm more than comfortable with my Openbox.
Oops, I missed specifying where these files go, but when I edit the post, it sends me an error message:
Fatal error: Call to undefined function get_header () in /home/desdelin/public_html/blog/wp-content/themes/dlinux/index.php on line
If someone can edit it, they go like this:
Main configuration file: ~ / .xmonad / xmonad.hs
Xmobarrc file: ~ / .xmobarrc
Console configuration file: ~ / .Xdefaults
😀
I can't seem to edit my own posts. I can't find the option anywhere on the desktop either. I have a couple of bugs, that's it, minimal fixes.
Well, I find it super interesting since it is more productive when it comes to programming. I want to mess with Awesome because I really want to learn LUA.
It exists for those of us who program in Python Qtile, but the truth is that I can't make it run, I'm using Ubuntu and I installed it via PPA and also from sources but the unfortunate thing doesn't want to work xD
Anyway LUA is something that I MUST learn and nothing better than seeing each other's faces with these types of tiles.
Keep it up anti, you are on your way to becoming an Author within DesdeLinux
And yes, I'm in college and in this shit they don't have Linux xD
Thanks nano. But, can you help me with editing the articles after they are published? I can not.
Yes, calm down, leave them as they fit better than I fix them
Thanks anti, I will definitely give XMonad a try. I see that it uses basic Haskell stuff without the need for a lot of complexity like the guards, the application operator and obviously the use of lists (otherwise it wouldn't be Haskell xD).
Let's see how it looks! 🙂
I've been using a tiling windows manager for a long time, Awesome. When I have time I will make a tutorial in which I hope to explain the whole process, from installing awesome to configuring a set of lightweight programs and creating our own theme.
If it seems good to you, when I have it I can let you know so that you can publish it here.
By the way and with your permission, I do a bit of advertising on my small website, if you want you can take a look, in case you are interested in any publication:
http://niferniware.sytes.net
A greeting!
If it's Awesome 3 I'm definitely interested in it.
One detail, the section of the web where I have hosted the blog is:
http://niferniware.sytes.net/blog/
I am sorry about the mistake.
A cheer!
I really liked your blog… ^^
Thank you very much Elav, we are in contact!
The truth is that in a way DesdeLinux It prompted me to create my own blog. So much time using Linux makes one consider contributing something in return ^^
A greeting!
"If you're wondering why I chose those four letters for my desks, I remembered the four nucleic bases of DNA."
Sweet, +1
Well, I really like the idea of putting DNA on my desks.
Excellent guide, thanks to her I am just trying xmonad, and I can only say one thing about it, I fell in love with xmonad, I still do not put my hand on it and still it seems excellent, thank you very much
Excellent, we hope to see your progress turned into a post! =)
A little observation to the tutor, at the moment I use Debian stable (Squeeze), and to install the dmenu, it is not done with an aptitude install dmenu, but with the suckless-tools package, otherwise, excellent tutorial
The same aptitude fixes it. Also the order is better understood like this.
This guide assumes you have x's installed.
In my case, I start from a debian console only, with which I had to install xorg. It would be fine, since what we are looking for is a minimalist environment, starting from a debian without graphical environments, installing xmonad in simple mode and adding tools and console programs, such as mutt, irssi, etc.
Yes, the Xs were already on. The post itself explains that I started with a minimal Debian already made with Openbox.