So we continue. In the previous delivery we ripped up an xmonad.hs file and got rid of the idea of Haskell as an alien language. Today we are going to see something simpler, Spectrwm; formerly known as Scrotwm. For the purposes of this article, we're going to call it Scrotwm because I'm on stable Debian and the package hasn't been renamed yet. Anyway, it is a regular installation.
sudo aptitude install scrotwm dmenu conky
What do we want conky for? Dmenu again? We will use them later, you will see.
Basics
There really isn't much to explain, because when running scrotwm as a session we find a bar at the top edge of the screen and a solid color as the background. Alt + P will launch dmenu, as always, but with the peculiarity that now the colors of the dmenu correspond to those of our status bar.
This happens because we don't just launch dmenu, but rather launch a somewhat more complex command specified in the Scrotwm configuration file: ~ / .scrotwm.conf (this changes in future versions to ~ / .spectrwm.conf). The order goes like this:
dmenu_run -fn $ bar_font -nb $ bar_color -nf $ bar_font_color -sb $ bar_border -sf $ bar_color
The words marked with a $ are nothing more than variables of a sh script, and are configured in the same file. I recommend not touching this part because once the colors are configured, it integrates quite well.
Setting up
The configuration file is very simple and well commented. It should work for everyone, but let's make a few modifications:
- We will change the Mod key for the Super key, giving good use to the exclusive flag of the keyboard
- We will change the colors of the windows
- We will add a few quirks to handle special windows
- A few keyboard shortcuts.
- We will face the shortcomings of Scrotwm
So we will almost do the same as in the previous article.
Face to face with the file
You have to open the file ~ / .scrotwm.conf but for that you have to create it first. If you were moving XMonad (I hope so) from the configurations that I provided before, you will have seen that when they make a mistake XMonad keeps the last valid previous configurations and sends you a nice -depends on how you see it- error message telling you what you did wrong. In Scrotwm there is not that and it will take again the global configuration written in the file /etc/scrotwm.conf. A simple copy and paste is enough:
cp /etc/scrotwm.conf ~ / .scrotwm.conf
It seems that you don't have to change the user, but it can be done with a common chown:
chown here-goes-your-username ~ / .scrotwm.conf
We find this line:
modkey = Mod1
and we leave it in Mod4, to assign it to our new favorite key. First task performed.
Colours
In the previous chapter, I chose the SolarizedLight palette because it suited my attempt at a brown, eye-friendly desk. But that palette already bored me and it was time to change it. Since I wanted something blue, I took Vivify for a spin and came across the Doorhinge schematic although I could either use SolarizedDark or asmdev, also available there. The file in question is here.
Scrotwm has a somewhat strange method of defining color. You have to write it separating the red, green and blue components, as in these lines:
color_focus		= rgb:80/c9/ff
color_unfocus		= rgb:0b/10/22
bar_border[1]		= rgb:80/c9/ff
bar_color[1]		= rgb:0b/10/22
bar_font_color[1]	= rgb:ff/ff/ff
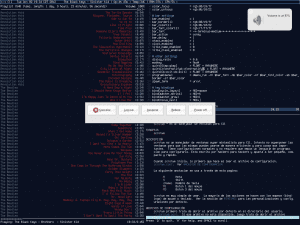
These are the colors I chose for the windows based on the doorhinge color scheme. We can notice two things. First, here are the variables that the dmenu command used a while ago. And the second is that we will get some edges without focus that will make multiple terminals appear as one. Something like that:

To convert our traditional values (like the strings from the previous article), we just cut it into three pieces and put the values between the bars. And here is not the function moodColor we did with a little Haskell last time.
Second task completed.
Quirks, or whatever that means
It is inevitable to keep comparing Scrotwm with XMonad. The project page itself tells us that it is inspired by ideas from it and from DWM. Before we did not put any special configuration with the windows, because XMonad handles them by default quite well. Scrotwm has the quirks to fix tiling problems in some applications like Gimp. We go to almost the end of the file and find the quirks section. We uncomment this line:
#quirk [Gimp: gimp] = FLOAT + ANYWHERE
How good work of Hercules, things start to get complicated. Did you already notice that Scrotwm tiled notifications too? It is a bit more difficult to solve this. To start we need to run the following command:
xprop | grep WM_CLASS
Our little arrow will mutate into a kind of pointer and we click on the notifications window. In the terminal it will be something like this:
WM_CLASS (STRING) = "xfce4-notifyd", "Xfce4-notifyd"
We ignore the first part of the command's output and invert the results to write this:
quirk [Xfce4-notifyd: xfce4-notifyd] = FLOAT + ANYWHERE
quirk [Cb-exit: cb-exit] = FLOAT + ANYWHERE
Third task completed. Now these programs should look like this:
Shortcuts
We are almost done. I'll put the same shortcuts as the previous time:
program [gvim] = gvim bind [gvim] = MOD + v program [mpd-p] = mpc toggle bind [mpd-p] = MOD + c program [mpd-n] = mpc next bind [mpd-n] = MOD + s program [mpd-b] = mpc prev bind [mpd-b] = MOD + a
The syntax is pretty simple. Fourth task completed.
The startup problem
We come to the awkward moment today. Scrtowm is great, but it can't handle something like a automatic start. There is a way to solve it. The file ~ / .xinitrc we put this:
nitrogen --restore & xfce4-volumed & mpd & exec scrotwm
And now, although it will only work if we start from startx or with slim, which uses it. There is a problem here and it is that in Debian stable neither slim nor gdm respect this, so it doesn't really work. It should work on ArchLinux and any other distribution vanilla than Debian.
If this works, we should have finished the last of our tasks.
And what was conky for then?
Well, to put a few more things on the status bar. Copy this to your ~ / .conkyrc file. The configuration file that I give you is already configured for this. Requires mpd.
out_to_x no out_to_console yes update_interval 1.0 total_run_times 0 use_spacer none TEXT $ {mpd_artist} - $ {mpd_title} | Up: $ {uptime_short} | Temp: $ {acpitemp} C | RAM: $ memperc% | CPU: $ {cpu}% |
And that's it. Conky's settings are much easier to play with than xmobar's. In the previous screenshots you can see how it works.
Conclusions
Scrotwm is a great product. Before complaining about its deficiencies, we must remember that it is developing. At least I stayed with him on this machine. I think it's the end of this series, because from now on you can do it yourself. By the way, the config file is here.
I would like to try this wm, what is the base from which you start?
I would like to start from a debian without a graphical environment, I understand that I would only need to install xorg and then I could continue with what you said. Is the font seen in the screenshots defined in the configuration file?
Indeed, the font is defined in the configuration file. It's Terminus and it installs automatically with the package. I changed the source of GVim and terminal to fit, because it looks pretty good.
I also started with minimal Debian, but when I did the installation I put Openbox on it, and I just switched to Scrotwm. Installing xorg was no problem for me.
Master anti, as you already have us used to… ^^
Thanks elav. 😀
By the way, I recently discovered i3 (http://i3wm.org/) and I find it excellent. I just wanted to recommend it for how intuitive and accessible to newbies.
What can be achieved seems extraordinary to me. thanks for all the work behind this post.
Very very good tutorial. If I hadn't already settled on KDE SC / Awesome I would surely install it.
+1
I'm not the only one who reads Scroto right? no? yes? :OK:
That was one of the reasons the name was changed to Spectwm. There were people who didn't like it and they made forks and everything, but if you look for the package, for example in Arch; it already comes out as spectrwm.
Thanks a lot!! With this tutorial and the Arch wiki I was able to configure it well. Look how it turned out ^^
http://i.minus.com/iVwrtZ0BXuCYd.png
I'm glad it served you 🙂