Given the little information we can count on when we make the decision to enter the Slackware world, I have decided to write a series of articles that explain at least the basic notions to work properly on this wonderful distribution.
As some may know, the first installment was about the post named, Slackware 14: Taking Down the Monster, where I briefly share my experiences and impressions of Slack.
Below is a detailed installation guide, which aims to support the easy process of carrying Slackware to our team.
To obtain Slackware go to your Official site, this guide is based on the DVD version.
Home
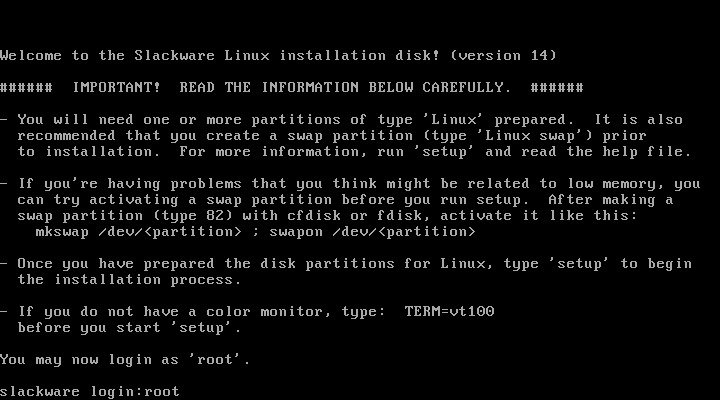
When we start up our computer we will find the first screen, obviously the welcome one, where it also requests parameters for the kernel configuration if we wish, for the purpose of this guide we will limit ourselves to pressing "Enter" without adding any extra data.

If you want to specify the keyboard distribution to use during the installation process type "1" to access the configuration menu

We chose the option "Qwerty / es.map"

We test the keyboard if we want to
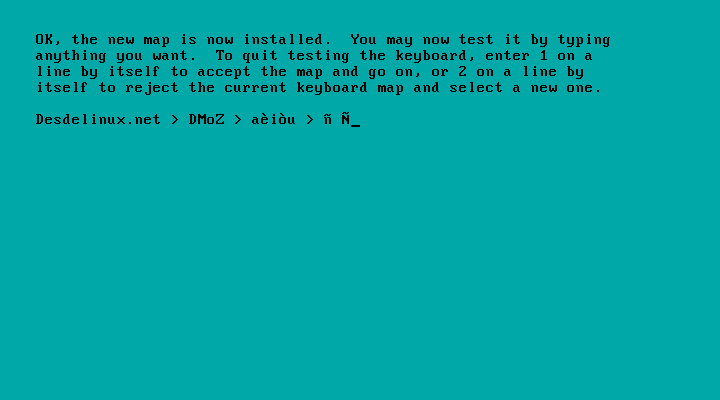
To abandon we press "Enter" after "1" y «Enter» again

We log in as "Root"
CREATING PARTITIONS
Must create the partitions of the disk where we will carry out the installation, for the purposes of this guide we will only create two, the root partition (/) and swap partition.
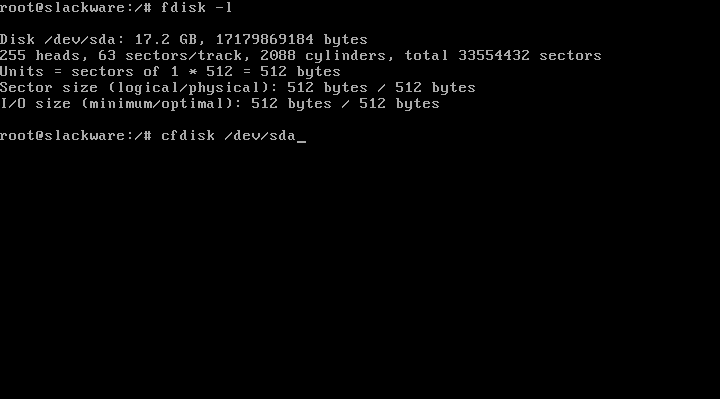
First we check the disks installed in our system by typing "Fdisk -l"
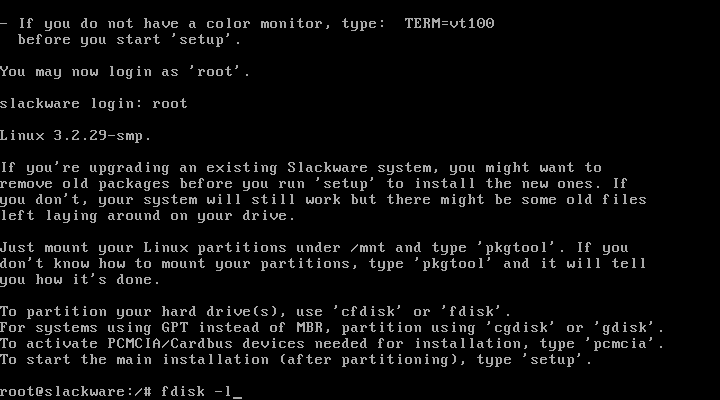
We will get a result like this

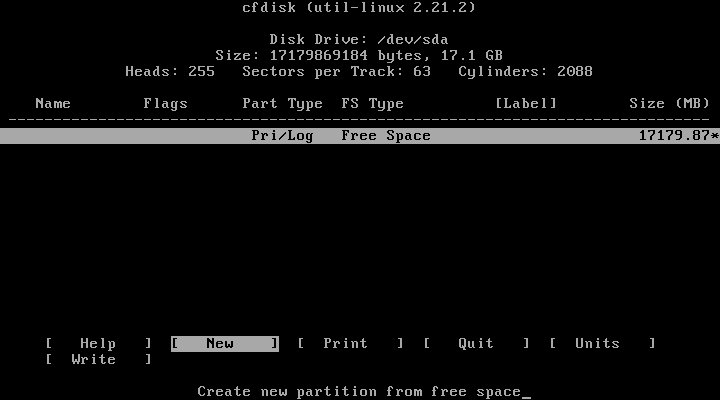
Once our disk is located, we start the partitioning process by typing "Cfdisk / dev / sda", thus accessing the interface cfdisk
First we will create the swap partition, for this we select the option [new]
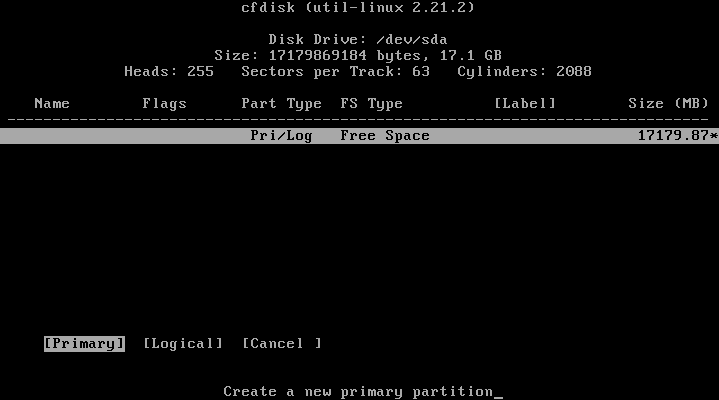
Then we select the option [Primary]
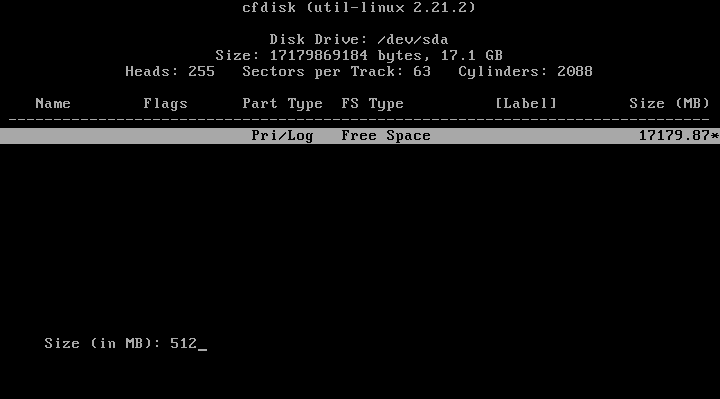
We choose the size what we want for our swap, in my case "512"
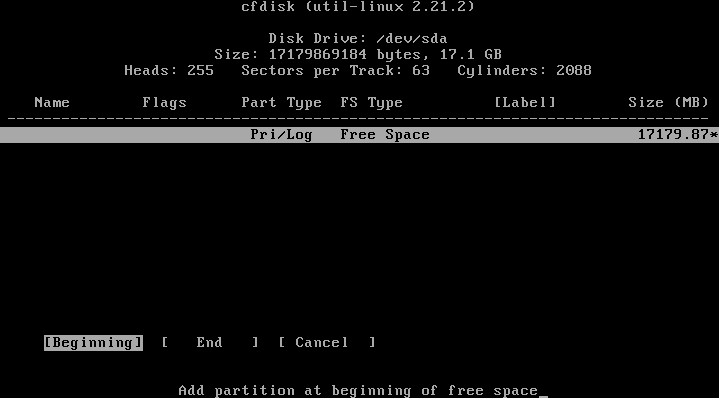
Now we must decide the swap position in the partition tree, in my case I will select the option [beginning]
We select the type of partition using the option [Kind]
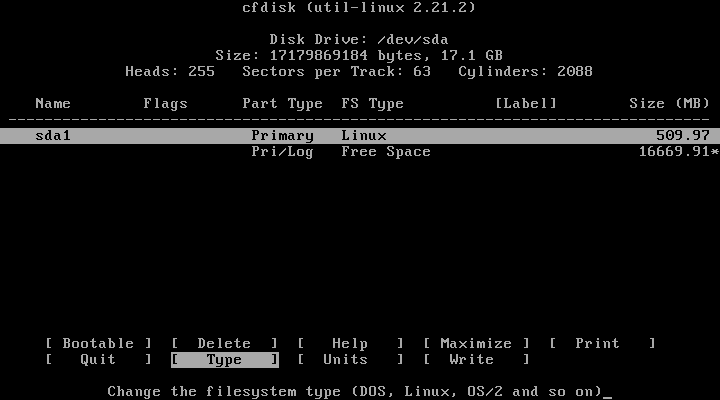
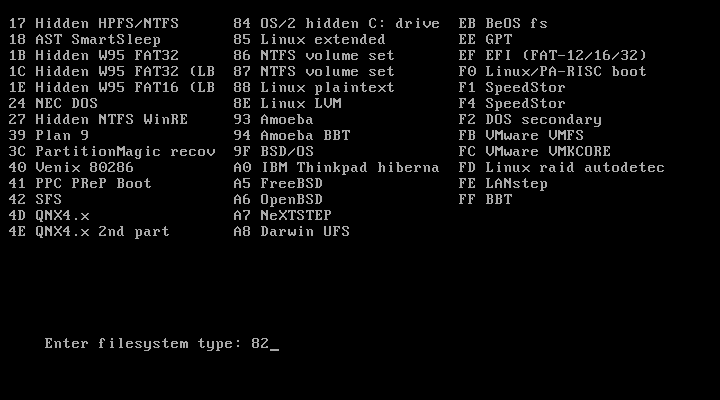
We indicate that it will be a type partition "Linux swap", for this we press "Enter"
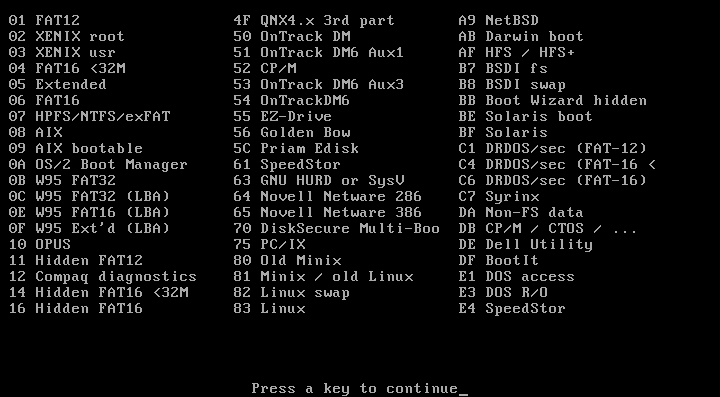
We type "82"
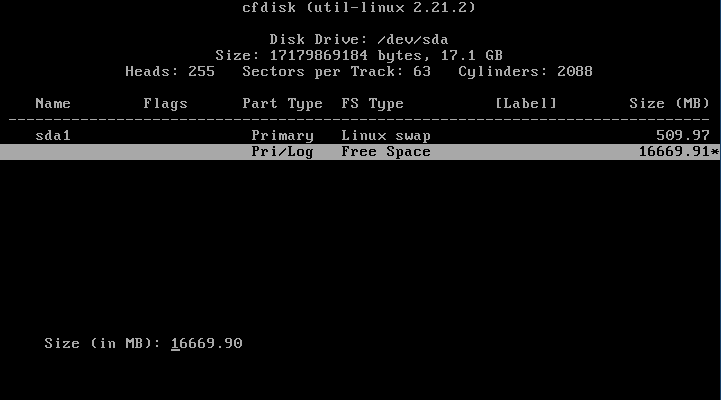
Time to create the root partition (/).
Select the option [new]
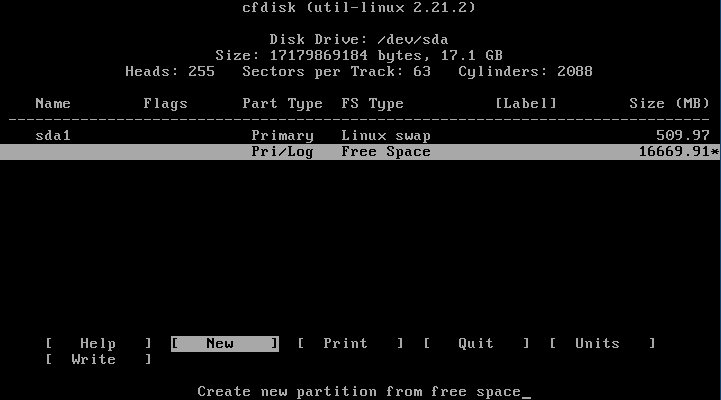
We will create a primary partition so we select the option [Primary]

We allocate the rest of the disk space, so we just press "Enter"
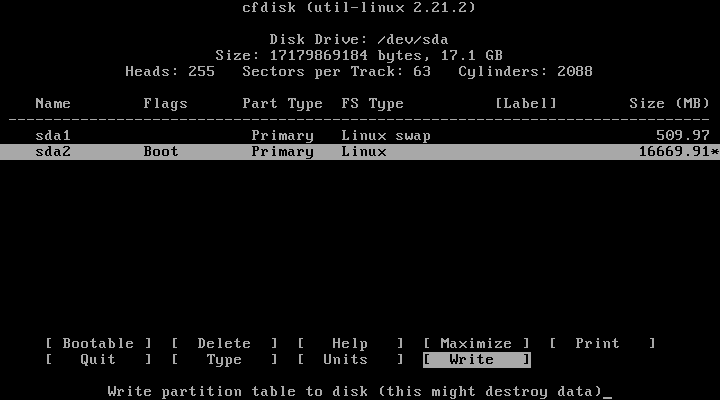
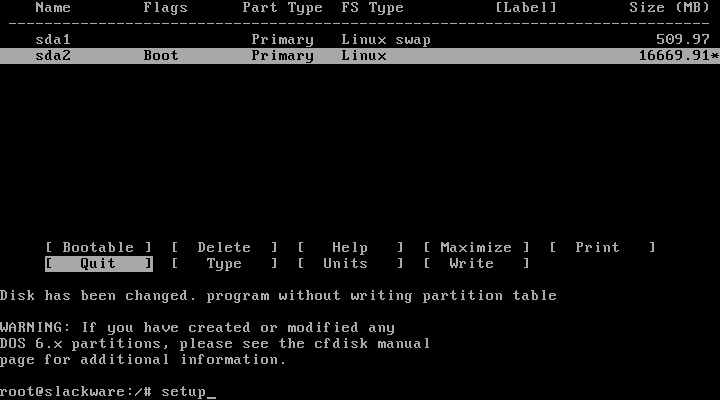
We mark the new partition as Boot selecting the option [bootable], we will notice that the section "Flags" will be marked as "Boot"

We save the changes made to our partition table by selecting the option [write]
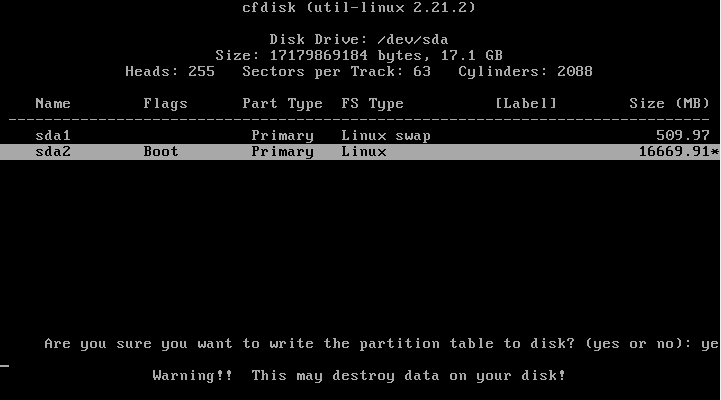
It asks us if we are sure, we type "And it is"
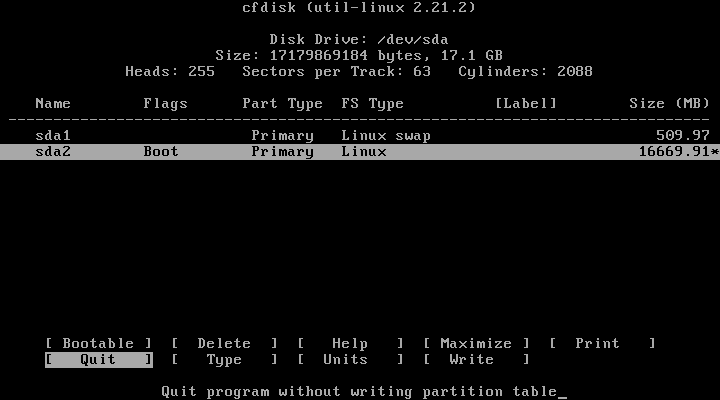
Our partitioning work has concluded, therefore we select the option [quit] to exit the screen cfdisk and return to our console where we will continue with the installation process.
CONFIGURING THE INSTALLATION
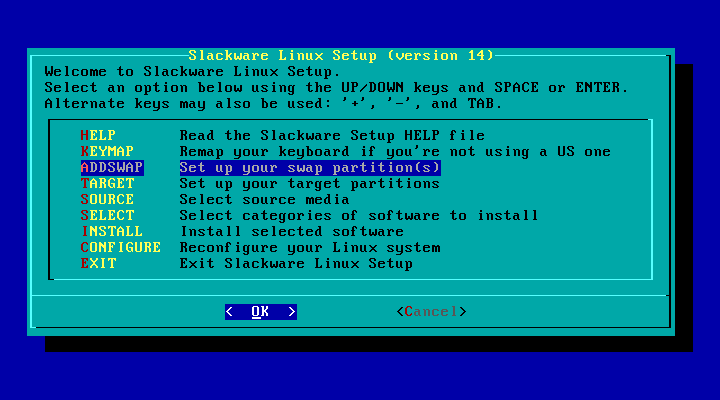
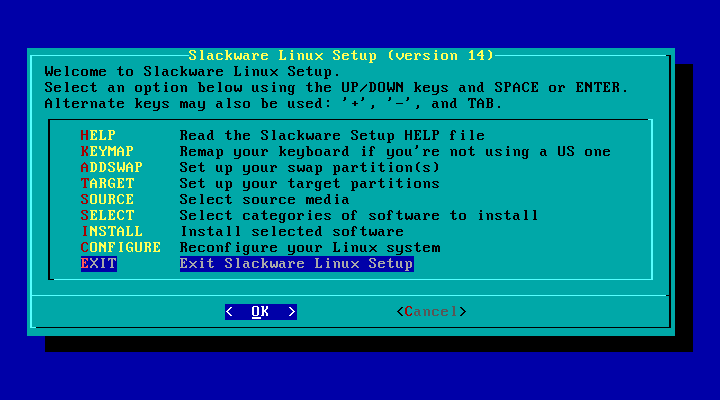
To access the configuration screen, type Setup
A list of options to configure will be displayed where the actual installation process will take place

The first thing we will do around here is activate swap partition previously created, we select the option "ADDSWAP"
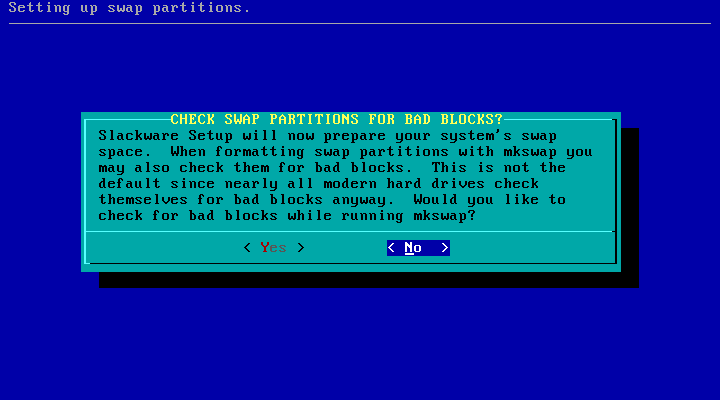
As we have already created it, it will automatically detect it, <OK> to continue

Ask if we want to check our partition for damage, as it is not necessary in the case we select <No>
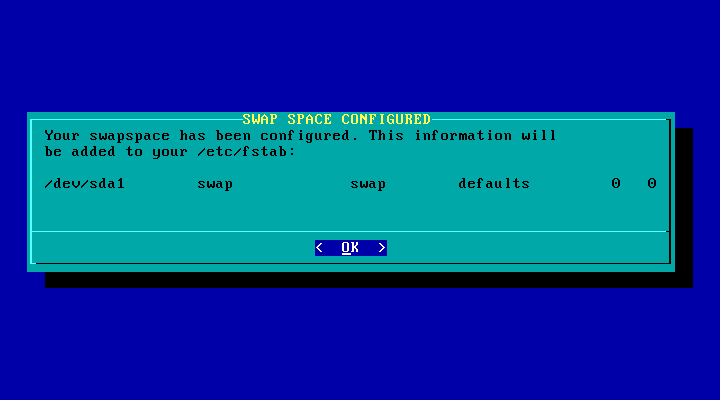
A screen will be displayed confirming that the operation was successful and that the partition was added to the fstab, <OK> to continue
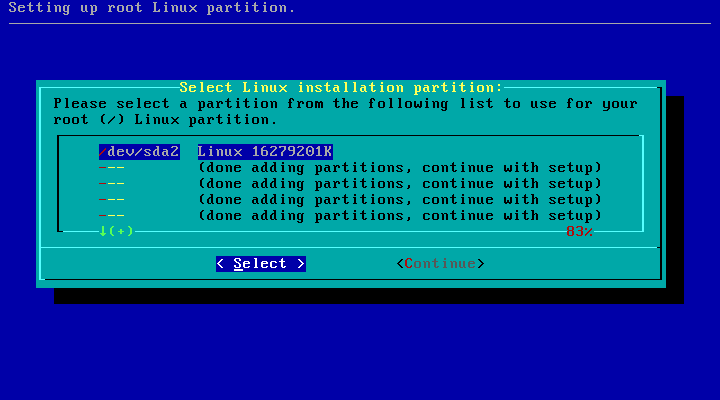
"TARGET"
Now it's the turn of select the partition root (/) which is the other partition that we create using cfdiskWe chose <Select>
select "Format" to assign a filesystem to the partition root (/)
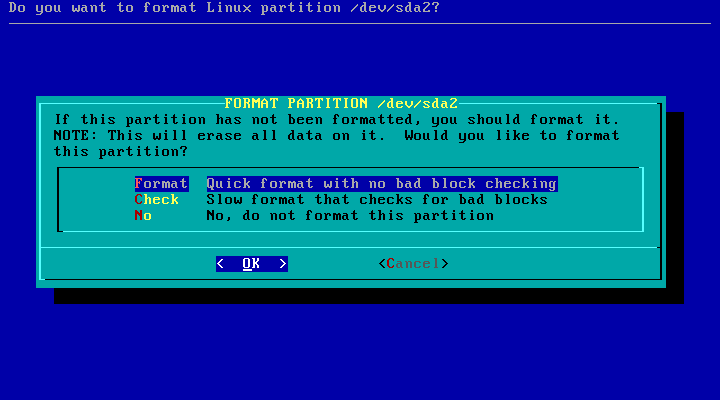
In my case I will select "Ext4"

The formatting process will start
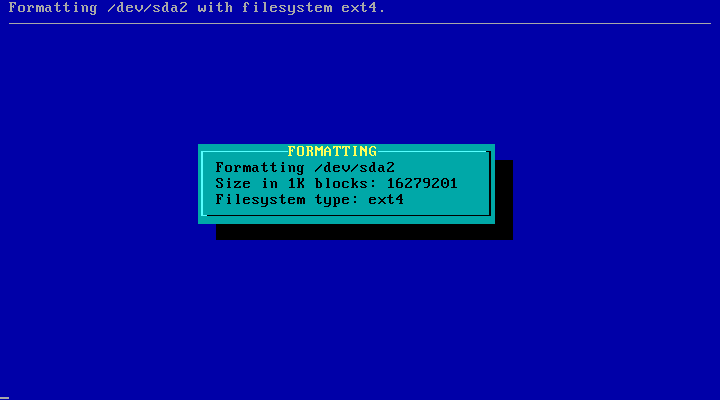
Once finished, it will show us a confirmation screen indicating that the partition was added to the fstab, <OK> to continue

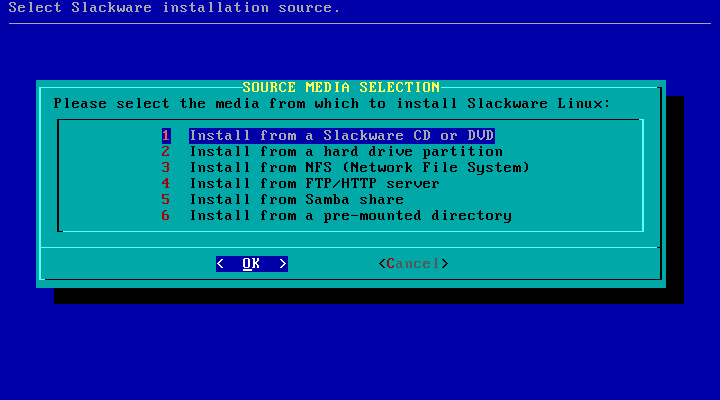
"SOURCE"
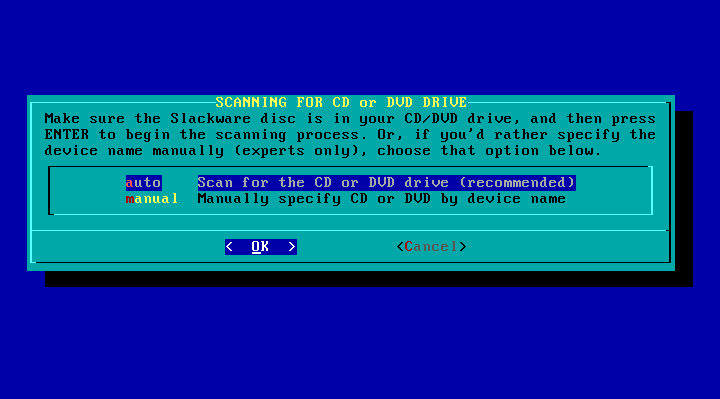
It asks us where we will get the packages to install, for the purpose of this guide we will choose the option "Install from a Slackware CD or DVD"
He asks us if we want automatically search for installation media (CD / DVD) or if we want specify it manually, in our case we select "car"
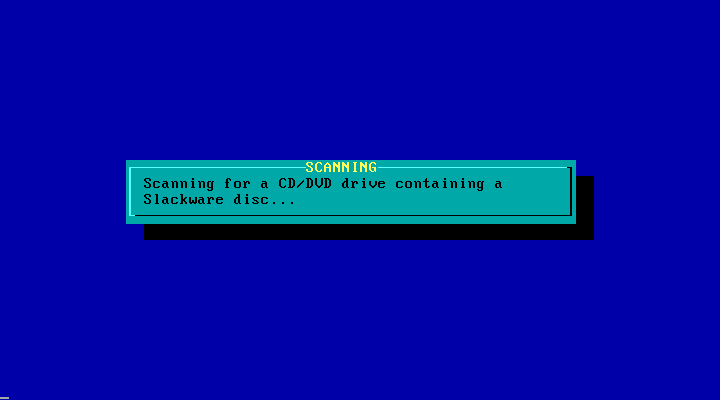
The scanning process is done
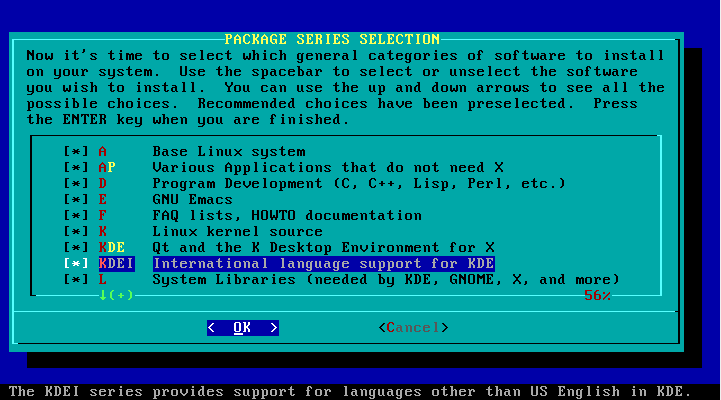
"SELECT"
Now we must select the packages that will be installed, it is necessary to select the option "KDEI International language support for KDE"For this we position ourselves on it and press the space bar, this will provide support for our language in KDE.
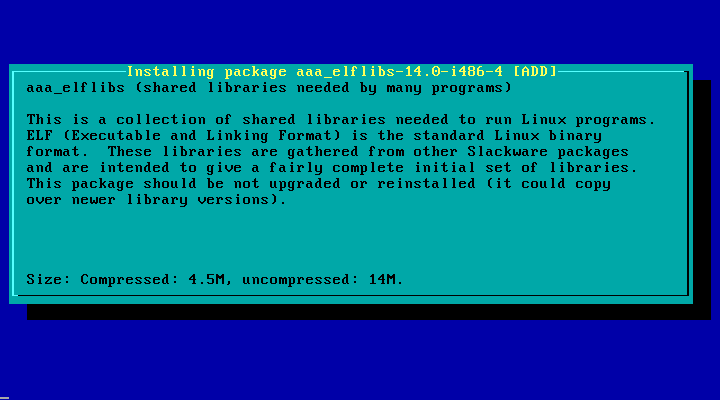
"INSTALL"
Now we are asked to let's choose between seven possible installation methods, you can explore the options but for the purposes of this guide we will choose the option "Full"

Esto will start the installation process of the packages that we have previously selected. This is the point where they will prepare a good coffee ...
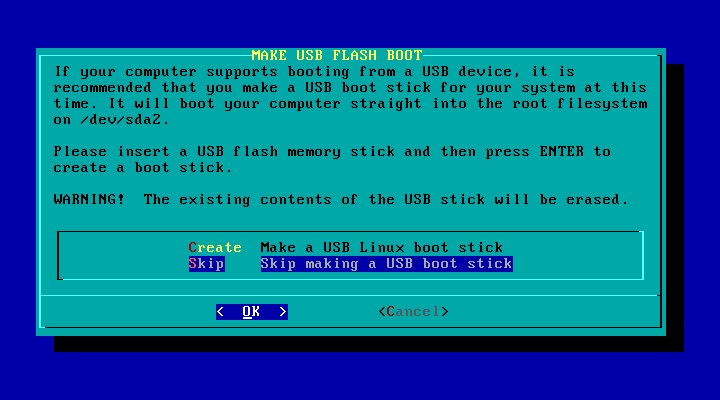
Once the installation process is complete, it will ask us if we want to create a bootable USB, for the purposes of this guide we will not do it, therefore we select the option "Skip"
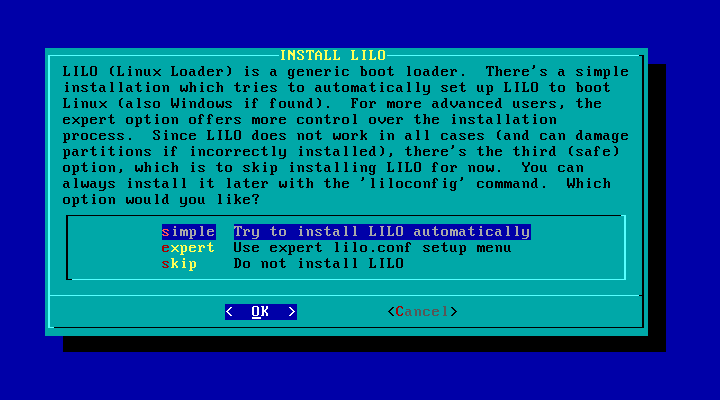
"CONFIGURE"
We define how we want to carry out the LILO installation, in our case we will use the option "simple"
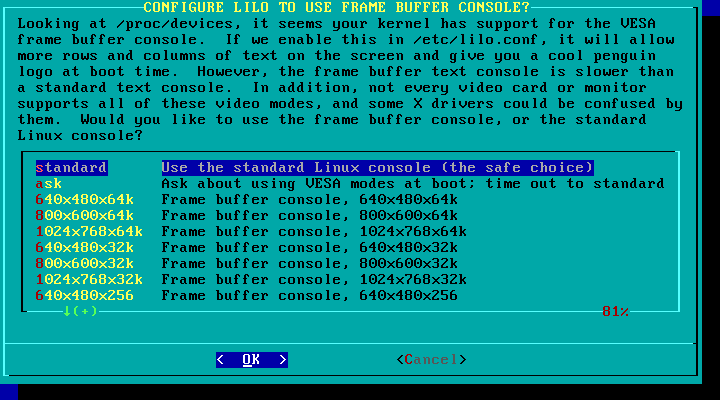
We choose the screen resolution where it will be presented LILO FABRICIf we do not know what it is or it is not in the list, we choose the option "Standard"
We add parameters for the kernel, in my case I will not use, <OK> to continue

Ask if we want include support UTF-8 in our console, we select <Yes>

We choose where we want to place LILO FABRIC, for this case we select the option "MBR"

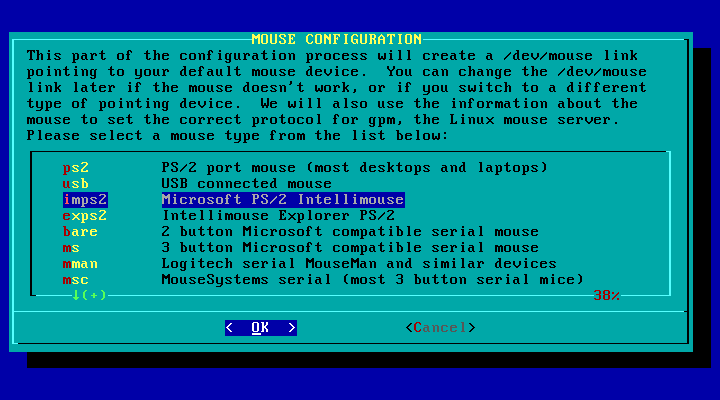
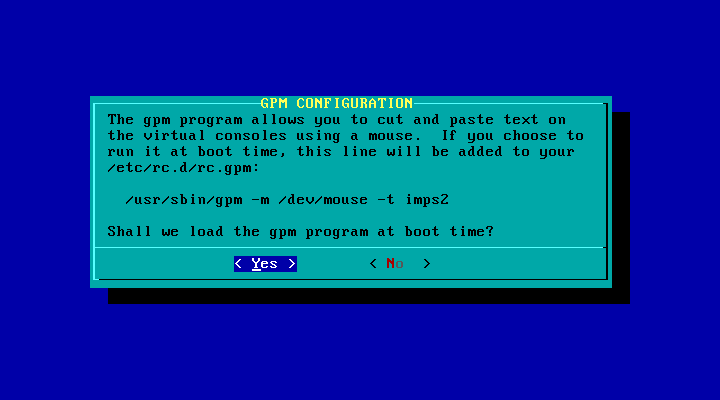
We select the driver that we want to use for our mouse, in most cases "Imps2" is the option that will work
It asks us if we want to use our mouse for console actions such as copy and paste, to confirm we select <Yes>
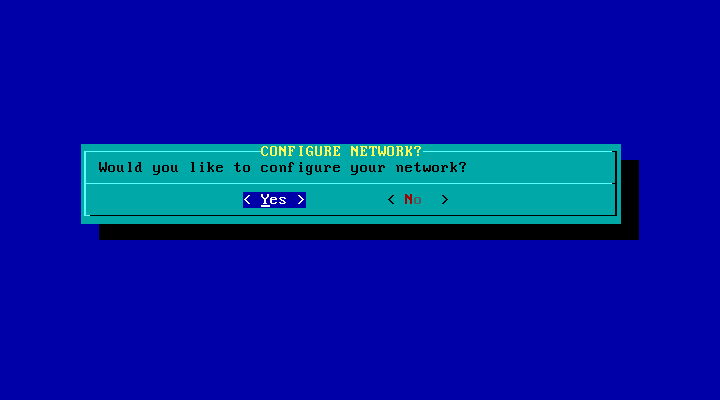
It asks if we want to carry out the network configuration, we select <Yes>
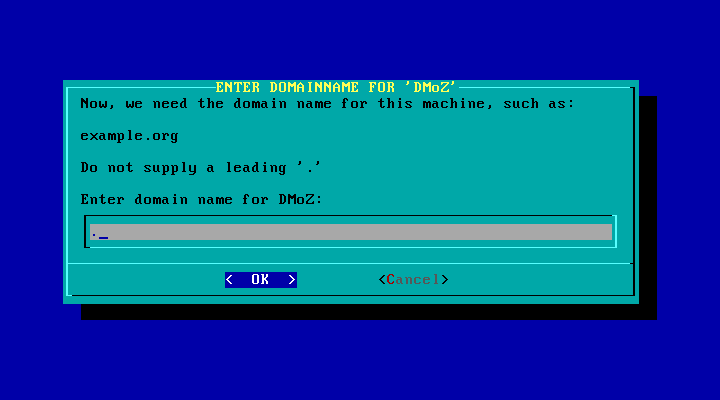
We add the name for our Host

Request the domain name, we type "." to skip
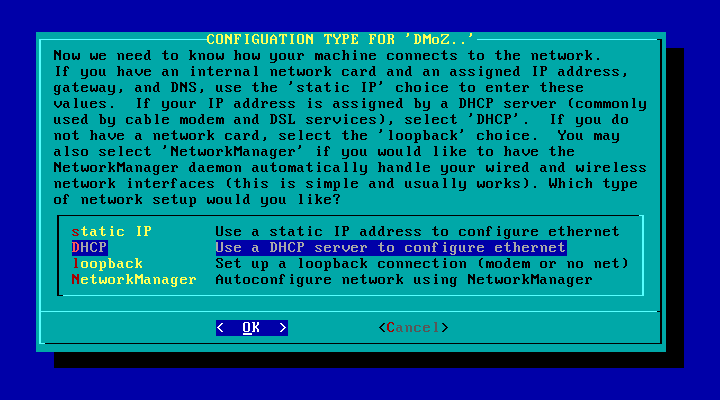
We choose the way we will get our IP, in most cases it will be for "DHCP"
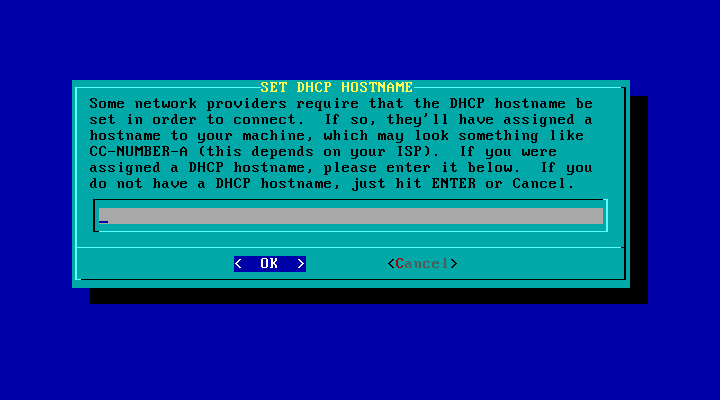
In some cases providers use names for their DHCP services, although in most cases this does not happen. <OK> to continue
The confirmation screen about the network configuration that we have provided appears, if everything is correct we select <Yes>

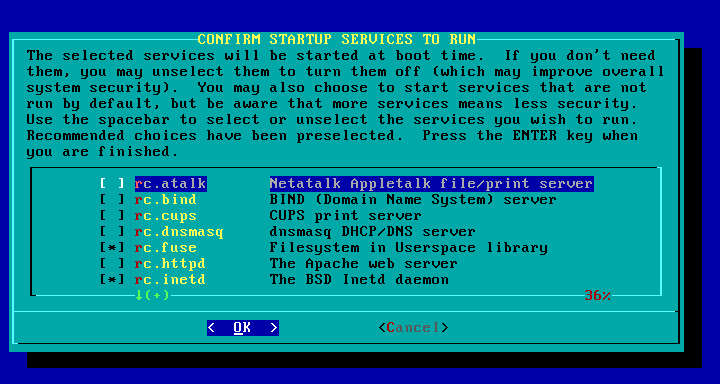
We select the services that will be executed when starting our equipment if it is the case, <OK> to continue
It asks if we want to configure the sources for the console, in our case we select <No>

We configure the clock, to do it properly we select "NOT"

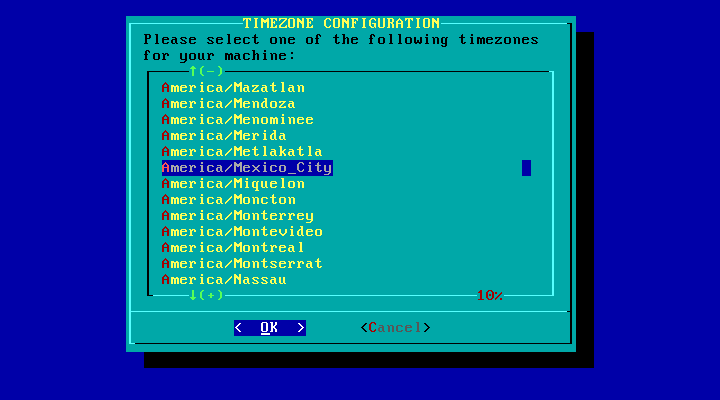
We choose our time zone, in my case "America / Mexico_City"
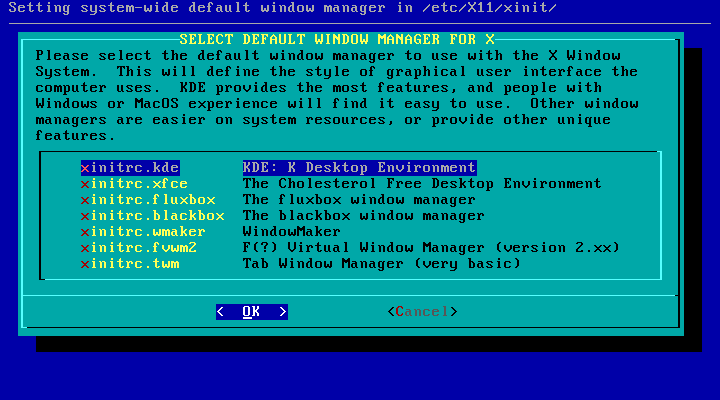
We choose the desktop environment What do we want to use in my case? KDE, therefore we select "Xinitrc.kde"
It warns us that the user ROOT does not have a password and asks us if we want to add one, we select <Yes>
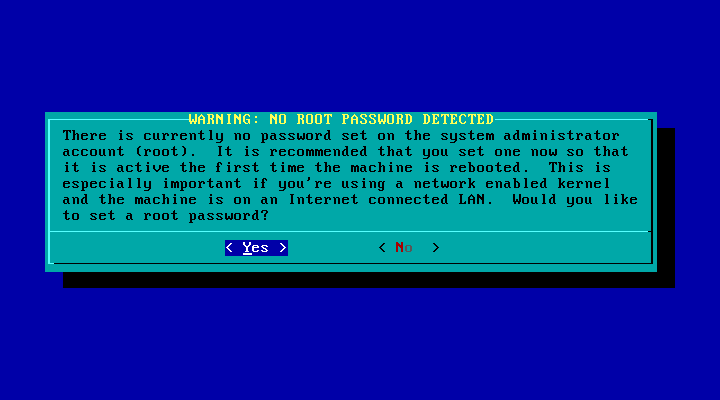
We add the password, press «Enter» to continue

We finished with the installation process and we are shown a confirmation screen, <OK> to continue
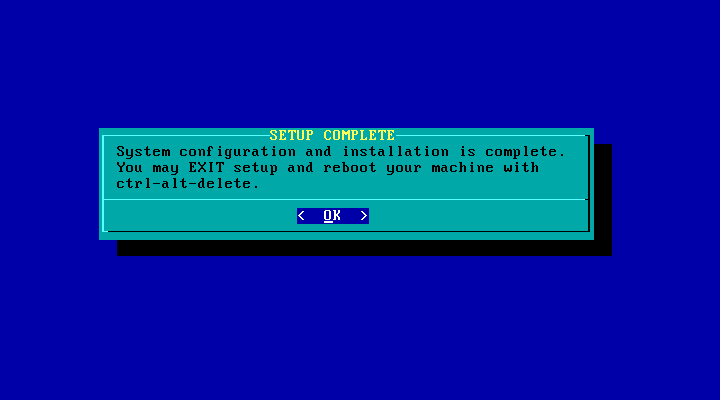
We return to the screen where I start the configuration process, we select "EXIT" to get out of setup
We restart our team by typing "Reboot"

Once restarted we will find the screen of LILO FABRIC
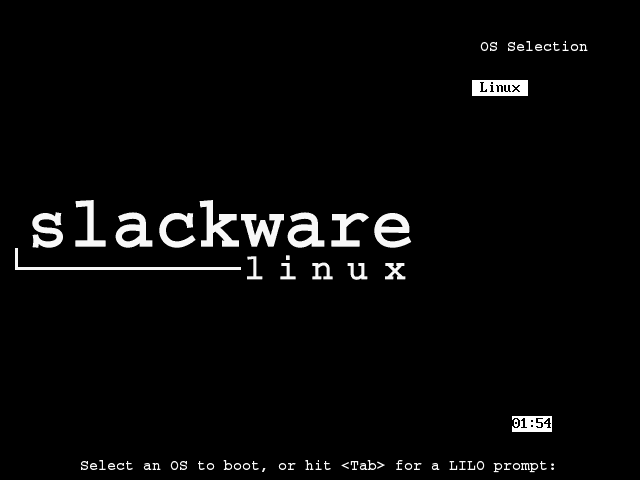
When we finish loading we will arrive at the command line where we will type "Startx" to access the graphical environment

Ready !!! We already have our Slackware installed and working.

This is the Slackware installation processAs you can see, it is quite simple and great knowledge is not necessary to carry it out.
Great, piece of article !!! 😀
Thanks elav !!! ...
I hope it is useful, as I mentioned, it was quite an odyssey to write it xD ...
But be satisfied with the result = D ...
Cheers !!! ...
Congratulations! Excellent tutor.
It's rare to see fellow Slackers, Cheers!
Hello, sorry, if it is not the way. But I would like to know, if you can tell me, the way (if there is one) to save the post, like this one, that I like.
Thanks, and I clarify that I am new here. Cheers!
I was the first to ask for a guide, and I'm the first to say thank you too. But I have two concerns, the first, it is more efficient to install Slack with two or three partitions adding (/ home) to it or it is indifferent, the second, to enable the graphical environment it is not easier to edit the inittab file.
Great contribution.
There is no reason =) ...
It is always recommended to create an additional partition for / home, but as I mentioned, this is only a guide and not a definitive process ...
Sure, it is necessary to edit the inittab, but that is material from the following article, which by the way, does not take long to appear on the blog ...
Cheers !!! ...
Slackware: a system for real males ... It looks difficult, but clearly, with a little patience and reading the tutorial well and researching well, you can reach an installation without problems, once I tried in VMWare, I remember that it cost me a lot because when starting the live dvd and doing a test installation, but after a couple of days, voilé!
Excellent tutorial, very well explained, especially for those of us who are more than just windows when installing !!
Greetings.
Precisely the previous text and this same one, aim to dispel the clouds of mystery that surround this distribution, the installation process is quite simple, take screenshots at each step to avoid doubts, however, once you start the process you realize that the number of screens is not proportional to the amount of time you invest in the installation ...
Cheers !!! ...
Are you saying that by using Debian I am not male? xDDD
Editorial: If you feel so macho, go for LFS xDDD
My last attempt with LFS was with Suse… I'm still reinstalling !! hahaha !!!
I'm still a little girl with Windows on the block, for MY PERSONAL LIKE Debian is too Taliban, although I admit that it has saved me many times, especially with those ASUS EEEPC, with 512 ram and a 2GB SSD, I installed Debian Squezze and Lxde as a desk and voila, 20 computers ready for a school, thanks to a private donation.
Regards!!
Thank you very much for this excellent guide!
What recommendations should be taken into account for users who have another distro installed and GRUB as a boot loader, and want to have Slack as well? For example Ubuntu with Grub2.
Should we put «skip» when installing LILO so as not to delete grub from the MBR, and then from Ubuntu «sudo update-grub2»?
Greetings.
There is no reason =) ...
Exactly, it's a matter of skipping the LILO installation by selecting the "skip" option instead of "simple" or "expert" and then configuring your GRUB ...
Cheers !!! ...
It's the best Slackware installation manual I've ever seen!
Cheers(:
= D Thank you for your comment ...
I really hope it is useful ...
Cheers !!! ...
Excellent guide. It strikes me to see that it still installs almost the same as when I installed it for the first time about 15 years ago. No time passes by slackware. It is the longest-lived and is still fighting.
Let's see if with this people are encouraged to install it. It is no more difficult than arch.
Thank you !!! ...
In fact, the installation process is very similar to the previous versions, usually the improvements of the evolution of the tools are added ...
Neither the installation process nor the configuration process are more complicated than in Arch, in fact, they are much simpler =) ...
Cheers !!! ...
For those of us who are not Linux experts, I include myself, this guide is great, I just needed it a few months ago when I made the leap from Ubuntu, Debian and now to Slackware, since precisely the tutorials in our language are scarce, I congratulate you From this moment you will be a must-read for those who want to try slackware. I recommend printing it, using a laptop or PC at the time of installation in case you want to consult a video and support the installation, and in my case a coffee pot.
Thank you !!! ...
One of my main motivations for deciding to write about Slackware, is precisely the lack of information in our language, I hope as time goes by adding tips or other guides on this disc.
In fact I am working (among other things xD), in a PDF version that will be ready to be downloaded, I also hope to be able to achieve a video tutorial of the installation process.
Cheers !!! ...
excellent article! Congratulations!! Excellent installation guide, to see when it finishes downloading my iso by torrent (11 hours says …… xD)
I had already read the slack guide, and it didn't seem like anything to write home about, what's more, it's easier than arch without the AIF: D. ( And i mean it)
Something I notice is that the guide is based on KDE as a desktop, but I imagine it is easy to change the parameters (just to point out)
I have a doubt that persists me, the packages in slack are more recent than those of debian?
Thank you !!! ...
That is why it is advisable to leave the torrent at night and maybe in the morning you will be able to collect the fruits xD ...
Actually the installation process is quite simple, great knowledge is not necessary, and I believe that by following this guide to the letter there is no loss ...
Yes, this guide is for KDE, however, it is enough to select the appropriate packages during the installation and then specify the desktop or WM that we want to use ...
Regarding your question, I would not know how to answer it because I am not very aware of Debian, but if you choose the current branch you will have very current packages, also, you can always upgrade the packages already installed ...
Cheers !!! ...
Thank you very much for answering!! See that your guide infected me and impulsively I started to download the iso, to test it on an empty hard drive that I have, thank you very much DMoZ ^^
Slackware, install by "foul" kde 4.8.5, which in debian is in testing, if you want to get newer packages in slackware you would have to follow these steps like me.
http://www.espaciolinux.com/foros/documentacion/instalar-kde-slackware-t50851.html
@helena_ryuu Gnome for example was discarded from Slackware as far as I understood it, but I'm not sure whether or not it is included in version 14 ... In any case there are third-party alternatives to install a particular desktop environment disk, such as this one: Dropline
Excuse the double post ... I wanted to say: To install that particular writing environment there are alternatives like Dropline: http://www.droplinegnome.net/
The good thing is that it is a DVD, and the bad thing at least I have not been able to download so many MB :(, better use the minimal install
Either Gentoo or Slackware
Good tutorial I really like LILO and it is not seen very much in other distributions as a default.
About Gentoo that was discussed in the other post (compile time) use openbox or xfce with a TWM, it is much faster to install than Gnome 3 or KDE.
Oh master, from today on, I'll light a candle XD. Excellent this guide, I've been waiting for 3 days, I guess this is the reward of waiting. Testing in Virtual. Thank you very much for a guide like this. Also the best existing environment.
The guide is very much appreciated ^ _ ^ in your first article I was very tempted to try slackware since, like many perhaps, I consider this distro as difficult but when I read the Distrowatch information a bit the only thing I did not like is that It is not that it is not rolling release, otherwise it is tempting to try it ... I will add it to my favorites and we will see when I dare to try it in a virtual lol
Thank you !!! ...
Give it a chance even if it's not Rolling Release, I come from Arch and I really like it a lot, but once I start with Slack I have absolutely thought about staying =)…
Cheers !!! ...
Hello friend, excellent, I have a question, in the network configuration if it is WiFi, how do I configure it, the connection comes from another house, please I am missing that detail.
Excellent tutor, I will keep it as it is quite useful. You know from what I see the installation process has not changed much since the last time I installed it on my PC was from version 7 (it was the first Linux distro I used).
Thanks for this info and I'll install it later to remind you of old times. Regards.
Hehehe, it sure was the first that existed XD.
Slackware has existed since 1995 and the first time I used it was since 1999 with version 4.0, you had to download a lot of 3.5 ″ floppy disks of 1.44MB capacity. It was quite an odyssey believe me but it was worth it. The super equipment in which I put it was a 486DX4 (the last of the series) and then a 200 Mhz Toshiba Pentium II MMX laptop and of course the laptop only had a floppy drive since the CD was incredibly expensive. Then I don't know why Patrick (maintainer and creator of the distro) jumped to 7 (5 and 6 did not exist) and updated it.
Looking at the tutor, I notice that the process has remained practically intact, that is to say the same and that says a lot about the fidelity that Patrick maintains with his idea of the distro (a linux with a unix flavor, my personal opinion of course).
At that time there were several linux distros that no longer exist, such as caldera and others that were also and that remain as debian (which was in version 2.1 slink, Suse linux (today opensuse) was in version 6.3. Arch was released in 2002 with homer 0.1 but I never installed it, I thought it was more complicated than Slackware (funny not? since it is the distro I currently use).
Anyway, it is a distro to which I have a special affection since it was the first one I used and I learned a lot with it.
I like that many people have identified with these Slackware posts, since it is a distribution that many people "pulled" for GNU / Linux. Long live Slack !!!
You know, as something anecdotal, I still have the equipment where I installed it.
A short time ago I started exploring LINUX and with FEDORA 17 but then I have been reading that there are many distro so much that I already decided to download ubuntu, open suse, sabayon but FEDORA 17 I liked it more. But looking at that tutorial I am thinking of downloading the ISO and testing it. and didn't even know it existed. I'm curious. although I am used to installing through graphic windows and all that but seeing this tutorial I will try. I like to try new things and more in computing. even if you don't have that much computer knowledge.
Thanks for the tutorial
Fedora FTW! Of course, RPM's mother… Although some say he's just the RedHat guinea pig, I'd rather be a guinea pig than pay for RHT's "super cheap" licenses. I respect the desktop, the change to GNOME 3 was a bit abrupt, but I think that with 3 versions (and the beta of F18 comes out in a week) they already have experience, at least GNOME Shell is fine for me (yes, without drivers owners or lags), better than KDE. 😛
great guide, I was going to install it this weekend with a guide that I found, but I couldn't, because when you start when you have to press enter I got the error: «This kernel requires the following features not present on the CPU:
pae
Unable to boot - please use a kernel appropriate for your CPU. »
both on the PC and in the virtual machine
In the case of VirtualBox, Configuration -> System -> Processor -> Enable PAE / NX
So at least you can try it. Regards.
Exactly, that damn option brought me a lot of headaches until I realized that I had to activate it to install systems that require a PAE extension like Ubuntu ... 😛
thanks!! I'll see
Wow !! Excellent installation guide !! 🙂
Excellent friend guide, very timely to help eradicate the fears and myths that exist around this type of distribution.
Thank you very much.
Great article! It is really appreciated, because surely it is good for a lot to be encouraged to try this distribution, which is not talked about as much as others.
A greeting.
Applause!!! Very good article .. Excellent I would say. Maybe one day I'll get on with it.
In the mouse configuration part, if my mouse is usb, do I use the usb option?
It is not really necessary, the Kernel alone has great support, you can perform the installation as marked in the guide and your USB mouse will still work ...
Cheers !!! ...
Excellent tutorial.
For a moment I thought you would use fdisk to create the partitions.
The idea was to make the guide as simple as possible so I omitted the use of fdisk xD ...
Cheers !!! ...
Good guide! The only thing, do not automatically enter graphic mode ... in this one they say how: http://archninfa.blogspot.com.es/2012/11/guia-de-instalacion-slackware-140.html
That section was deliberately omitted and is included in the next post in the series that is now available on the blog as well ...
https://blog.desdelinux.net/que-hacer-despues-de-instalar-slackware-14/
Cheers !!! ...
it's great
question: do you have one from Gentoo? and Does Gentoo have a graphical environment or is there a distribution?
If you answer me, you help me a lot
There is a very complete installation guide in the Gentoo documentation ...
http://www.gentoo.org/doc/es/handbook/handbook-x86.xml
Gentoo installation is done through the console, once you install the base system you can add the desktop environment or the WM that you like the most ...
Sabayon is a distribution based on Gentoo but much more friendly to the common user ...
Cheers !!! ...
At first I had no knowledge about the OS under LINUX then in google I found the information and I was surprised to see that there is FEDORA, UBUNTU, OPENSUSE, DEBIAN, etc. I told myself why so many. As I was used to windows and I was saying it will be that fedora is the most up-to-date or will it be that first it was Fedora, then Ubuntu, opensuse I mean something like windows 95, 98 2000, XP, Vista, 7, and now windows 8
After reading more I realized that it is not like windows and each of these distros are releasing versions every six months some others longer ...
But now I am surprised to know that there are more LINUX distro little known to say so or that they are little spoken. since the ones I mentioned initially are the ones with the most information on the internet. but the one mentioned here in this post which is Slackware makes me want to download the ISO and try it.
As looking for information about LINUX I have subscribed to other blog and one of these days I got a post how to install another distro called ZORIN OS 6, that is, version 6 and I am also surprised by how many OS there are. They say that this Distro Zorin is recommended for those of us who are new to windows. in my case I have FEDORA 17 and I have already learned all that about yum or how to install programs. the basics but compared to the beginning that was more lost.
I'm going to lower the ISO of ZORIN 6 which in 32 bits is about 1.4gb and 1.5gb for 64bits
What strikes me that they have a "paid" version or saying it in another way that it is the correct one is a donation and is between 10 and 15 euros plus shipping. According to the ultimate version it brings many options such as games, accounting programs for small accounting. I just haven't downloaded it to see what that little accounting program looks like. here they say they offer technical support.
I would like if it is possible if someone has installed this Zorin distro to make the comment how stable it is.
I leave the link to Zorin's page
http://zorin-os.com/index.html
and to download the free version is http://zorin-os.com/free.html
and for those who want to donate and have technical support http://zorin-os.com/premium.html
… Welcome to the family! It looks interesting. I also use Fedora 17, but not only yum exists, therefore the utility you use to install programs is the one that each distro uses. Just say.
Little known Slackware !? Okay, it is "little known" among Windows users, in the GNU / Linux world Slackware is something like God (if God existed, of course).
Slackware and Debian are the patriarchs of GNU / Linux, all other distros came much later 🙂
"Ready !!! We already have our Slackware up and running. »
It seems that NetworkManager was not working at all o_O
If Slack has a wiki in Spanish you should add this post there 😉
Surely it is because you need to give NM execution permissions, try doing this as root:
chmod + x /etc/rc.d/rc.networkmanager
Cheers !!! ...
Deluxe!
An excellent guide has helped me a lot, would you give me permission to reproduce it? It happens that with some friends we are encouraging the use of Linux and its different distributions, greetings !!.
You can use it later, just remember if it is possible to give piglets to desdelinux.net
Cheers !!! ...
Thank you very much, and I will give credit to desdelinux.net thanks!!
The guide was a resounding success, I think it was released at the exact moment, as well as what to do after installation. I believe that those who start and those who are experienced, a fan is opened on the traditional distros, it only remains for me to congratulate you for this great effort. Cheers
Thank you !!! ...
Yes, given the sometimes elusive information about Slackware is that many decide not to continue, I hope with this series of writings to annoy that trend, for the moment I have not been able to complete the rest of the articles that I have thought about Slack, but in when the stars align they will be available around here ...
Cheers !!! ...
Congratulations on the guide, visual and easy to follow.
I have never been encouraged by this distro because I do not see it very intuitive in its use and I do not know how easy or difficult to install the applications and how extensive their repos are. The truth is that my idea of an operating system is something that makes working with the computer as easy as possible, I think that with slakware I would have to compile more than one application and I don't see that as productive.
I think it is one of the best distros for the famous stability of slakware but with debian testing I also have stability and it is rare to have to compile something, so its use is quite bearable which is the question that remains with Slakware.
I would like to try it on a virtual machine thanks to your work, I'll see.
It is actually a very mythologized distro, as I have already mentioned, I work on some articles that explain the different ways of installing (handling) packages, and they are really simple ...
I am a Computer Systems Engineer, and believe me that of all the tools I need, so far I have not had to compile anything manually, I have done everything through the available tools and without any frights ...
Currently I have XFCE installed as a desktop environment and everything is going great, from now on I will also write something about it with my configurations and themes used in the process ...
As always, I hope the guide is useful and really cheers you up ...
Cheers !!! ...
Hello, thank you very much for patiently preparing the guide. You know ... I copied the procedures for a 'test' in a virtual machine and when configuring this little memory (and I have little) and also because it is virtual (here comes the matter!) UNELECT everything related to the KDE desktop and leave Xfce. Do you know what the result was? I did not appear at any time the option to choose a xinitrc.xfce as your guide shows it. So I started the newly installed system but without a graphical environment and I have nothing from Xfce. Use a 32 bit version 14 CD image.
If you know or want to solve this in your guide, I'll tell you about it. I think there will be several that happen for not wanting to select what KDE refers to. Now I'm still looking to see how I put the xfce with its package manager (something I never use) and repos. Greetings and thank you very much.
PS: I also think that maybe there you have to select the installation packages manually if you do this, and not leave it by default (the step in question carries the announcement to install all the software from DVD). But the installation takes too long to test it right now… .hehe
Just to thank the contribution, hoping to grow this blog to serve as a guide for all those who are starting in the Linux world, and of course, wish everyone an excellent and profitable 2013.
PS Installing Slackware 14 in VirtualBox on a Macbook =) looks nice.
Thank you very much all of ten !!!. But I can't connect to the internet
I recommend that you post your problem more fully in the forum (http://foro.desdelinux.net/viewforum.php?id=4), there we can better help you with the solution to your problem ...
Cheers !!! ...
A question, do not laugh, but how do I install together with windows? what happens is that my wife has a cyber and I want to install it on one of her computers without altering its "windows". I mean, in the LILO step what do I do? or how do I do it, thanks, I've been using linux for a while but I'm still a novice, you know Ubuntu, Joli OS, Puppy and all that but I want to take another step.
How about Josue?
Nobody laughs at anyone here, we are all here to help ...
On the web there are many tutorials on how to carry out this process, even on YouTube you can find video tutorials.
I recommend you visit the forum (http://foro.desdelinux.net/) where we will gladly answer your questions widely, as it is the right place to do it.
Cheers !!! ...
excellent tutorial !!
Thank you, it worked great for me =)
Excellent post DMoZ a few weeks ago x11tete11x encouraged me to install Gentoo and I did it in Vbox, it works very well despite being limited in memory, now I'm going to give Slackware one more chance. I had already installed version 12 and Arch both on Vbox. and I liked Slack a little more because of the way this legendary system works, as soon as I download the ISO I install it on a hard disk partition to get more out of it. I'll go for the 64-bit one, so I install Vbox for it, and on this Funtoo but with ZFS filesystem, I hope I can achieve it. One never stops learning in the GNU / Linux world and thanks to these posts it is achieved with more ease or less difficulties depending on the type of user. Once again excellent tutorial.
Cheers !!!!
I am currently on Fedora 18, and thanks to this tutorial I have been able to install Slackware 14.0 64 bits on a virtual machine. I have also managed not to fully install kde 4.8.5, with this, I intend to avoid the endless updates of the distribution and external. I have chosen to use Xfce 4.10, which has all the functionalities. Among the programs that I have installed are; Vlc 2.5, Libreoffice 4.0, Xine, Uplayer. Cheers
Thank you very much for the doubt, installed in Virtualbox and working
But of course a rooster does not crow….
Excellent, manual, I have installed different distros, but Slackware was one that gave me a headache.
Thank you very much for this great contribution.
I have not been able to install Slackware 14 in Virtual Box any of the presentations (32 - 64) bits.
Notice: “This kernel requires the following features not present on the CPU: pae
Unable to boot - please use a kernel appropriate for your CPU. "
I already did the following "Configuration -> System -> Processor -> Enable PAE / NX" but nothing.
I installed it at home on my computer without any problem but when I try to install it on another PC in Virtual Box it doesn't let me ... mmm ... something similar happened with version 13.37.
Greetings from Colombia!!!
VictorHenry tries to use QEMU which works very well and does hardware emulation. The 64-bit one may not work for you if you don't have hardware virtualization VT support, it seems that virtualbox doesn't work without it even though your computer is 64-bit as is my case, VMware does. I could not install opensuse 64 bits in VBox with Slackware of 64 bits and if I can do it with qemu it is in Debian wheezy 32 bits or Slack 64 bits with the option qemu-system-x86_64.
Greetings from Argentina!!!
If very interesting, it is well done but as always, THE MOST IMPORTANT IS LEFT
-WiFi configuration 02: 00.0 Network controller: Broadcom Corporation BCM4321 802.11a / b / g / n (rev 03) (for example)
-USB sound configuration (alsa or pulseaudio)
-Configuration of a splash at startup
-Configuration of a sound server (to compose music install jackd, the pulse module for jack, synchronize them when jack is executed and return everything to its normal state when it is finished)
-Configuration of suspension / hibernation of the same and check problems with the USB sound cards when performing these tasks
In short, they are things that, although they are not essential, are recommended for those of us who like to have multimedia entertainment for example or those of us who have two sound cards
regards
OK thanks!!! I will try QEMU. I comment on any result any result !!!
Ready!!! Slackware 14 (32-bit) installed successfully.
Installation Type: Virtualized with VMWare Server 2.0.
Host OS: Windows 7 Enterprise.
I don't like it very much is the amount of RAM that the virtual machine consumes, besides that everything is completely slow.
Compared to other software to virtualize, in my opinion, VMWare consumes too much RAM ... but hey ... when there are no glasses it takes water directly from the bottle.
I will try to install this JEWEL of distro using other virtualizers ... I hope to have good results in the installation.
Greetings from Colombia!!!
How can I download slackware? : /
I have left Fedora 18 and installed Slackware64 14.0 on the HD of my PC, with Xfce 4.1 desktop. It goes really fast, again thanks for the tutorial. Cheers
But did you put slpash on the boot? Is there a way to do it without recompiling the kernel? How are applications installed in Slackware? Compiling? Or is there some way similar to Debian / Ubuntu?
regards
You mean Xfce 4.10 right? oO
Hello, how are you, thank you very much for the tutorial, it is very complete, I ask you a query at the time of partitioning, when you create the SWAP partition in Type, do you put Logical or Primary? because in the images you can see Primary, thank you very much, greetings!
Man, I leave it as primary, although I'm not sure what applications entail doing it like this !!!
That's right, I have debugged the installation, I have completely removed the kde 3.8.5 desktop that comes by default, I no longer receive the annoying updates from the distribution. Now it goes very fast, plus Xfce 4.10 is fully configurable. Cheers
Very good article!!
But I have a problem installing it on my toshiba L305D laptop, it shuts down when it is installing the kdei packages and does not finish the installation process :)
Can you help me solve this problem?
regards
I already managed to install Slackware 14 64 bits and it is re-fine.
Yes now!! To take advantage of it.
Greetings.
Extremely great! .. to see how it goes with the installation 😉
Regards!
Excellent carnal contribution
Perfect and walking.
Just what I needed. And it looks much more comfortable than installing the Arch when making the subsequent configurations.
I will opt for Slack for the community of veterans that there is, besides that at least it gives you good support, plus you don't have to manually configure the graphical system (although you can smooth things over later), just by typing startx and the issue is solved.
Dear I have to tell you that it makes me really very happy to find Spanish-speaking users who use Slackware, I started with red hat 5.1 and after many distro I ended up adopting the great Slack, I would like to be in contact with you to consult specific topics which are It is complicating me hahaha
Total genius !!!
I always wanted to find the code of the first version and I never found it, if someone has it more than grateful!
bbip@live.com.ar
Thank you all for your comments, remember that for any questions please send them to the forums (http://foro.desdelinux.net/) since I can not always be aware but there you will find many other experts on the subject who will gladly help answer all your questions.
Cheers !!! ...
A question I was asked to install this as a school task thanks for the very good tutoring, it is already installed but the login does not write it down I put root but it tells me that some command is wrong to reset the login
Man, you can follow the following links ... personally I had to use the installation disc and everything went well!
links:
http://elsoftwarelibre.wordpress.com/2009/09/05/recuperar-tu-password-de-root-en-linux/
http://linuxzone.es/faq/%C2%BFcomo-poner-y-recuperar-la-contrasena-de-administrador/
http://www.linuxquestions.org/questions/slackware-14/reset-password-without-installation-cd-876500/
Strip Rescatux, there you can delete all the passwords and then you can enter Slackware, here is the link, it has saved me many times
http://www.supergrubdisk.org/rescatux/
Thanks, when I found the post I almost got a tear of how beautiful it is, many times I tried to do it alone and I never could.
Thank you so much!
Excellent contribution friend!
Greetings from Ecuador
An excellent tutorial friend a thousand thanks indeed.
Very good tutorial, I recently read the Debian administrator's manual, and I must say that this tutorial has nothing to envy to the Debian manual. Congratulations!!!
Very good tutorial, thanks C:
Someday I'll jump in the water with this one.
very good tutorial I finished installing and I love it thank you !!!
Hello! I followed the instructions to the letter, but I had to create the USB boot stick to start Slackware. I have read everything about LILO because in the process it showed me an error about it. To date I have not been able to get it to boot without the memory, has anyone had a similar problem? Regards.
Very good tutorial. I have installed this distro without any problem. It only remains for me to figure out how to create a third / home partition during the installation process but investigating it will appear. Thank you very much friend
Friend to install version 13.0 is the same (I want to install this), at the time of making the partition (/) and the swap partition with (fdisk-l) the following appears:
- / bin / sh: fdisk-l: not found.
And from there I do not advance.
I would appreciate your comments in advance, thank you.
Hey friend, a question, I'm installing it from a USB, how do I tell you where the boot file is in the memory, I see that you put it to autodetect it from a CD.
Att: Erasmus
Excellent tutorial.
http://taskwealth.com/?id=1171
The tutorial was very useful to me.
Thank you.
Thank you very much for sharing your slackware installation process in such detail ...
Excellent your guide, I congratulate you, I still consider myself a beginner in Linux, you have to dare, cross the river, I have come out of the myth of this distro that in other comments, they find it very difficult to install, and that is why I did not dare to use it, but with this spectacular guide there is no reason to fear, I am going to install the distro to test it 14.1, I am currently using Pclinuxos 2013.12 KDE 1.6 GB, let's see what happens, I accept your comments and suggestions regarding the change of distro .
GREETINGS, CONGRATULATIONS, FROM MY COUNTRY CHILE, A HUG.
it asks me for a dakstar login:
password:
what do I write?
Excellent manual friend, thank you very much for the contribution ...
I am new to this and the installation has been quite easy, thanks again and it is good to know that there are people like you to share the knowledge ...
On this page there is documentation about slackware
http://slackware-es.com/slackbook/
First of all congratulations and thanks for the guide.
Now come my doubts. I have hardly any knowledge of computers and less of GNU / Linux. I have tried some simple distros such as linux mint, trisquel, Guadalinex and one thing that does not convince me is the amount of programs that come installed by default that I do not know if they end up slowing down the computer. What is Slackware installed by default? I'm tempted by what they say about its speed and I don't need to have the newest programs on the market either. From what I read many say that Kde is a very heavy desktop environment. Even with Kde is it still a fast distro or should I put some other desktop environment if I have an old PC? I like the idea of free software but when I tried with Trisquel and with Gnewsense, I couldn't view videos or things with flash. Will Slackware be able to see what most users see? My aspirations are that it starts up quickly, that I can surf the internet, play the odd video and music and a word processor. Come on, with a browser, a vlc, a pdf reader and a word processor, if it works lightly I would be more than happy. My idea is to stop depending on windows, which I still could not achieve. Once I finish installing as the guide says, is everything ready or do I have to configure other things?
Sorry for the ignorance, I'll be reading and learning more.
All the best
Hello, for a somewhat old pc and if you have little computer knowledge, a very good option is to try lubuntu.
Greetings.
Hi, I must say that Lubuntu was the first distro I tried. I tried several out of curiosity and although I know that Slackware is not the friendliest, I would like to take a look at it, then continue reading and pulling tutorials.
Focusing on this distro, today I followed the tutorial step by step and despite the fact that the installation was apparently successful until the end, coinciding on each screen with what the guide shows, once I restart and type startx the screen goes gray and the graphical environment never appears.
The PC is an AMD sempron, 1800 MH, with 512 of ram (I burned a memory and now I must throw with that for the moment).
Any idea why the desktop isn't showing up?
Hello
I don't know if the author of this post will answer me
he's already two years old 🙂
I want to know if that works with the latest version and if I need to be connected to the internet during the installation through the cd / dvd
Only that, the truth seemed excellent to me, I will do it tomorrow, thanks in advance if you want to answer.
Regards!!!
very well explained but when installing it I have to close all this explanation, or do I have to print all this explanation ???
Good morning, greetings fellow slackweros, I have a problem please I hope for your great help, I installed dual slackware with w7, everything went great but from the moment I changed from usb keyboard to ps2 I do not see slack, a friend told me that it is that's menuentry, but I don't know how to fix it someone who can help me, or tell me the steps to follow, I already have the iso of the same slackware installed, I follow the friend's comment but I enter and see the different partitions and but I don't know where to enter and return everything to how it was when I installed, sorry if I explain myself wrong but this is how I detail my problem.
thanks in advance
Good Morning! As many will know, Windows 7 Ultimate will stop receiving security updates from Microsoft on January 15, 2020. I plan to migrate to linux 100% before that happens. In a laptop I use fedora 30, in a mini laptop I use Ubuntu Budgie and I lack the conventional PC. I want to install Slackware for the latter, but when I downloaded the ISO images from the official website, I realized that I should create two bootable USB sticks: one with the installation driver and the other with the "source codes". Should I use both or just one? I have a computer with an Intel Pentium IV processor and Windows Vista for now. Thank you.