
Windows 10: Enable Samba to connect resources on GNU / Linux
How it is already of public and massive knowledge, Samba is a free software project that allows the implementation of Windows file sharing protocol, in Operating Systems of type UNIX, especially the free and open like GNU / Linux.
Samba came up Windows 7 enabled by default. But from then on, that is, in the past version Windows 8.X, and in the current one, Windows 10, it must be activated manually in order to make a shared resource in a network by a Computer with these Private Operating Systems, be detected and connected on a computer with GNU / Linux. Which is why it is essential to know the procedure to activate it and achieve this objective.

The protocol Samba known as SMB (Server Message Block), and in some literatures like CIFS (Common Internet File System), beyond simply allowing computers with GNU / Linux, Mac OS X or Unix In general, they can share or access resources in Windows-based networks, it is actually, a suite of Unix applications that implements the SMB protocol, which is used for client-server operations in a network.
In this way, a computer Unix or similar with Samba you can enter a Microsoft network, showing itself as Server and / or Client, and thus be able to:
- View and explore client computers on the network, to facilitate collaboration and interaction with them.
- Share and access network resources, such as folders, files, or devices such as disks, printers, scanners, and MFPs.
- Facilitate the verification of client computers through an access name against a Windows domain.
- Allow interaction and integration with a Name Resolution Server (WINS) on a Windows network.
Finally, before getting into the subject, remember that Windows 10, is the most modern and advanced Microsoft Operating System, from the July 29, 2015While Windows 7 from the January 14, 2020, no longer has Official extended support. While, Windows 8.1 will suffer the same consequence, from the January 10, 2023.
Therefore, or they are replaced free of charge with Free and open operating systemsas GNU / Linux, or you will have to pay the price to upgrade to Windows 10 and thus have official support.
How to activate the Samba Service in Windows 10 to connect shared resources in GNU / Linux?
Observations and recommendations
For our case study, we will use 2 physical computers, one with Windows 10 and another with MXLinux 19.1 (DEBIAN 10) on a home network, that is, without network Servers. Just a Router that assigns the IP addresses dynamically.
It is ideal that the computer with Windows 10 have a Team name y Workgroup / Domain Name manageable, that is, short, legible and easy to remember, if necessary or possible. And as far as possible, that the Workgroup / Domain Name is the same as that configured in the computer with GNU / Linux.
Step 1:
Configure Computer Name and Workgroup / Domain Name
Assuming that the Network Workgroup name from the computer with GNU / Linux sea "Home", you must go to the Computer with Windows 10, stop in the called tab "Team name" of the window "System properties", accessed by the option of Control panel call «Advanced Equipment Configuration», make the change, as shown in the image immediately below.
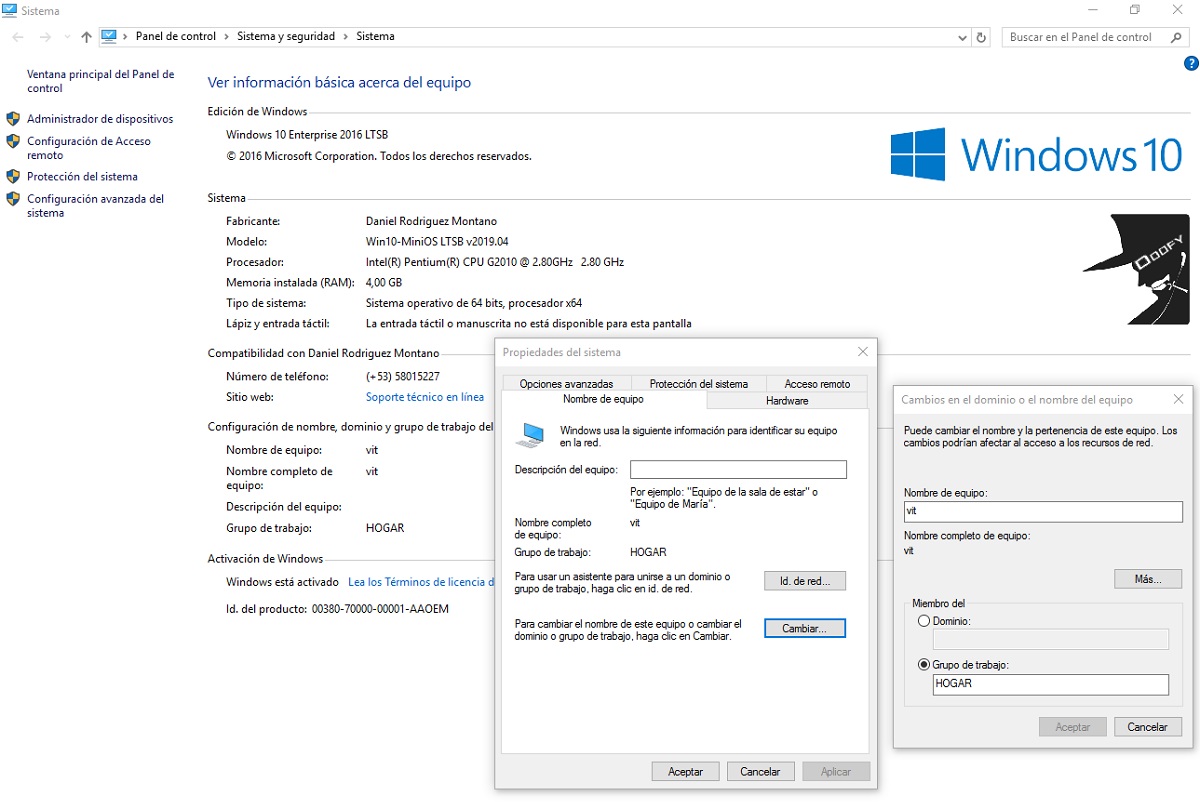
You cannot do the double change in one go, that is, you must change the "Team name" first and reboot, and then the name of the «Workgroup" network and reboot.
Step 2:
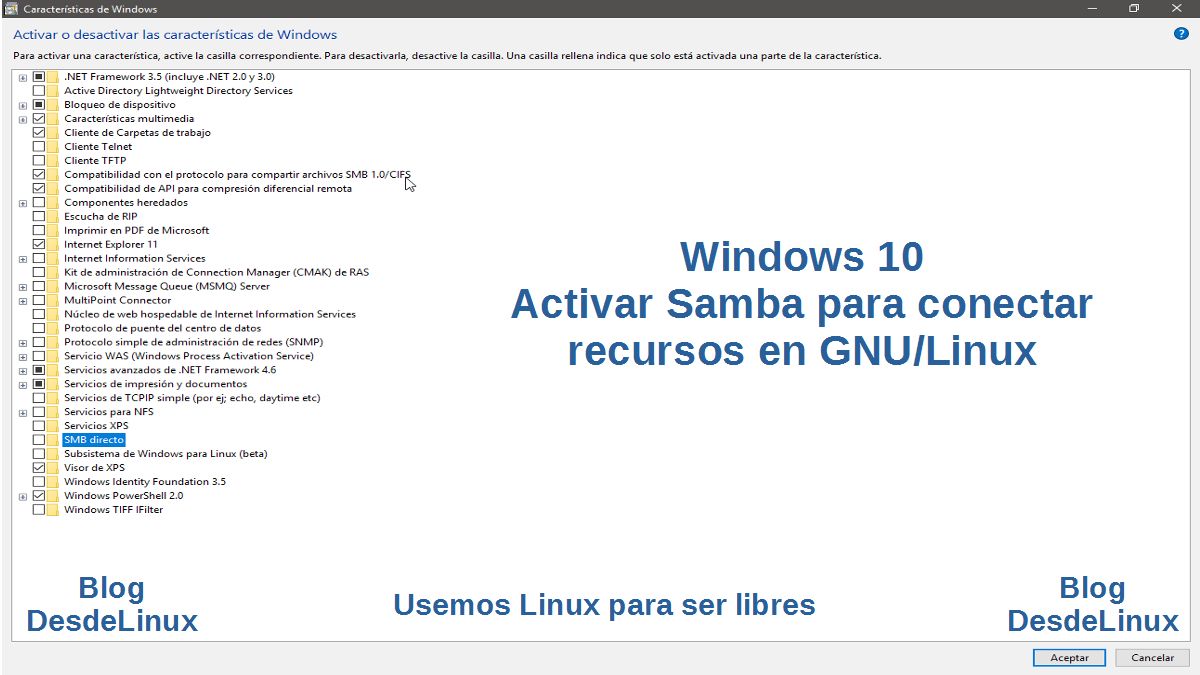
Enable the SMB1.0 / CIFS feature in Windows 10
In this step you must access the "Windows features" through the route "Control Panel", "Programs" and "Programs and Features". Once there, you must press (activate) the box corresponding to "Support for SMB 1.0 / CIFS file sharing protocol".
Then you must press the button "Activate", as shown in the image immediately below. Preferably, it should be rebooted for the changes to be fully accepted.
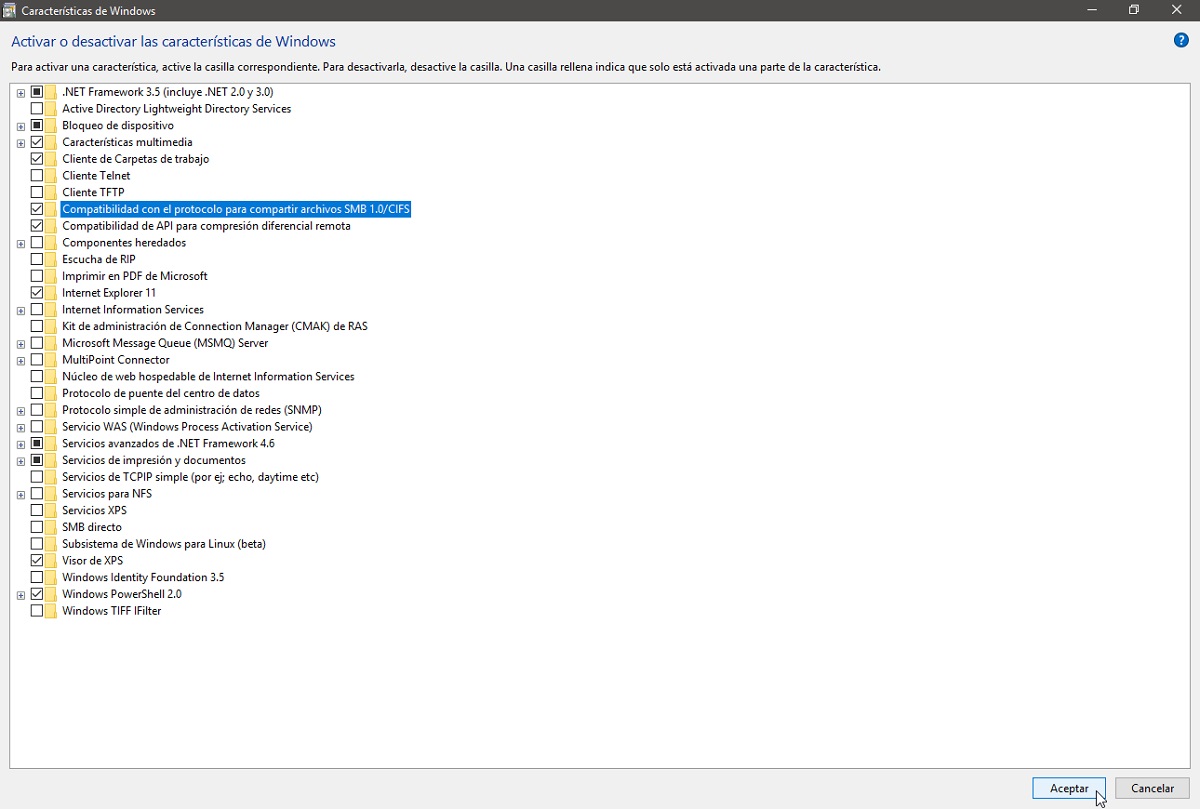
If desired, the checkbox of "SMB direct" for more advanced support (use) of the protocol.
Step 3:
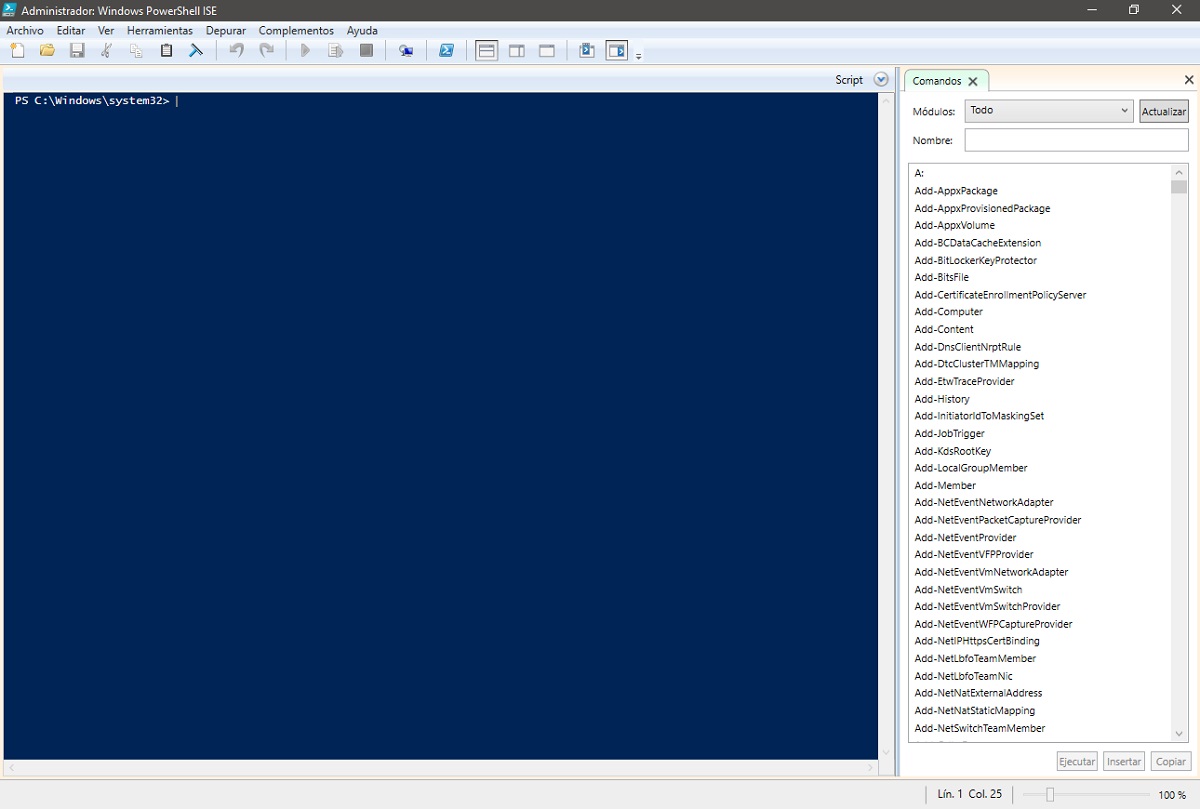
Validate and enable support for SMB 1.X / 2.X / 3.X from Windows Power Shell
To detect and enable / disable via Windows Power Shell, Samba network protocol from Windows 10, the following commands can be executed for each case:
SMB 1.X
Detect
Get-WindowsOptionalFeature –Online –FeatureName SMB1ProtocolDeactivate
Disable-WindowsOptionalFeature -Online -FeatureName SMB1ProtocolActivate
Enable-WindowsOptionalFeature -Online -FeatureName SMB1ProtocolSMB 2.X / 3.X
Detect
Get-SmbServerConfiguration | Select EnableSMB2ProtocolDeactivate
Set-SmbServerConfiguration –EnableSMB2Protocol $falseActivate
Set-SmbServerConfiguration –EnableSMB2Protocol $trueFor our case study, both protocols were activated, that is, SMB 1.0 and SMB 2.X / 3.X using the application "Windows PowerShell ISE" as "Administrator", which is the one shown in the image immediately below.
Step 4:
Create a share
For our case study, a folder called "Example" at the root of Windows 10 Operating System used, where a named User is created "Sysadmin" ("Admin", according to the file explorer in the path "C: \ Users \ Admin". Said shared resource must be created, preferably with the addition of the User "Everyone" with all the necessary security permissions, and shared in this case, with the same name on the network, that is, "Example".
As shown in the following pictures:
- Sysadmin User real name: admin
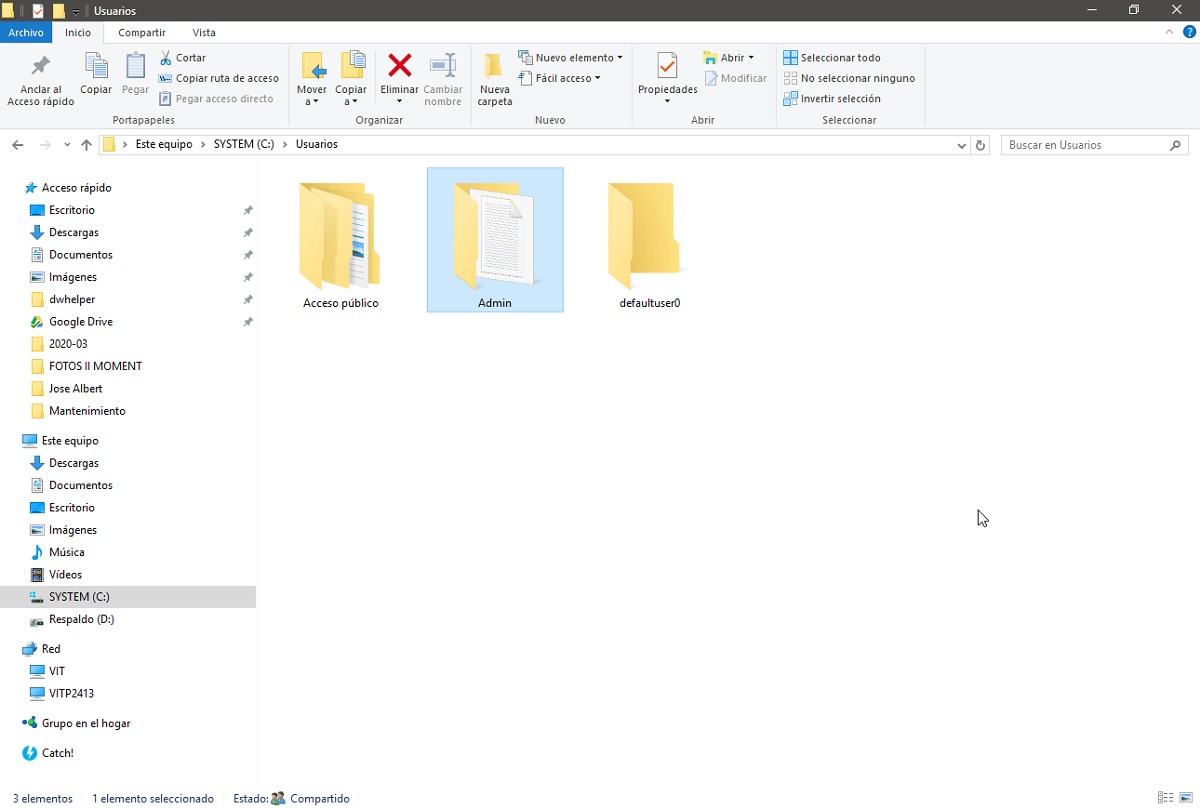
- All User Assignment and Security Permissions: to the folder «Example»

- Assignment of network name "Example": for the share.

- Network Resource display: from Windows 10
Step 5:
Connect the share on the computer with GNU / Linux
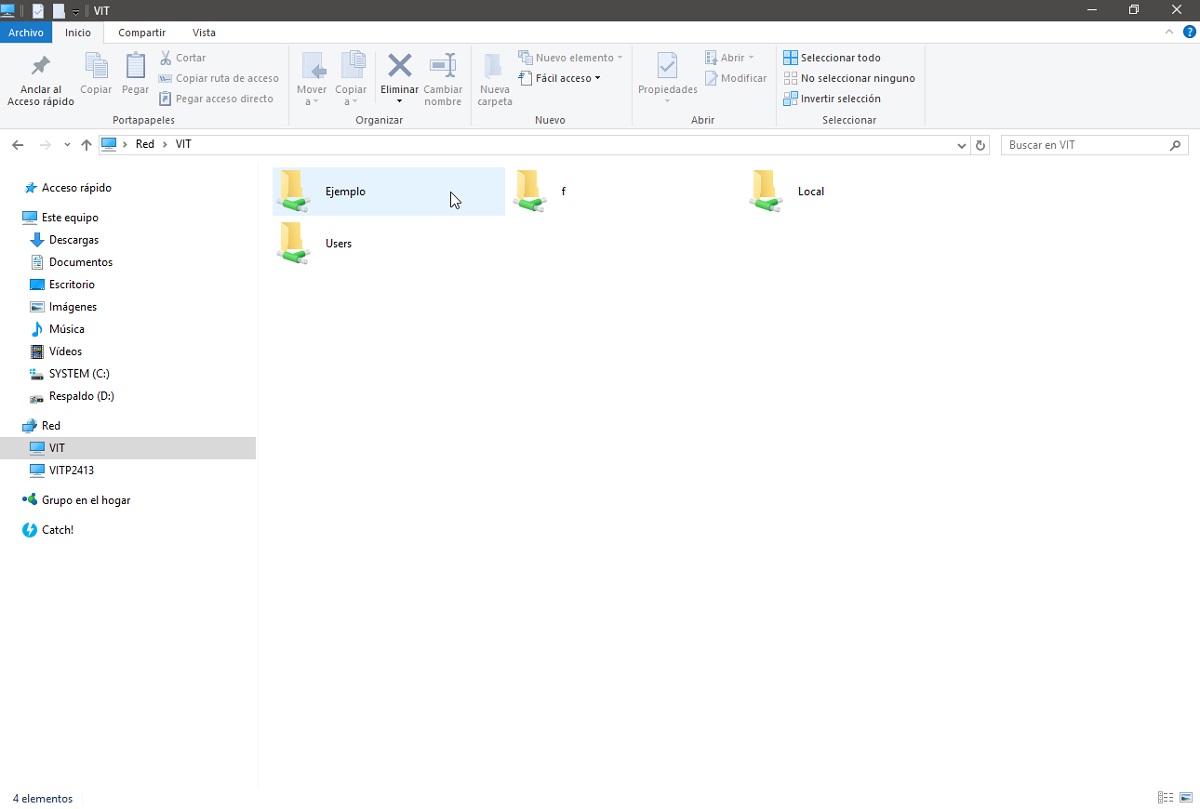
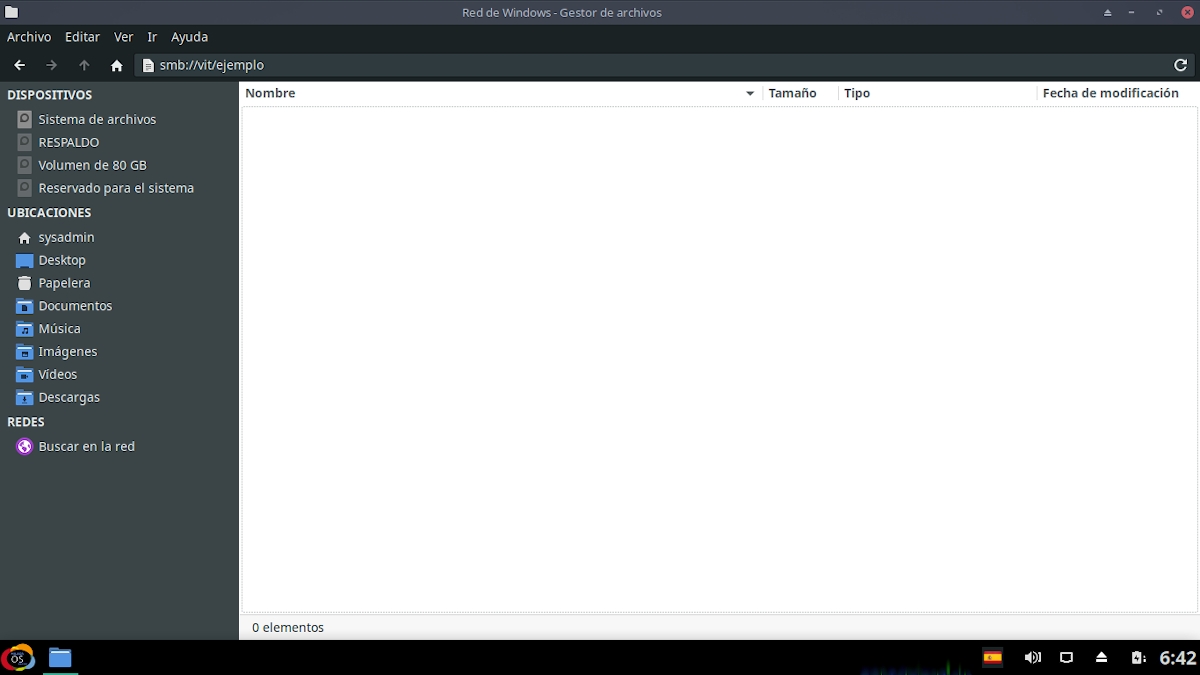
For this step, from the computer called "VITP2413" we will open a File Browser in our GNU / Linux Operating System, to connect via Samba to share "Example" located on the computer "VIT" having Windows 10, as shown in the following images:
- Running File Explorer: to run network path "Smb: // vit / example" towards the shared resource on the Computer with Windows 10.
- Windows 10 User Parameter Settings: for samba connection.

- Share view: on Windows 10 called "Example" on GNU / Linux.

Finally, for more information on this subject, you can access the Microsoft official link thereon.

Conclusion
We hope this "useful little post" about «¿Cómo activar el Servicio de Samba en Windows 10 para conectar recursos compartidos en GNU/Linux?», which is an important technical operation to perform, now that «Windows 7», it is no longer the stable version and with official support of «Microsoft», be a lot interest and utility, For the whole «Comunidad de Software Libre y Código Abierto» and of great contribution to the diffusion of the wonderful, gigantic and growing ecosystem of applications of «GNU/Linux».
And for more information, always do not hesitate to visit any Online library as OpenLibra y jedit to read books (PDFs) on this topic or others knowledge areas. For now, if you liked this «publicación», don't stop sharing it with others, in your Favorite websites, channels, groups, or communities of social networks, preferably free and open as Mastodon, or secure and private like Telegram.
Or simply visit our home page at DesdeLinux or join the official Channel Telegram from DesdeLinux to read and vote for this or other interesting publications on «Software Libre», «Código Abierto», «GNU/Linux» and other topics related to «Informática y la Computación», and the «Actualidad tecnológica».
Hello
Actually, what Windows 10 does not have activated by default is smb1, which for security reasons recommends not using it. But the smb (cifs) protocol still exists normal. The best thing is to enable the use of smb2 and smb3 in the Samba configuration on the Linux machine with which I want to share folders
Greetings Camilo! Thank you for your comment and clarification on the subject discussed.
Windows shared folders can even be accessed on Linux with the following command: mount -t cifs // ip / resource / mount_point -o domain = domain, username = user
The "domain" parameter would be used if the Windows computer is in an Active Directory domain.
Greetings Gonzalo! Thank you for your comment and contribution on the subject discussed. Sometimes, it is better to make connections via terminal than via graph.
it worked perfect! Thanks a lot!