欢迎阅读关于如何创建我们自己的操作系统的另一篇文章,在本例中为NextDivel。
如果我们回到 第一篇文章 在所有操作的最后,我们都应该想到这样的事情:

如果这是正确的,我们可以继续。 我将使用GitHub上的系统和结构(http://github.com/AdrianArroyoCalle/next-divel),因为它对我和您来说都比较舒适。 如您所见,文本是基本文本,没有吸引力。 看起来似乎与众不同。 但是俗话说,要尝尝颜色,在我们的操作系统中就会有颜色。 我们将要输入的第一个颜色将是定义VGA卡的颜色,它们是0:
- 黑色
- 蓝色
- 绿色
- 青色
- 罗霍
- 品红
- 褐色
- 浅灰色
- 格里斯·奥斯库罗(Gris oscuro)
- 浅蓝色
- 浅绿色
- 青色清除
- 红灯
- 浅洋红色
- 浅褐色
- 目标
我们将在标头中定义这些颜色,以使其更方便使用,并可能在将来成为系统API的一部分。 因此,我们在NextDivel include中创建了文件ND_Colors.hpp。
#ifndef ND_COLOR_HPP

#define ND_COLOR_HPP

typedef enum ND_Color{

ND_COLOR_BLACK = 0,

ND_COLOR_BLUE = 1,

ND_COLOR_GREEN = 2,

ND_COLOR_CYAN = 3,

ND_COLOR_RED = 4,

ND_COLOR_MAGENTA = 5,

ND_COLOR_BROWN = 6,

ND_COLOR_LIGHT_GREY = 7,

ND_COLOR_DARK_GREY = 8,

ND_COLOR_LIGHT_BLUE = 9,

ND_COLOR_LIGHT_GREEN = 10,

ND_COLOR_LIGHT_CYAN = 11,

ND_COLOR_LIGHT_RED = 12,

ND_COLOR_LIGHT_MAGENTA = 13,

ND_COLOR_LIGHT_BROWN = 14,

ND_COLOR_WHITE = 15

} ND_Color;

#endif
同时,我们将定义新的函数以更舒适的方式在屏幕上编写(不,我们还没有实现printf,我知道您想要它)。 我们将为一组与屏幕相关的功能(ND_Screen.cpp和ND_Screen.hpp)创建一个文件及其头。 在其中,我们将创建函数以:更改字母和背景的颜色,编写句子和字母,清洁屏幕并在屏幕上四处移动。 我们继续使用VGA屏幕,但现在我们将使用一些字节来显示颜色。 ND_Screen.cpp看起来像:
/**

* @file ND_Screen.cpp

* @author Adrián Arroyo Calle

* @brief Implements four easy functions for write strings directly

*/

#include <ND_Types.hpp>

#include <ND_Color.hpp>

#include <ND_Screen.hpp>

uint16_t *vidmem= (uint16_t *)0xB8000;

ND_Color backColour = ND_COLOR_BLACK;

ND_Color foreColour = ND_COLOR_WHITE;

uint8_t cursor_x = 0;

uint8_t cursor_y = 0;

/**

* @brief Gets the current color

* @param side The side to get the color

* */

ND_Color ND::Screen::GetColor(ND_SIDE side)

{

if(side==ND_SIDE_BACKGROUND){

return backColour;

}else{

return foreColour;

}

}

/**

* @brief Sets the color to a screen side

* @param side The side to set colour

* @param colour The new colour

* @see GetColor

* */

void ND::Screen::SetColor(ND_SIDE side, ND_Color colour)

{

if(side==ND_SIDE_BACKGROUND)

{

backColour=colour;

}else{

foreColour=colour;

}

}

/**

* @brief Puts the char on screen

* @param c The character to write

* */

void ND::Screen::PutChar(char c)

{

uint8_t attributeByte = (backColour << 4) | (foreColour & 0x0F);

uint16_t attribute = attributeByte << 8; uint16_t *location; if (c == 0x08 && cursor_x) { cursor_x--; }else if(c == '\r') { cursor_x=0; }else if(c == '\n') { cursor_x=0; cursor_y=1; } if(c >= ' ') /* Printable character */

{

location = vidmem + (cursor_y*80 + cursor_x);

*location = c | attribute;

cursor_x++;

}

if(cursor_x >= 80) /* New line, please*/

{

cursor_x = 0;

cursor_y++;

}

/* Scroll if needed*/

uint8_t attributeByte2 = (0 /*black*/ << 4) | (15 /*white*/ & 0x0F);

uint16_t blank = 0x20 /* space */ | (attributeByte2 << 8); if(cursor_y >= 25)

{

int i;

for (i = 0*80; i < 24*80; i++)

{

vidmem[i] = vidmem[i+80];

}

// The last line should now be blank. Do this by writing

// 80 spaces to it.

for (i = 24*80; i < 25*80; i++)

{

vidmem[i] = blank;

}

// The cursor should now be on the last line.

cursor_y = 24;

}

}

/**

* @brief Puts a complete string to screen

* @param str The string to write

* */

void ND::Screen::PutString(const char* str)

{

int i=0;

while(str[i])

{

ND::Screen::PutChar(str[i++]);

}

}

/**

* @brief Cleans the screen with a color

* @param colour The colour to fill the screen

* */

void ND::Screen::Clear(ND_Color colour)

{

uint8_t attributeByte = (colour /*background*/ << 4) | (15 /*white - foreground*/ & 0x0F);

uint16_t blank = 0x20 /* space */ | (attributeByte << 8);

int i;

for (i = 0; i < 80*25; i++)

{

vidmem[i] = blank;

}

cursor_x = 0;

cursor_y = 0;

}

/**

* @brief Sets the cursor via software

* @param x The position of X

* @param y The position of y

* */

void ND::Screen::SetCursor(uint8_t x, uint8_t y)

{

cursor_x=x;

cursor_y=y;

}
标头将是非常基本的,因此我不在这里包括,而是突出显示ND_SIDE类型的定义
typedef enum ND_SIDE{

ND_SIDE_BACKGROUND,

ND_SIDE_FOREGROUND

} ND_SIDE;
还要提一下,我们使用了 ND_Types.hpp 头,该头基于 char 和 int 定义了 uint8_t、uint16_t 等的一些基本类型。实际上这个标头是 C99 标准中的标头,事实上我的 ND_Types.hpp 是该文件的复制/粘贴 desde Linux,所以你可以交换它们并且不会发生任何事情(只有定义,没有函数)。
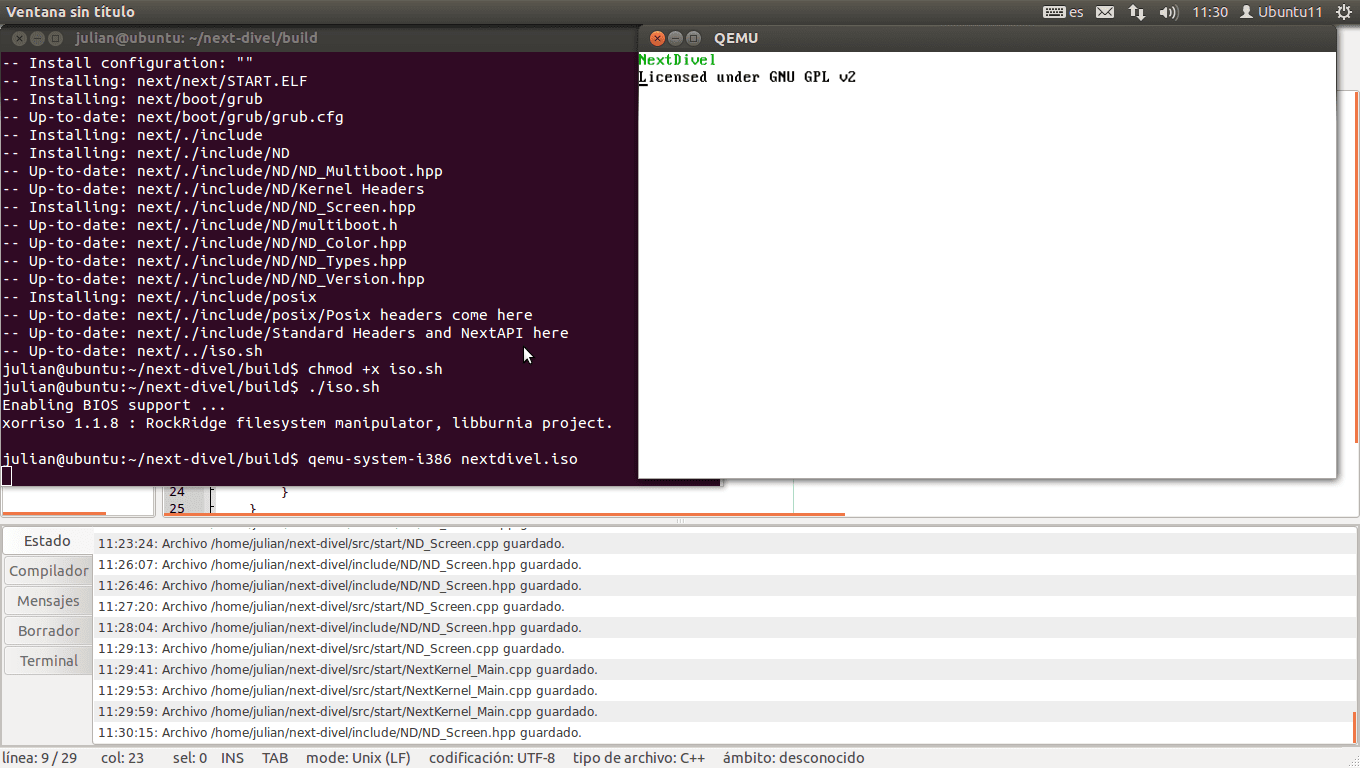
为了测试该代码是否有效,我们将修改内核的C入口点:
ND::Screen::Clear(ND_COLOR_WHITE);

ND::Screen::SetColor(ND_SIDE_BACKGROUND,ND_COLOR_WHITE);

ND::Screen::SetColor(ND_SIDE_FOREGROUND,ND_COLOR_GREEN);

ND::Screen::PutString("NextDivel\n");

ND::Screen::SetColor(ND_SIDE_FOREGROUND,ND_COLOR_BLACK);

ND::Screen::PutString("Licensed under GNU GPL v2");
如果我们按照以下步骤操作,我们将获得此结果
由于我们已经创建了这些功能,因此我们可以开始制作小型GUI,例如每次出现不可恢复的错误时都会显示的内核崩溃。 像这样:

而这个小小的GUI我们仅通过以下功能实现了它:
void ND::Panic::Show(const char* error)

{

ND::Screen::Clear(ND_COLOR_RED);

ND::Screen::SetColor(ND_SIDE_BACKGROUND, ND_COLOR_WHITE);

ND::Screen::SetColor(ND_SIDE_FOREGROUND, ND_COLOR_RED);

ND::Screen::SetCursor(29,10); //(80-22)/2

ND::Screen::PutString("NextDivel Kernel Error\n");

ND::Screen::SetCursor(15,12);

ND::Screen::PutString(error);

}
而这里的职位。 我提醒您有关从0开始编译系统的说明:
git clone http://github.com/AdrianArroyoCalle/next-divel

cd next-divel

mkdir build && cd build

cmake ..

make

make DESTDIR=next install

chmod +x iso.sh

./iso.sh

qemu-system-i386 nextdivel.iso
我借此机会感谢您对第一篇文章的好评。
很好的朋友,即使如此,我还是牺牲了我对C ++代码的理解。
问候。
这些物品很棒。 再次引起了我对处理器性能低下的好奇。
也许如果我有时间的话,我将开始下一场比赛。
我已经很久没有发送文章了。 已经需要
好的,就是这样。
我一直想知道如何构建操作系统。
等待您的下一篇文章。 干杯
很棒的朋友!
我只有一个问题,有人可以向我传递此示例的C文件吗?
它总是在终端中向我发送错误