Benvinguts a un altre post sobre com crear el nostre propi sistema operatiu, en aquest cas NextDivel.
Si reprenem el codi de l' primer post a la fi de tot ens hauria d'haver sortit alguna cosa com això:

Si això és correcte podem continuar. Vaig a utilitzar el sistema i l'estructura que tinc a GitHub (http://github.com/AdrianArroyoCalle/next-divel) Ja que és més còmode per a mi i per a vosaltres. Com es pot apreciar el text és un text bàsic, no resulta atractiv0. Pot semblar una mica més de la pila. Però com diu la dita, per a gustos colors, i en el nostre sistema operatiu hi haurà colors. Els primers colors que podrem posar seran els que defineixen les targetes VGA i són 16:
- Negre
- blau
- Verd
- Cian
- vermell
- Magenta
- Marró
- gris clar
- gris fosc
- blau clar
- verd clar
- cyan clar
- vermell clar
- magenta clar
- marró clar
- Blanc
Aquests colors els definirem en un header per tenir-lo més a mà i potser en un futur formar part de l'API de el sistema. Així vam crear l'arxiu ND_Colors.hpp al include de NextDivel.
#ifndef ND_COLOR_HPP

#define ND_COLOR_HPP

typedef enum ND_Color{

ND_COLOR_BLACK = 0,

ND_COLOR_BLUE = 1,

ND_COLOR_GREEN = 2,

ND_COLOR_CYAN = 3,

ND_COLOR_RED = 4,

ND_COLOR_MAGENTA = 5,

ND_COLOR_BROWN = 6,

ND_COLOR_LIGHT_GREY = 7,

ND_COLOR_DARK_GREY = 8,

ND_COLOR_LIGHT_BLUE = 9,

ND_COLOR_LIGHT_GREEN = 10,

ND_COLOR_LIGHT_CYAN = 11,

ND_COLOR_LIGHT_RED = 12,

ND_COLOR_LIGHT_MAGENTA = 13,

ND_COLOR_LIGHT_BROWN = 14,

ND_COLOR_WHITE = 15

} ND_Color;

#endif
Al seu torn definirem noves funcions per a escriure en pantalla d'una manera més còmoda (no, encara no anem a implementar printf, sé que ho esteu desitjant). Crearem un arxiu i la seva header per un set de funcions relacionades amb la pantalla (ND_Screen.cpp i ND_Screen.hpp). En elles anem a crear funcions per: canviar el color de les lletres i el fons, escriure frases i lletres, netejar la pantalla i desplaçar-nos per la pantalla. Seguim fent servir les pantalles VGA però ara farem servir uns bytes que donaran el color. ND_Screen.cpp quedaria com:
/**

* @file ND_Screen.cpp

* @author Adrián Arroyo Calle

* @brief Implements four easy functions for write strings directly

*/

#include <ND_Types.hpp>

#include <ND_Color.hpp>

#include <ND_Screen.hpp>

uint16_t *vidmem= (uint16_t *)0xB8000;

ND_Color backColour = ND_COLOR_BLACK;

ND_Color foreColour = ND_COLOR_WHITE;

uint8_t cursor_x = 0;

uint8_t cursor_y = 0;

/**

* @brief Gets the current color

* @param side The side to get the color

* */

ND_Color ND::Screen::GetColor(ND_SIDE side)

{

if(side==ND_SIDE_BACKGROUND){

return backColour;

}else{

return foreColour;

}

}

/**

* @brief Sets the color to a screen side

* @param side The side to set colour

* @param colour The new colour

* @see GetColor

* */

void ND::Screen::SetColor(ND_SIDE side, ND_Color colour)

{

if(side==ND_SIDE_BACKGROUND)

{

backColour=colour;

}else{

foreColour=colour;

}

}

/**

* @brief Puts the char on screen

* @param c The character to write

* */

void ND::Screen::PutChar(char c)

{

uint8_t attributeByte = (backColour << 4) | (foreColour & 0x0F);

uint16_t attribute = attributeByte << 8; uint16_t *location; if (c == 0x08 && cursor_x) { cursor_x--; }else if(c == '\r') { cursor_x=0; }else if(c == '\n') { cursor_x=0; cursor_y=1; } if(c >= ' ') /* Printable character */

{

location = vidmem + (cursor_y*80 + cursor_x);

*location = c | attribute;

cursor_x++;

}

if(cursor_x >= 80) /* New line, please*/

{

cursor_x = 0;

cursor_y++;

}

/* Scroll if needed*/

uint8_t attributeByte2 = (0 /*black*/ << 4) | (15 /*white*/ & 0x0F);

uint16_t blank = 0x20 /* space */ | (attributeByte2 << 8); if(cursor_y >= 25)

{

int i;

for (i = 0*80; i < 24*80; i++)

{

vidmem[i] = vidmem[i+80];

}

// The last line should now be blank. Do this by writing

// 80 spaces to it.

for (i = 24*80; i < 25*80; i++)

{

vidmem[i] = blank;

}

// The cursor should now be on the last line.

cursor_y = 24;

}

}

/**

* @brief Puts a complete string to screen

* @param str The string to write

* */

void ND::Screen::PutString(const char* str)

{

int i=0;

while(str[i])

{

ND::Screen::PutChar(str[i++]);

}

}

/**

* @brief Cleans the screen with a color

* @param colour The colour to fill the screen

* */

void ND::Screen::Clear(ND_Color colour)

{

uint8_t attributeByte = (colour /*background*/ << 4) | (15 /*white - foreground*/ & 0x0F);

uint16_t blank = 0x20 /* space */ | (attributeByte << 8);

int i;

for (i = 0; i < 80*25; i++)

{

vidmem[i] = blank;

}

cursor_x = 0;

cursor_y = 0;

}

/**

* @brief Sets the cursor via software

* @param x The position of X

* @param y The position of y

* */

void ND::Screen::SetCursor(uint8_t x, uint8_t y)

{

cursor_x=x;

cursor_y=y;

}
El header serà molt bàsic així que no ho incloc aquí, però destacar la definició de l'tipus ND_SIDE
typedef enum ND_SIDE{

ND_SIDE_BACKGROUND,

ND_SIDE_FOREGROUND

} ND_SIDE;
També esmentar que fem ús del header ND_Types.hpp, aquest header ens defineix uns tipus bàsics per a uint8_t, uint16_t, etc basat en els char i els int. Realment aquest header és el a l'estàndard C99 i de fet el meu ND_Types.hpp és una còpia/pega de l'arxiu desde Linux, així que podeu intercanviar-los i no passaria res (només hi ha definicions, cap funció).
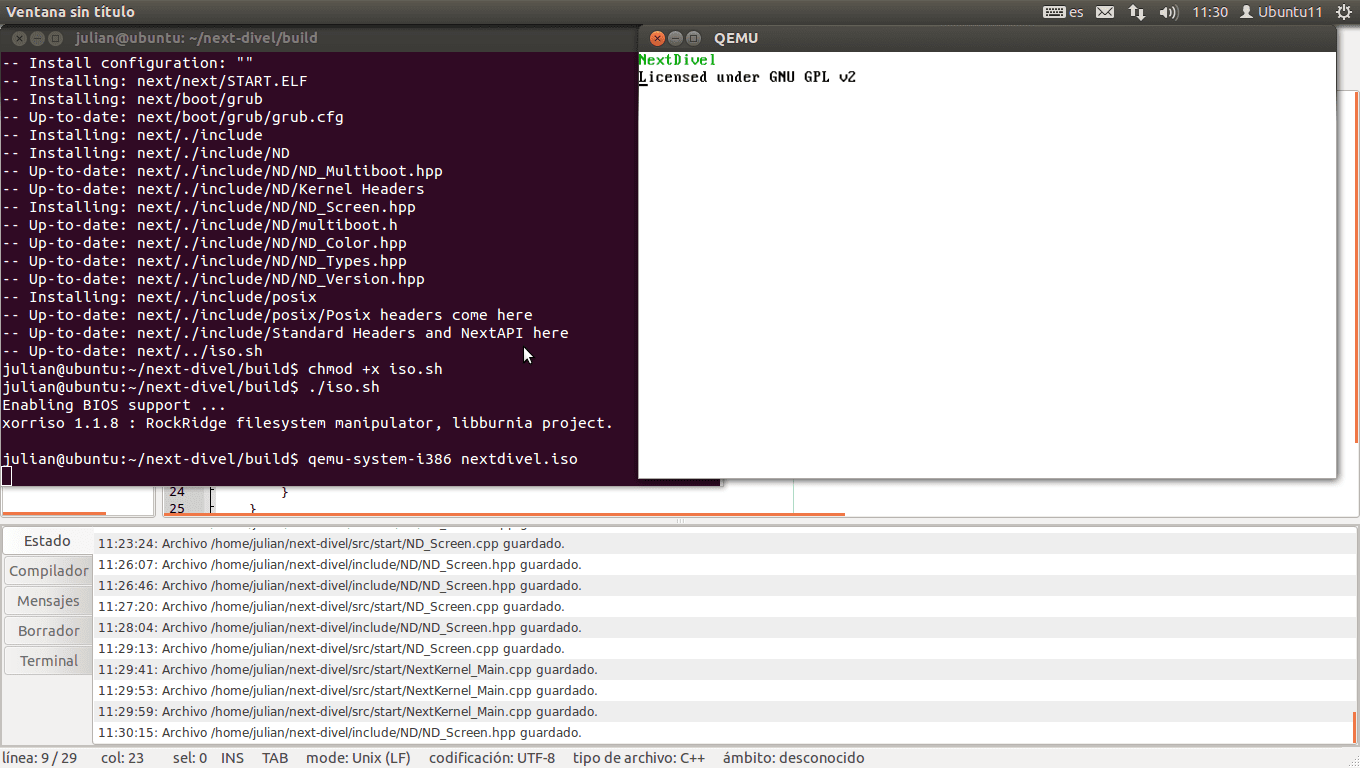
Per provar si aquest codi funciona modificarem el punt d'entrada al carrer de l'nucli:
ND::Screen::Clear(ND_COLOR_WHITE);

ND::Screen::SetColor(ND_SIDE_BACKGROUND,ND_COLOR_WHITE);

ND::Screen::SetColor(ND_SIDE_FOREGROUND,ND_COLOR_GREEN);

ND::Screen::PutString("NextDivel\n");

ND::Screen::SetColor(ND_SIDE_FOREGROUND,ND_COLOR_BLACK);

ND::Screen::PutString("Licensed under GNU GPL v2");
I si seguim aquests passos obtindríem aquest resultat
Gràcies a aquestes funcions que hem creat podem començar a fer petites GUI, com per exemple un kernel panic que mostrarem cada vegada que hi hagi un error irrecuperable. Una cosa tal que així:

I aquesta petita GUI la vam fer només amb aquestes funcions:
void ND::Panic::Show(const char* error)

{

ND::Screen::Clear(ND_COLOR_RED);

ND::Screen::SetColor(ND_SIDE_BACKGROUND, ND_COLOR_WHITE);

ND::Screen::SetColor(ND_SIDE_FOREGROUND, ND_COLOR_RED);

ND::Screen::SetCursor(29,10); //(80-22)/2

ND::Screen::PutString("NextDivel Kernel Error\n");

ND::Screen::SetCursor(15,12);

ND::Screen::PutString(error);

}
I fins aquí el post. Us recordo les instruccions per compilar de 0 el sistema:
git clone http://github.com/AdrianArroyoCalle/next-divel

cd next-divel

mkdir build && cd build

cmake ..

make

make DESTDIR=next install

chmod +x iso.sh

./iso.sh

qemu-system-i386 nextdivel.iso
I aprofito per donar-vos les gràcies per l'excel·lent acollida que va tenir el primer post.
Excel·lent amic, igue així m'estic matant el casc entenent el codi en c ++.
Salutacions.
aquests articles estan genials. han despertat la meva curiositat pel funcionamineto a baix nivell dels processadors una vegada mes.
tal veus si tinc temps em posaré a jugar amb next-divel.
fa temps k no envio un article. ja cal
Molt bé, aquest és el camí.
Fa molt que volia saber com es cap a un sistema operatiu.
Esperant la teva proper post. Salutacions
Bonissim amic!
Només tinc un problema, Algú em pot passar un arxiu en C d'aquest exemple?
Sempre em mana errors en el terminal