
|
I hope you already have your GNU / Linux prepared for low latency audio, because we are going to start working with it. Whether we are fans of electronic loops or inveterate metalheads, we are going to need a competent DAW and, luckily, Ardor 3 has come to us a few months ago. It is available in the KXStudio repos, in which it is updated 2 or 3 days apart from the release of the official version (remember that Ardor has started a cycle of rapid updates with this new version).
In today's post we are going to stay with the basics of its interface. |
First of all: Ardor can handle the JACK server very reliably, so it is not necessary for us to use QjackCTL or variants, although it can always save us from a trouble knowing them. For this reason, I would recommend that you spend time with QjackCTL or even Jack from the terminal, and then work exclusively from Ardor (in case it is your DAW).
In this intro, I'm going to launch Ardor directly.
1. Audio / MIDI settings
If we have not started JACK previously, it will be the first thing we see.
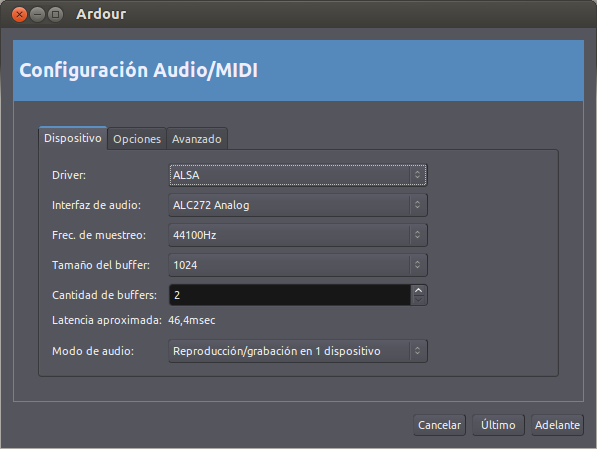
The "device" tab is of special importance. In it we will establish the basic parameters of the JACK audio server.
- Driver: type of audio interface. As you should already know, the integrated or usb cards work with ALSA and the firewire with FFADO.
- Audio interface: depending on the driver that we have selected, we can choose between all the available devices.
- Buffer size: fundamental aspect of latency (delay) and system stability. The larger the buffer size, the higher the latency (less than 20 ms is recommended so that the lag allows us to record above what we are listening to). On the other hand, the smaller the buffer size there will be less latency, but a higher performance will also be required from the system. With a 256 or 512 buffer you should record without problem, while 1024 or more would be recommended when mixing or mastering, since in these stages latency is not so important.
2. Create / Open Session
After configuring the audio server, we can open an existing recording session or create a new one. When we create a new session, a whole directory is generated that organizes the information and the different audio takes of our project (as in any DAW worth its salt).
It is not recommended that you enter these folders unless you want to copy an exported file, since you could alter relevant information for the program and corrupt the session. Although everything can be reassembled, it is better to avoid that work. If what you want is to take the session to another PC, you only have to copy the entire folder
With Ardor we can create «templates». This will avoid us having base projects with the tracks, buses and plugins that we want so as not to have to repeat the whole process in recordings with a similar structure. It is not a relevant topic now, as it will be my next entry on Ardor.
On the other hand, we can also create «scenes», which are variations of the project accessible from this menu. Likewise, it will be a topic to see later.
3. Main Window
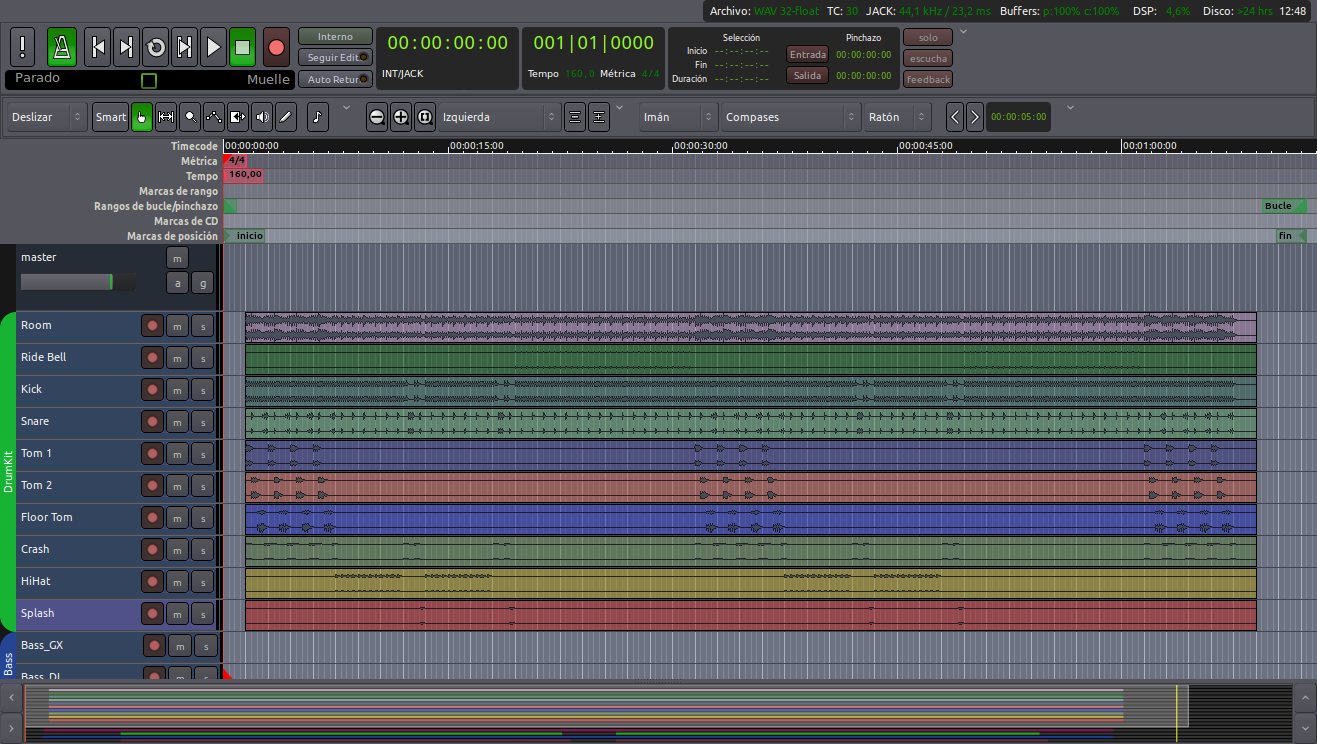
The main Ardor interface consists of the following sections:
- Transport: Playback and metronome controls, timing ("internal" by default so Ardor controls the transport), JACK server information, session, and punch settings.
- Editing toolbar: operating mode selectors (clip editing, region ...), track size and zoom controls, and mesh / grid settings (which mark the behavior of audio clips and regions against time divisions).
- Time: if we right-click on it, a menu is displayed in which we can select the time bars that we want: time code, metric, tempo, punch, loop, etc. We can modify or rename the indicators (metric, tempo, position marks) by dragging them or by right clicking.
- Multitracks: section that contains the master bus track (by default) and all the audio / midi tracks and buses that we want to add (by right-clicking or from the «track» menu). Depending on the height of the tracks, more or less controls will be shown.
- Summary: view of the structure of the entire topic.
4. Mixer in editor and edit list
From the «View» menu we can add these two sections.

- The mixer in the editor (left) allows us to modify all the mixing parameters of the selected track (plugins, inputs and outputs, pan…).
- The edit list (right) allows us to access all the different audio takes (recorded and processed), track and bus configuration, groups ... The audio clips or regions present a drop-down menu to identify all the possible variations they have undergone. . From here we can drag them to the slopes.
5. Audio Connections Manager
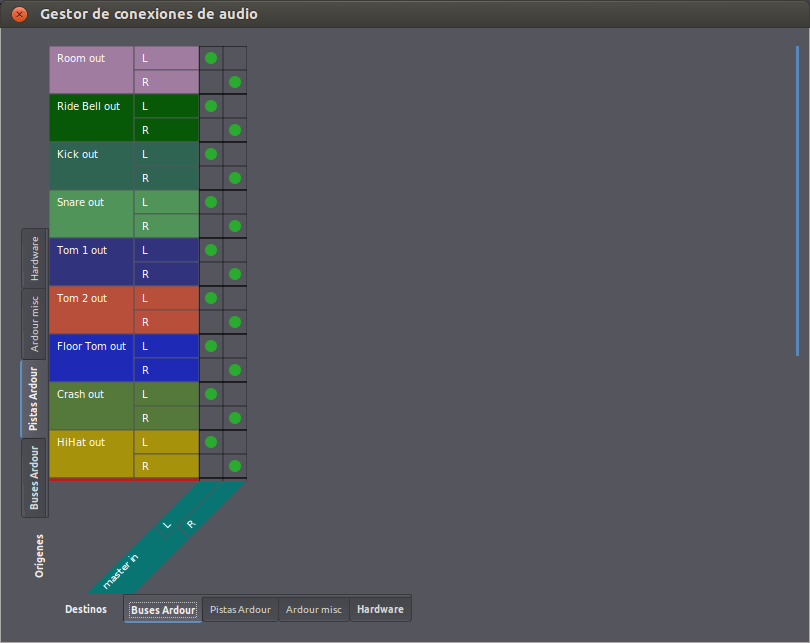
The "mixer in editor" is very useful to connect all the tracks and buses with their corresponding inputs and outputs, but sometimes we will find ourselves in the position of having to make multiple connections (imagine the case that we want to import 6 tracks of toms that we want to associate with an exclusive bus). For this, and for more, the audio connection manager will make us completely forget about tools like QJackCTL.
6. The Mixer

Once our recording is done, we will spend almost all the rest of the time in this window (accessible from the menu or with 'Alt + M'). You can see four sections:
- Channels.
- Groups.
- Tracks and buses (with all of them, ALL their controls: name, input, phase, inserts, sends, pan, fader, output… among others).
- Master channel.
You will understand that this section is too extensive, so it remains for another entry. The regulars of music production will already know what to do with it.
7. «Import» menu
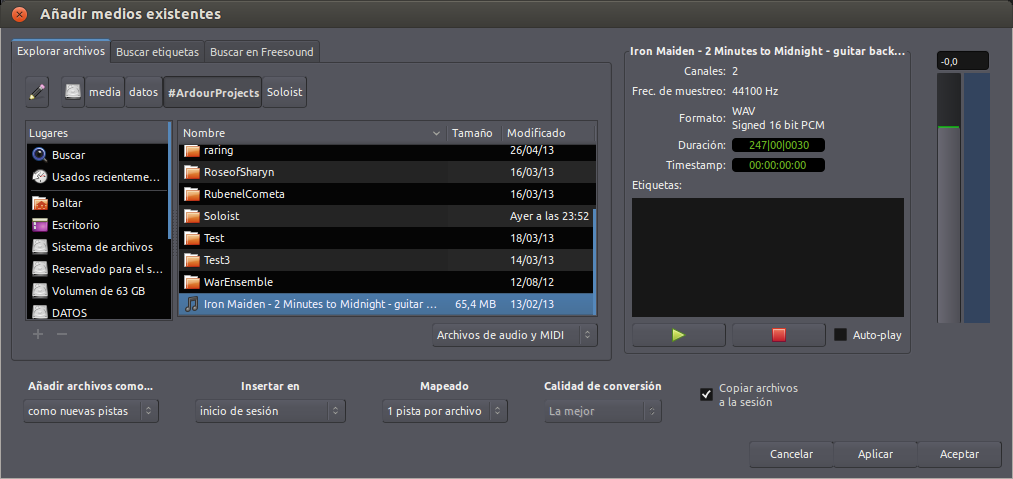
So that you can start playing with it, look for a project that you have exported in tracks (if you don't have any at hand, you can download one of the ones provided by the "guru" mike senior).
My advice for this menu "File> Import" will be that you select the options "import at login", "mapping: 1 track per file" and "copy files to session".
The creators of Ardor are quite reluctant to let people work with MP3, so they don't make it easy. If your projects are mp3, you can convert them with Audacity, the terminal or others. The sampling frequency is not a problem, if your files have another Ardor it will indicate it in red, but it will convert them without problem.
Very interesting. Thank you!
Right now I'm out of time for these things, but when I go back to the musical theme in GNU / Linux I'll stop by here to give the beating Ha, ha, ha!
Thanks for this series. A greeting.
Hello, I still can't find how to configure Ardor in a simpler way
, It is my first time in this program and I do not understand much, you would be able to explain it better
with images that show how it should be configured?
It turns out that I need to record myself, I like to sing and play guitar, I would like to record my songs
on my laptop with the internal microphone, since I don't have one to connect it
I'd really appreciate it if you could do it.
thanks in advance and greetings!