
|
Since you start using GNU / Linux one of the things that most attract the eye are the effects and functionalities that the Compiz composition and window manager can provide you, but if you have an old PC the first thing that comes to mind is that you won't be able to run those wonderful effects on your gadget. False! One day reading on the Arch Linux forums I realized that there was something called “Compiz Standalone” that apparently lets you make your own desktop environment from scratch and, best of all, with the amazing effects of Compiz. |
In this article I am going to show you how to create your own Compiz Standalone session in Ubuntu, the version I use for testing is Ubuntu 12.04, but I suppose it will work just as well in later versions.
Configuration
1.- The first thing we must do is install the necessary packages:
sudo apt-get install compizconfig-settings-manager compiz-plugins-extra
With this we are installing the CompizConfig Options Manager or "ccsm" which is an "advanced" configuration utility for Compiz and some Plug-ins.
2.- Create the session file for the Login Manager:
Since we use LightDM to login in Ubuntu, we need to create an index file for LightDM to read and launch the necessary applications.
gksu gedit /usr/share/xsessions/compiz-session.desktop
And inside the file we paste the following:
[Desktop Entry] Encoding = UTF-8 Name = Compiz Comment = Compiz Fusion Standalone Exec = / usr / local / bin / compiz-session Type = Application
We save the file and close it.
You can modify the Name and Comment sections to your liking, but the Exec option is better if you leave it that way, since we are going to work with several files to start the Compiz session, but if you prefer to change the names there is no problem as long as make the pertinent modifications to the other files.
3.- Build our session:
As we can see in the previous step, the session file will call a script to start the session. Now continue to create that script.
gksu gedit / usr / local / bin / compiz-session
And inside the file we paste the following:
#! / bin / bash if test -z "$ DBUS_SESSION_BUS_ADDRESS"; then eval `dbus-launch --sh-syntax --exit-with-session` fi compiz --replace ccp & wmpid = $! sleep 1 if [-f ~ / .compiz-session]; then source ~ / .compiz-session & else xterm & fi # Wait for WM wait $ wmpid
We save the file, close it and make it executable:
sudo chmod 755 / usr / local / bin / compiz-session
The above script is for the desktop manager to log in and start the applications that we specify at startup along with Compiz and D-Bus.
4.- Applications at startup
In the previous step we created a script that started D-Bus together with Compiz but if we log in as it is at this moment, the only thing we would see would be the mouse pointer, then we need to create the file that will start the applications that will make up the desktop environment as if we were in Openbox; the panel, dropbox, docks, etc.
We execute in the terminal:
gedit ~ / .compiz-session
Inside this file we will put the applications that we want to be executed at the beginning of our Compiz Standalone session.
Mine was like this:

As an example you can put the following in your file:
#! / bin / bash gnome-settings-daemon & tint2 & nm-applet & bluetooth-applet & xscreensaver -no-splash & gnome-terminal &
gnome-settings-daemon will load your settings into GTK + themes and other system settings.
tint2 is a minimalist and very configurable panel, a lightweight alternative to the Gnome panels, although you can also set the XFCE panel to start for example, most likely tint2 is not installed on your system:
sudo apt-get install tint2
5.- Final touches and customization:
As a decent window manager we should add an application menu to make it more comfortable to open applications, we can achieve this with the myGtkMenu application, to install it in Ubuntu you can follow this tutorial that I did, it is not much to do but that would do that an optional step lengthens the article much more.
- Install myGtkMenu on Ubuntu
If you have Ubuntu 64 bit, you will have to recompile the application.
Now, for the menu to load when we right-click on the desktop, we must open the Compiz configuration «ccsm», the plugins window will open, we go to commands and in the first command line we put “myGtkMenu file-de-menu”, where menu-file will be the path where the menu configuration file for myGtkMenu will be, then we go to the "key combinations" tab and choose a combination, it can be Shift + Alt + m. We enable the Plug-in leaving “Commands” activated.

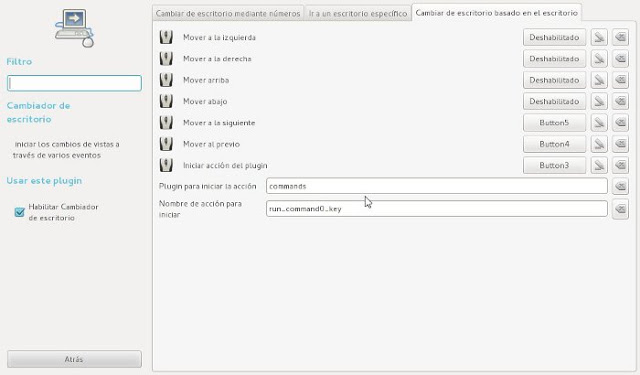
Then we go to the Plug-in "Desktop Changer" and in the tab "Change desktop based on desktop", we modify the last two options "Plug-in to start the action" and "Name of action to start" so that it remains So:
Key Combinations (Hotkeys)
Compiz is a window manager, with support for commands, but it only lets us configure eleven commands, so we resort to other applications such as xbindkeys which allows us to configure all the combinations we want (personally, I don't have it working because I don't use the keyboard much ), we install it with:
sudo apt-get install xbindkeys
You can follow this tutorial to configure xbindkeys, it is still really easy
- XbindKeys: Setting up your keyboard
The only thing we lack are the commands to log out, for this I use the same Compiz menu, but you can also use applications such as oblogout or whatever you want, you are totally making your desktop from scratch 😀

In this capture I am not using myGTKmenu, although it is Compiz standalone, I am using compiz-boxmenu because this capture was taken running my Arch Linux.
Now we edit our sudoers file, it is important that to open the file you do it in the following way so that you will not screw up with sudo:
sudo EDITOR = nano visudo
Where it says nano can go leafpad, gedit or the editor you prefer.
And you add this to the last line:
thedary arch-crawl = NOPASSWD: / sbin / shutdown -h now, / sbin / halt, / sbin / poweroff, / sbin / reboot
YOU MUST CHANGE What is in red for your username and what is in green for your hostname, (The name you put on your pc)
Now you can put the corresponding commands for "Logout", "Shutdown" and "Restart" in your menu file.
Shutdown: sudo shutdown now
Reboot: sudo reboot
Sign out: pkill compiz
Customization
If you followed all the steps well, you should have your compiz session active and ready to go, what follows is customization.
Screen resolution, keyboard settings and enable numlock at startup
To add an "unsupported" resolution to my compiz session and not bother with the Xorg.conf which is somewhat sensitive ¬¬ 'add xrandr to my startup script and for keyboard layout I used the command setxkbmap (This part does depend on your keyboard and you should know by now what is the distribution of yours), the last command is to activate the Numlock at the beginning.
We must install numlockx, because it does not come with the system:
sudo apt-get install numlockx
We add the lines just above our startup script, our .xinitrc would look like this:
Something like this would be fine:
xrandr -s 1280x1024 xrandr --dpi 96 setxkbmap en & numlockx & ~ / .compiz-home & exec compiz ccp &
Wallpaper
It is not necessary to use other applications because compiz brings the Wallpaper plugin but if you still want to use another you can use feh or nitrogen
Activate the Wallpaper plugin, then click New and choose the easy image:

Icons on the desktop
Personally, I am not a fan of icons on the desktop, but to manage icons on the desktop we can use idesk, pcmanfm or nautilus, and others, all these we can install with yaourt, with pcmanfm we can also configure the wallpaper for the desktop, and we gives the option to keep the compiz-boxmenu menu on the desktop, if we use nautilus we will lose the desktop menu. The following tutorial for Openbox is totally valid and applicable for Compiz Standalone as well.
[OpenBox] Add desktop icons via PCmanFM / SpaceFMDon't forget to add pcmanfm –desktop & or spaceman –desktop & to the startup script depending on which one you have chosen.
Panel and Dock
Docks we know many that we can use cairo-dock, avant-window-navigator, docky all are in yaourt and the panel you want to add is of your preference xfce4-panel, lxpanel, mate-panel, gnome-panel ... As we are following the philosophy KISS we will install a very simple, cute and configurable panel if gentlemen is tint2
sudo apt-get install tint2

The configuration of this panel is a piece of cake we just run tint2conf and the rest is up to your imagination
Application launcher
I like it a lot, it's simple and beautiful it's called dmenu, but you can also install gmrun, synapse or whatever you like.
sudo apt-get install dmenu
we execute it with dmenu_run
Screen Saver (Screensaver)
You want a screensaver, so let's use xscreensaver
sudo apt-get install xscreensaver
You must add this to our startup script so that it loads every time we log in:
/ usr / bin / xscreensaver -no-splash &
To choose and configure the Screensaver we execute xscreensaver-demo
Common problems
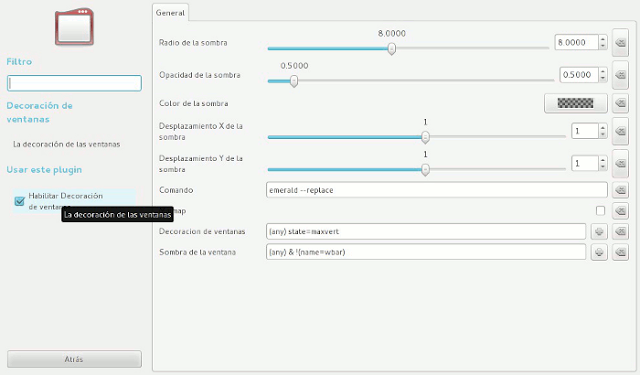
Borders not visible on windows (emerald, gtk-window-decorator, etc ..)
- If this happens to you it is because the window decoration plugin is not activated, go to ccsm and search for Window decoration and activate it.
The deformation of the cube does not work: If this happens to you, it may be because you use feh or nitrogen or another program for the wallpaper, there is no other way and you should activate the "Wallpaper" plugin, let's not even think it was so bad
Conky does not work well or looks bad: If conky does not work well, change the line "own_window_type xxxxx", from the conky configuration, to "own_window_type dock".
Great thanks for the contribution
Another "tip" many times it is tedious to have to configure all those things by hand, then it is better an environment that already brings the things preconfigured, I highly recommend LXDE + Compiz, in this way there are many things that you do not need to configure and to tell you to LXDE that starts with compiz, it is enough to modify a file, and to remove the LXDE panel, it is enough to modify the autostart (Y)
I've done it with Lubuntu and it's great 😉
Excellent tutorial, is there a problem if I use gdm?, I have gnome 3.6 installed on ubuntu