I've had a problem with Google Chrome translation on Linux, I have managed to improve it with some modifications, but I do not quite like this. That is why I have tried to find an alternative that allows me to translate words or some texts that I do not know.
To solve this problem, we are going to teach how to translate texts in Linux using keyboard shortcuts and notifications, for this I will use a guide Andrew (Alin Andrey) That is going great and I hope it will serve you well. The guide consists of several scripts made by Andrew and the correction of a script dating back to 2012 that was used as the basis.
This method allows us to translate any text that can be selected (texts on web pages, pdf, txt, applications, among others), so its uses can be many.

How to translate texts in Linux
Advantages and Disadvantages of this solution
Among the advantages of this method we can highlight:
- It allows the translation of any text that can be selected (PDF, web pages, magazines, libreoffice, in-app texts, among others.
- It allows to translate texts quickly, thanks to the use of keyboard shortcuts.
- Allows you to view translations from system notifications.
- Allows translation from various source languages.
- The target language can be parameterized.
- It is ideal for translating small words and phrases.
- It is easy to install and configure.
The main disadvantages of this method are:
- You cannot translate entire web pages.
- If Google cannot determine the source language, it will return an error and therefore will not translate the text.
- An internet connection is required for this method to work.
Configuring the script to translate texts in Linux
In order to configure and run the script to translate selected texts using keyboard shortcut and notifications we must follow the following steps:
- Instalar las dependencias necesarias, en primer lugar instalar libnotify-bin (para enviar notificaciones de escritorio), wget (para recuperar la traducción de Google) y XSEL (que se utiliza para obtener el texto resaltado en ese momento). En Ubuntu y derivados puedes instalarlo usando el siguiente comando:
sudo apt-get install libnotify-bin wget xsel- Copy the following code to the console:
#!/usr/bin/env bash
notify-send --icon=info "$(xsel -o)" "$(wget -U "Mozilla/5.0" -qO - "http://translate.googleapis.com/translate_a/single?client=gtx&sl=auto&tl=es&dt=t&q=$(xsel -o | sed "s/[\"'<>]//g")" | sed "s/,,,0]],,.*//g" | awk -F'"' '{print $2, $6}')"
and then create a file called "notitrans" (You can call it whatever you want, for this case it will be called what the original author called it), which will contain the previous code.
If you want to translate to a language other than Spanish, you must replace «tl = es» with the language of your preference, for example «tl = ru» for Russian, «tl = fr» for French, etc.
- We must give execution permission to the file created with the following command:
chmod +x ~/notitrans- We add the script to our $ PATH with the following command
sudo mv ~/notitrans /usr/local/bin/- Our script is ready, now we have to make it activate when we use a keyboard shortcut, for this we must create a custom access.
For Cinnamon, GNOME, and Unity, you can create a custom keyboard shortcut by accessing System Settings> Keyboard> Keyboard Shortcuts> Custom Shortcuts, where we must click on add custom shortcut. Where we enter the name of the shortcut, in my case I put Translate and in the Order we place «notitrans»Or the name that we have given to our script:
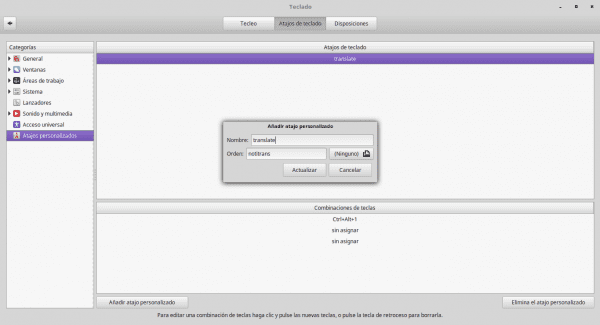
add keyboard shortcut
Variations of the script to translate texts in Linux
Es muy fácil modificar el script para adaptarlo mejor a sus necesidades. A continuación encontrará un par de variaciones que ha creado Andrew. Para usar estos script, simplemente siga los mismos pasos que anteriormente (incluyendo cambiar «es» al idioma en el que desea traducir el texto), pero no copie el código de script anterior sino que utilice el que corresponda:
Visualizing translation with Zenity
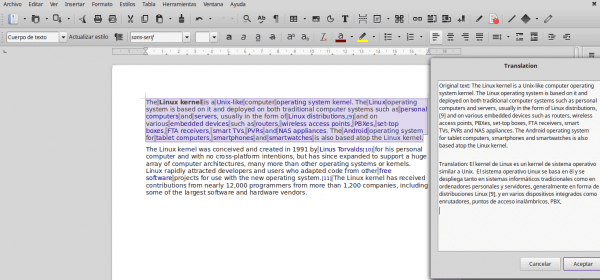
In order to view our translation in Zenity We must follow the following steps:
- Install Zenity on your system. In Ubuntu and derivatives you can install it with the following command:
sudo apt-get install zenity- Perform all the steps in the original script, but use the following code
#!/usr/bin/env bash
text="$(xsel -o)"
translate="$(wget -U "Mozilla/5.0" -qO - "http://translate.googleapis.com/translate_a/single?client=gtx&sl=auto&tl=es&dt=t&q=$(echo $text | sed "s/[\"'<>]//g")" | sed "s/,,,0]],,.*//g" | awk -F'"' '{print $2, $6}')"
echo -e "Original text:" "$text"'\n' > /tmp/notitrans
echo "Translation:" "$translate" >> /tmp/notitrans
zenity --text-info --title="Translation" --filename=/tmp/notitrans
Viewing the translation in the notifications and automatically copying to our clipboard
To have a variation where the translation is shown by system notifications and automatically copied to our clipboard we must do the following steps:
- Install xclip on your system. In Ubuntu and derivatives you can do it using the following command:
sudo apt-get install xclip
- Perform all the steps in the original script, but use the following code
#!/usr/bin/env bash
text="$(xsel -o)"
translate="$(wget -U "Mozilla/5.0" -qO - "http://translate.googleapis.com/translate_a/single?client=gtx&sl=auto&tl=en&dt=t&q=$(echo $text | sed "s/[\"'<>]//g")" | sed "s/,,,0]],,.*//g" | awk -F'"' '{print $2, $6}')"
echo "$translate" | xclip -selection clipboard
notify-send --icon=info "$text" "$translate"
Already culminating, I hope this article allows you to make translations of words or texts that you want, in the same way if any of you have any questions or modification of the script, do not hesitate to leave your comments.
Source: Webupd8
Thank you very much for the script; It is very useful, and thank you very much for the translation and the article because these are really the true articles that make you grow in knowledge regarding the GNU Linux field.
I suggest you please more translations and more articles ...
Greetings and have nice day.
Excellent + 5, thank you! A fix: "Copy the following code to the console:", it is not in the console but in the created text file.
Great contribution, it has been very good for me. I would like to clarify a question, is it possible to make the text to be translated larger? In other words, with Zenity I select a paragraph and it doesn't translate everything, just a couple of sentences, with Ubuntu's own notification system it translates only the first sentence. Is there a way to expand it?
Regards and thank you very much in advance.
Very good contribution!
What I was looking for!
Well, not really, I was looking for a way to do it only in okular documents (with some kind of plugin), since I usually work with a lot of PDF's. But this helps me translate word beyond okular. It is an excellent contribution
I thank you !!!
Excellent is little. Thank you