What is a loop filesystem?
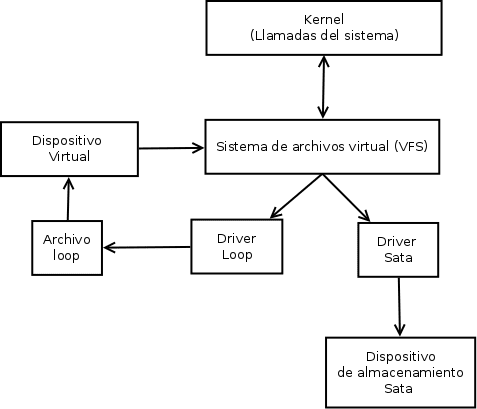
Gnu / Linux (and the vast majority of unix systems) has a mechanism that allows mounting a file (previously formatted) as if it were a hard disk, usually without a partition table. This crappy diagram (made by me) explains how this mechanism works.
Uses of loop files
1- Mount.iso files
The .iso files, the standard par excellence on CDs and DVDs, is nothing more than a loop file whose file system can be ISO 9960. (more common on CDs) or UDF (most common on DVDs). To mount it, we will use the mount command.
mkdir iso # create the directory chmod -R 666 iso # grant all users read permission mount image.iso iso / # mount the iso image (requires root)
The limitation you have is that, for obvious reasons, both file systems are read-only.
2- read-only squashfs
Suppose we have a folder of images and / or videos that is organized according to the year in which it was taken. Obviously, it is quite unlikely that we want to modify the data contained in folders from previous years. That's where Squashfs comes in. Squashfs is a read-only compressed filesystem, so once the image is made, we will not be able to modify the data within.
Thus, not only we will save huge amounts of space, but there will also be the curious effect that the reading of the files will be faster, by having to read smaller files, since nowadays decompressing a file is a minimum effort for most CPUs.
Leaving the preambles, to create the squashfs image we must use the mksquashfs command, whose syntax is simple:
mksquashfs directorio 1 [directorio 2 directorio 3...] imagen.sqsfs -comp [algoritmo de compresión] -b [tamaño del bloque ]
And here is a practical example:
mksquashfs fotos-2009 fotos-2010 fotos-2011 fotos-2012 fotos-2013 fotos_2009-2013.sqsfs -comp xz -bs 1M
Well, the chosen algorithm is xz since it is the one that higher compression ratio offers (of those available), while the chosen block size is the maximum. what allows for better compression results (by default they are 64KiB).
Now we should be able to mount it with a simple;
mount fotos_2009-2013.sqsfs fotos_2009-2013/
After checking that everything is correct, we can delete the original files or leave the file as a backup.
In case we want it to be mounted when the OS starts, we must add a line of this style to the / etc / fstab:
/dir/loop.sqsh /dir/mountdir squashfs ro,defaults 0 0
Now, what happens when we want to add or delete files, or simply extract these snapshots? Well, we have the command the command unsquashfs.
unsquashfs [opciones] snapshot.sqfs [Directorios o archivos que extraer]
By default it will use "squashfs-root" as the extraction directory. can be changed with -d option
- livecd's
- Embedded Systems
- Servers
- In general, any read-only system
3- «Emergency swap»
Imagine that for whatever reason (hibernation, massive compilations ...) you need an extra swap. This is where the loop file comes into play, the first step is to make an empty file of a certain size, with a certain block size, we do this with the command dd:
dd if=/dev/zero of=loop bs=1M count=512
In this case, the block is one MiB and the file size is 512MiB. It does not have to be this way.
We create and activate the swap with this command
mkswap loop && swapon loop
Bear in mind that the performance of a loop file is always somewhat lower than that of a real physical one.
4-do what you want
These are just some of the most characteristic examples, feel free to experiment with chroots, encryption systems, nested loops… Your possibilities are limitless. But, be careful with the commands you run, think carefully before pressing enter.
Links of Interest
- squash fs wikipedia
- man mksquashfs
- man unsquashfs
- iso 9960 wikipedia
- udf wikipedia
- vfs wikipedia
- loop wikipedia
Good post che !! I have some gigantic backups out there and it never occurred to me to compress them. I'm going to use this and by the way I encrypt my external one to fill it out and then I remembered that I was going to encrypt it 🙁
Interesting to try the squashfs thing
Good tutorial, I had read how to create img files with dd and mount them, but did not know the use of Squashfs and its compression; Although it does not allow modifying its content, its use can be useful in situations such as those you comment. Thanks for sharing, greetings.
Very good to know, thanks for the Tip.
You always learn something new. Excellent!
It's funny, I knew squashfs and what they are for, but it had never occurred to me to compress my images. Thanks for the tip.
Impressive, let's try it to see what's up, very good tip
excellent tuto !!! =)… Very good tip !!!
Hello roader. Very interesting article, thanks for sharing.
In Gentoo you need to enable SquashFS support in the kernel before compiling it, I'll test it to see how it works. Thank you.
tested on Gentoo compiling the kernel for it and excellent.
Just correct a small typo, roader.
In the example:
mksquashfs photos-2009 photos-2010 photos-2011 photos-2012 photos-2013 photos_2009-2013.sqsfs -comp xz -bs 1M
spare the s in "-bs" (which determines the size of the block), it should look like this:
mksquashfs photos-2009 photos-2010 photos-2011 photos-2012 photos-2013 photos_2009-2013.sqsfs -comp xz -b 1M