Hello friends!. I bring you a tight summary of how to implement a standalone server in Debian using only the Console and a Text Editor.
Previous step to realize the limitations and / or complexities of the graphical interfaces that exist to implement a similar service, and that I invite you to try them.
We are not forcing anyone to use the method given here. We only share our little experience in this regard. Very personally I think it is easier to share folders in Linux using the console and a text editor.
There are many articles on the web about how to use graphical tools such as System-Config-Samba in Ubuntu, SWAT, Gadmin-Samba, Zentyal Samba in Ubuntu, etcetera.
We recommend you find, install, use and study them, and then compare them with the simple method proposed here. As we say in Cuba, Draw your own conclusions.
The method can be used for any machine running Debian, be it a desktop machine or a server.
Any questions, read the previous article «Samba: Standalone Server on Debian»Or consult the documentation.
We will see:
- Home Network
- 1.- We install and configure Samba
- 2.- We create the users on our team and add them to the Samba user database.
- 3.- We create the directories to share and reflect them in the file /etc/samba/smb.conf.
In the example we will create the users so that they can NOT start a local session on our computer. We will also create them without a personal folder. We also explain why we do NOT use pdbedit to add them to the Samba user database.
Home network
At least one of the PCs will have Linux installed :-), and more specifically Debian. For the example we will choose the pc-son, because the Son, who is called Pepito (Jaimito in other latitudes) has a heart for Free Software and is studying about it. From time to time he discusses with the Father about the advantages of the SWL, but the latter usually tells him "I have more experience than you, and that of Libre ... does not convince me." Then the Son replied "Father, remember that your Windows 7 is a pirated copy ...". Nothing, family things. 🙂
Team: pc-mother, pc-father, pc-daughter and pc-son
subnet: 192.168.1.0/255.255.255.0
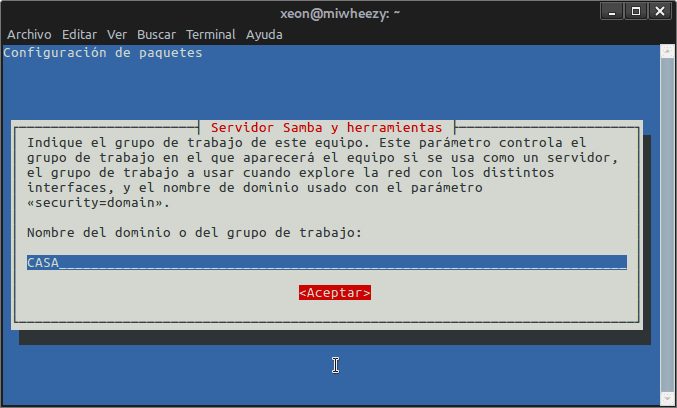
Workgroup: HOUSE
Users: mother, father, daughter and son
The following data that will serve to resolve the names in the network, we must add them to the file hosts in each of the teams. In the case of Linux the file is / Etc / hosts, while in Windows it is usually in C: \ Windows \ System32 \ Drivers \ etc \ hosts.
192.168.1.10 mother-pc
192.168.1.15 pc-parent
192.168.1.20 pc-daughter
192.168.1.25 pc-child
That way we will save installing and configuring a DNS. However, whoever wants to can do so using the guide «Primary Master DNS .... ".
The Working Group on the Debian team will declare it in the file /etc/samba/smb.conf. On Windows, it is declared in the MyPc Properties. The IP addresses of each Windows computer are declared in the Properties of the Network Connection.
To check that everything works fine so far, on any computer we execute ping remote-pc-name and the remote computer should return the request. We take it for granted that we know how to make a little home network. How to do it is not the objective of this post. They can ask friends who already know. We only gave the essential tips.
1.- We install and configure Samba
: ~ # aptitude install samba smbclient: ~ # cp /etc/samba/smb.conf /etc/samba/smb.conf.original: ~ # dpkg-reconfigure samba

dpkg-reconfigure samba-common


: ~ # testparm: ~ # service samba restart: ~ # smbclient -L localhost -U: ~ # smbclient -L localhost -U% Domain = [HOME] OS = [Unix] Server = [Samba 3.6.6] Sharename Type Comment --------- ---- ------- print $ Disk Printer Drivers IPC $ IPC IPC Service (child-pc server) Domain = [HOME] OS = [Unix] Server = [Samba 3.6.6] Server Comment --------- ------- PC-SON pc-son server Workgroup Master --------- ------- HOME PC- SON
Note: If you don't immediately get the above output correctly, wait a few minutes. Also, if there is no WINS server on the network, edit the file /etc/samba/smb.conf and uncomment the line # wins support = no and leave it like this: wins support = yes. Then run as the user root: body parm and then service samba reset.
2.- We create the users on our team and add them to the Samba user database.
adduser --no-create-home --shell / bin / false parent adduser --no-create-home --shell / bin / false stem adduser --no-create-home --shell / bin / false child adduser - -no-create-home --shell / bin / false child
If you want to verify the non-creation of personal folders, run updatedb and then locate parent o locate mother. If you also want to check if the created users can log in to the local machine, try to do so directly or via ssh.
Why don't we use pdbedit to add the team users to Samba?.
If we execute man pdbedit, and we read about the option -a | –create it is explained very well that it adds users to Samba, but that DO NOT calls the UNIX Password Synchronization Script. Further, pdbedit must always be invoked by the user root or with your permissions.
If in the main Samba configuration file /etc/samba/smb.conf is declared unix password sync = yes, which is the default parameter, pdbedit it will only update the data in the Samba user database and it will NOT do so in the computer database, that is, in the file / Etc / shadow.
A bit technical but that's the way it is. However, "smbpasswd » SI add the user and synchronize their password immediately, through the Synchronization Script. So let's use smbpasswd so as not to get entangled in the horses' legs. 🙂 Our first user to add to Samba is root.
smbpasswd -a root smbpasswd -a father smbpasswd -a mother smbpasswd -a son smbpasswd -a daughter
Now IF we will use the command pdbedit for checks. For more information run man pdbedit. We cannot give all the answers in one post or in a whole series of them. Samba is Very Big indeed.
: ~ # pdbedit -L root: 0: root mother: 1002: daughter: 1004: father: 1001: son: 1003:: ~ # pdbedit -Lv
For convenience, we add all created users to the group users. Very convenient for public folders with read-only or read / write permissions. The group users is a wild card.
: ~ # adduser mother users: ~ # adduser daughter users: ~ # adduser father users: ~ # adduser child users: ~ # less / etc / group | grep users users: x: 100: father, mother, son, daughter
So far everything is Ok in relation to the creation of users.
3.- We create the directories to share and reflect them in the file /etc/samba/smb.conf
Basically it is the same as published in the previous article.
Example 1: We want to share the folder / home / son / music for all users of the house. The permission will be read-only. First of all we create the folder / home / son / music and we configure its owner and permissions if necessary. As the user hijo we execute:
mkdir / home / child / music ls -l / home / child | grep music
To edit the Samba configuration file with permissions of root, we push ALT + F2 and we execute gksu gedit /etc/samba/smb.conf, we type the password of the root, and add the following at the end of the file:
[pc-child-music] comment = Personal music folder path = / home / child / music read only = Yes valid users = @users read list = @users
After the modifications to the file, we execute body parm as the user hijo and we recharge the service as root. We can also run both commands like root:
testparm service samba reload
To check the newly configured service we can do it by executing the following command on the computer itself:
smbclient -L localhost -U%
Example 2: We want to share the folder / home / son / music for all. The permissions will be read / write for hijo and read-only for the rest of the family grouped in the group users. We have no need to modify the owner or permissions on the folder. We just change the share settings in the file a bit smb.conf.
[pc-child-music] comment = Personal music folder path = / home / child / music read only = No valid users = @users write list = child read list = @users
Example 3: Pepito's father is hearty to the action series and already has his hard drive at the top. He asked his son to leave a space on his machine so that he could fill it with the series, and also make it accessible to the whole family.
Pepito agreed, of course, so he can ask his dad to buy him another 2-tera hard drive, which is his dream. Pepito is sure to blackmail his father with the fact that he saved him a few pesos with the installation of the pirated Windows 7. 🙂
Si we execute as root:
mkdir / home / child / series chown -R root: users / home / child / series chmod -R g + ws / home / child / series ls -l / home / child | grep series
To edit the Samba configuration file with permissions of root, we push ALT + F2 and we execute gksu gedit /etc/samba/smb.conf, we type the password of the root, and add the following at the end of the file:
[pc-child-series] comment = Dad's Series path = / home / child / series read only = No valid users = @users write list = parent, child read list = @users force create mode = 0660 force directory mode = 0770
We immediately check the basic syntax of the smb.conf through body parm and we recharge the service through service samba reload. We can also run smbclient -L localhost -U%. in Pepito's machine, or smbclient -L pc-child -U% from another computer in the house that had Linux installed, as well as the package smbclient.
And this is it for today, Friends !!!
Programmer in Visual FoxPro ... I drop a tear ...
Excellent contribution!
Hug! Paul.
The tear is for the good times, eh? Foxpro is like Elvis, he still lives. I run it on Wine on Debian like the most. Thanks for your comment!!!
My first comment is to say "Excellent comment", Happy day. !!!
Excellent explanation, easy and simple.
100% recommended, I also use this method, and by console, it is much simpler and faster.
regards
Excellent. It couldn't be a better guide to make shared folders for Windows from Debian.
Thank you all for commenting and for the good reception of the post !!!
Impeccable. Thank you very much for the contribution. It will be of great use.
Excellent contribution, it will help me to leave security = share
Security = Share is a security mode disapproved by Team Samba as shown in their documentation. I am pleased that the article has served you so that you abandon the use of that way. Security = User is the default mode. Thanks for comment.
I always say it, your posts are very educational and very well explained, as you say and as it seems to me, it is always better to configure samba by hand and not with interfaces that do not always do the job well, your post is very good, continue like this. God bless you, Greetings
@Erick, I try to write articles in a positive way and to reach the majority of readers. I think that like all other things, sometimes I get it and sometimes I don't. Thanks again to everyone!!!.
Very good article, only that since I am comfortable, I use syste-config-samba, and it is much easier for me 🙂
System Config Samba, from Ubuntu and other distros, does not solve the problem of permissions on folders. As a general rule, the people who use it, grant 777 permissions to the folders and it is an elementary way of sharing in the XP style without a domain controller, where you allow anyone to read and write. In the end, what can be more complicated than the issue of permissions, you must do it manually if you want a bit of security. If the latter is not so necessary, the method is valid. Thanks for comment!!!
Good article, just to say that when creating a group in Windows, it discovers the computers that make up the network.
One question, what if I use DHCP on all my terminals, it happens that I have many devices connected wirelessly and I refuse to put static addresses on them, thanks.
Sorry for the delay in responding, but that's when I realized your comment. I think that if you use DHCP, you must declare your linux samba server to act as a WINS server, and in DHCP configure the subnet and range according to the parameters of your network.
If not, see the Samba documentation about it: "Samba3 - Howto", chapter 48 DNS and DHCP Configuration Guide.
Tremendous article friend.
I also shared through the terminal, it was faster for me, but I always had a problem and it was that on Windows computers, the network explorer never saw my computer, but if I entered the ip directly, if I could navigate the directory shared by Samba.
If not I am wrong and looking here, my problem was, the not adding to the host file on both computers ???
Well, excellent article, I really liked it.
Excellent indeed this and other contributions for samba I am compiling them to make my own file server is like my salvation when one is a novice, it is appreciated.
Congratulation
Thanks @ asen007. For that we write in the hope that it will be useful. I'm glad it helps you in your performance. Congratulations !!!
One more time thanks total ... Debianero de cora ... 😀
Hi, I wanted to know what exactly the command “pdbedit -L” does THANK YOU