Well, this one I think will be a fairly short tutorial and hopefully didactic;). I am going to make a small repository available to you on my github so that you can send your PRs and at the same time so that you can practice how to do all the steps that I am going to leave below. Here is the link to do your test PR:
https://github.com/CodeLabora/TuPrimerPR
Well, let's quickly list the steps necessary to send a PR:
- Fork
- Clone
- Remote
- Branch
- Exchanges
- Add
- Commit
- Push
- PR
I am putting them in English so that they find their respective options on the git command line.
Fork
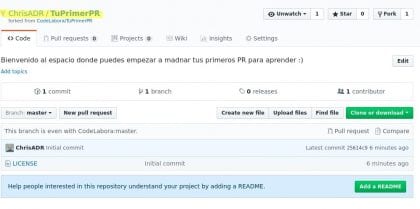
A fork is your own version of a Github repository. This allows you to clone the work of another project and have it in your account so that you can change things without worrying about losing your changes. To make a fork it is only necessary to go to the page and click on the Fork button that is in the upper right part.

Own. Christopher Diaz Riveros
Once the fork is done, you will see that the repository appears in your account.
Own. Christopher Diaz Riveros
Clone
Now that we have a repository we are going to clone it to our team. (I assume that people who use Linux follow me, but for users of other systems there are also versions of git that you can download on their official page.

Own. Christopher Diaz Riveros
And with our terminal we do the following.

Own. Christopher Diaz Riveros
With this we will have a new folder called TuPrimerPR in which our Github project will be. We enter the folder with the command «cd TuPrimerPR» and we will see that inside are the files that are in our fork.

Own. Christopher Diaz Riveros
(Note that the number of files may vary depending on what they find in my repository when they fork)
Remote
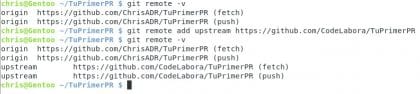
This is an optional step, but one that avoids many problems when working continuously on a project. Fork by default creates an exact copy of the repository, but at the exact moment of creation. This means that if the project continues to advance, your repository is going to fall behind with the passing of days or hours. "Git remote" allows us to specify another download point (the original project) and thus be able to update our project every time we see that the parent project is being updated.
To find your parent project, you just need to use the link that is just below the name of your repository. (Check the second image of the Fork section). We are going to add this information below:

Own. Christopher Diaz Riveros
This is the original project (we will call it upstream to keep up with many projects).
Own. Christopher Diaz Riveros
As you can see, I have added the remote with »git remote add »
With this we will be able to update the project when necessary, but we will not use it now because it is not necessary. (I will explain that later, or in another post, depending on the need)
Branch
The branches (or branches) allow you to create sections of code that you can work in an isolated environment. This means that what you do in a branch does not necessarily affect the original code until a »git merge« is used. It is also an extra functionality that Github allows you, every time you create a branch, Github automatically generates the source of the Pull Request when necessary.

Own. Christopher Diaz Riveros
Now that we are in our special branch, we can work on our contribution.
Exchanges
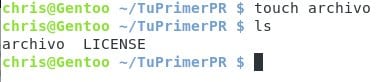
I'm going to add a couple of files so you can see how it's done.
Own. Christopher Diaz Riveros
"Touch" allows us to create a blank file (if it doesn't exist). with this we can move on to our next step.
Add
»Git add» allows us to add files to our commit (I'll explain later). To see what files you can add you can use the command »git status»

Own. Christopher Diaz Riveros
With this we have everything ready for our Commit
Commit
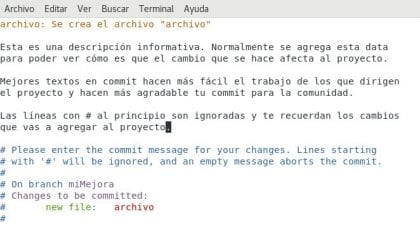
Commits are marks (or milestones) in time. they define a state for all files in the project and accumulate the changes necessary to get from the beginning of the project to the current state. It sounds a bit complex, but it is quite simple, just remember that they are the stairs of your project. We write »git commit» and we will get a window to write our commit message.
Own. Christopher Diaz Riveros
And when finishing and saving the text, we will see something like:

Own. Christopher Diaz Riveros
Where a summary of what the commit does is shown.
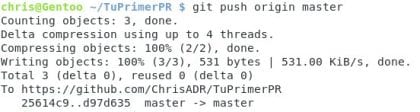
Push
With push we are uploading to our Github account all the commits that we have on the computer that are not in our repository on the internet. This will allow Github to generate the new PR automatically.
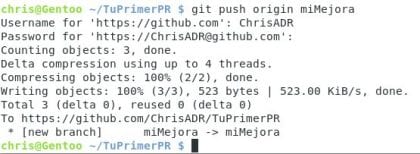
Own. Christopher Diaz Riveros
Notice that we are using the name of our branch and that it asks us for our username and password. At the end it shows us that the myImprove branch has been created within our Github account. Let's see what we have achieved in the browser. 😉
PR

Own. Christopher Diaz Riveros
As you can see, a new line has been created that says "Compare & Pull request". This Github functionality allows us to create the PR in a simple way, we are going to click to see what happens.

Own. Christopher Diaz Riveros
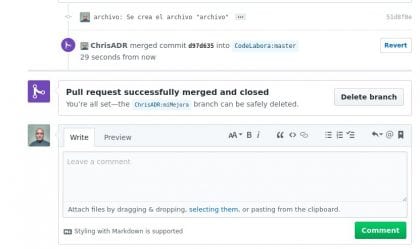
Github is pretty smart. As you can see, parts of the commit are added to the form for submission. It is only necessary to click the button and voila 🙂 Simple.
Extras
This is behind the scenes of the projects, the PR appears and the manager decides whether to accept or not, or to write more messages. In my case I will accept it instantly.
Own. Christopher Diaz Riveros
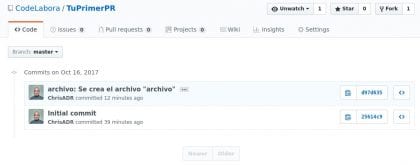
Once the merge is done, they will be able to see the project's commit log and see their name in it.
Own. Christopher Diaz Riveros
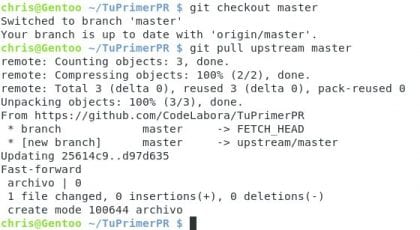
But now we have a problem. That commit does not appear in of our repository, only in the project. Do you remember our remote passage? Now is when it pays off 🙂
We go back to our master branch and do the following:
Own. Christopher Diaz Riveros
With this we have downloaded all the information of the original project to our team. As you can see, our commit appears there. Now we are going to save all this work in our Github repository to be able to delete the branch that has the contribution that they already added to the project.
Own. Christopher Diaz Riveros
Now that we have our updated Github repository we are going to delete our branch, but first we make sure it is inside our main branch (master)

Own. Christopher Diaz Riveros
As you can see I had a slight error, this was because I was in my myImprovement branch when I wanted to delete. This is fixed by returning to the master branch.
Conclusion
Done 🙂 as simple as that. Now that you have mastered the dark secrets of Github for sending PR, I look forward to seeing your contributions on various projects. And if you want you can leave your first PR in my repository 😉 to remember.
I haven't touched a thousand and one Git benefits (EYE, not Github) and as you would expect from developers who are tied to the kernel community, Git is an extremely powerful tool, with hundreds of features.
In order to get a better idea of what it does and all the power of Git, I highly recommend this book. I'm sure it will help you a lot to improve your handling of git.
Greetings and I hope it helps you 😉
Excellent tutorial, hopefully you can continue delving into Git. Thank you!
Clear! I will be adding more content as soon as I can about this and much more.
Excellent
How good it served you 😉 Greetings
As soon as I can I practice it, thank you very much, this tutorial is what I have been looking for for a long time but I could not find it!
Very well explained, from the basics, thank you. I would improve the captuas when you have time.