
|
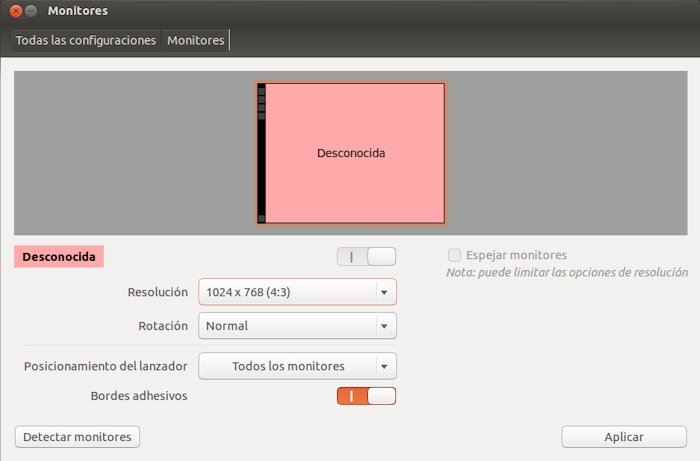
If you go to the System Configuration and enter Monitors, you will see that the resolutions that appear, in many cases (for example those with an Intel graphic) are low or not the ones you would like for your monitor, we will fix it so that start the session with the resolution you want. |
Previous steps
We go to the System Configuration and select Software Sources, Additional Drivers tab, it must be empty because proprietary drivers are not being used.
We go to System Configuration> Monitors and we will see how in the resolution screen there are very few to select, in addition to not being useful:
But let's see how our video card works.
We install the mesa-utils package for Intel, Ati and Nvidia cards:
sudo apt-get install table-utils
We add the repository of free drivers for Intel, ATI and Nvidia:
sudo add-apt-repository ppa: xorg-edgers / ppa
We update the system repositories and the system itself.
sudo apt-get update sudo apt-get upgrade
The computer will have to be restarted.
Now we test how the graphical acceleration is going:
glxinfo | grep -i render
If we see Direct rendering: yes, it is correct. We can see it graphically by typing the following in a terminal:
glxgears
Now, let's get to work
1. From the Terminal you type the following command:
sudo xrandr
It will show us the active graphic modes. Xrandr is a console command to operate / change screen resolution, but on restart it gets lost.
2. We set the resolution:
sudo cvt(x)(y)
Where the "x" and "y" are the resolution data, for example "1280 1024", as you can see they are separated with a space)
3. We enter, for example:
CVT 1280 1024
It will appear something like this:
1280x1024 59.89 Hz (CVT 1.31M4) hsync: 63.67 kHz; pclk: 109.00 MHz Modeline "1280x1024_60.00" 109.00 1280 1368 1496 1712 1024 1027 1034 1063 -hsync + vsync
4. Later we will select everything in the "Modeline" line to use it within a file.
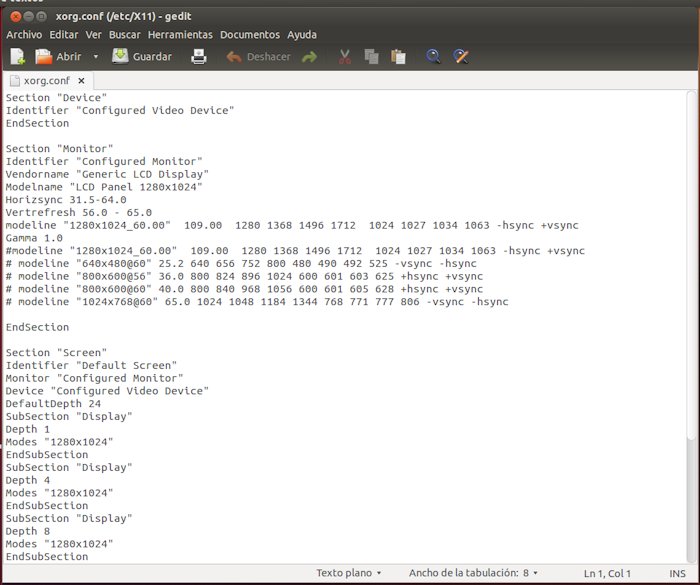
5. We are going to generate the xorg.conf file in the right place, since by default Ubuntu does not use it and it is used to establish the X configuration (graphic server).
sudo gedit /etc/X11/xorg.conf
6. You will see that it has been generated in white. We copy the following and paste it into the blank file:
Section "Device" Identifier "Configured Video Device" EndSection Section "Monitor" Identifier "Configured Monitor" Vendorname "Generic LCD Display" Modelname "LCD Panel 1440x900" Horizsync 31.5-64.0 Vertrefresh 56.0 - 65.0 modeline "1440x900_60.00" 106.47 1440 1520 1672 1904 900 901 904 932 -HSync + Vsync Gamma 1.0 # modeline "640x480 @ 60" 25.2 640 656 752 800 480 490 492 525 -vsync -hsync # modeline "800x600 @ 56" 36.0 800 824 896 1024 600 601 603 625 + hsync + vsync # modeline "800x600 @ 60" 40.0 800 840 968 1056 600 601 605 628 + hsync + vsync # modeline "1024x768 @ 60" 65.0 1024 1048 1184 1344 768 771 777 806 -vsync -hsync # modeline "1440x900_60.00" 106.47 1440 1520 1672 1904 900 901 904 932 -HSync + Vsync EndSection Section "Screen" Identifier "Default Screen" Monitor "Configured Monitor" Device "Configured Video Device" DefaultDepth 24 SubSection "Display" Depth 1 Modes "1440x900" EndSubSection SubSection "Display" Depth 4 Modes "1440x900" EndSubSection SubSection "Display" Depth 8 Modes "1440 900x15 "EndSubSection SubSection" Display "Depth 1440 Modes" 900x16 "EndSubSection SubSection" Display "Depth 1440 Modes" 900x24 "EndSubSection SubSection" Display "Depth 1440 Modes" 900xXNUMX "EndSubSection EndSection
Being that way:
7. We look in the file "xorg.conf" for the following and delete it (you select it and delete it with the Delete key):
modeline "1440x900_60.00" 106.47 1440 1520 1672 1904 900 901 904 932 -HSync + Vsync
8. We paste what was copied in point 2-3, which in my case is:
Modeline "1280x1024_60.00" 109.00 1280 1368 1496 1712 1024 1027 1034 1063 -hsync + vsync
9. In the following lines you will see the hash marks or numeral symbol. Make a new line on top of them and type a new pad, pasting again what was copied in step 8. In this way it will be listed in the screen configuration when we access it to change the resolution.
10. In the editor, you go to the upper menu to Find-Replace, you look in Section «Screen» "1440 × 900" which is what the pasted file has and you replace it by "1280 × 1024" which is my case or the resolution you need .
11. Save and close the editor.
12. You restart the computer, you go to system settings> Monitors and change the resolution you want.
13. I have not tried to put more resolutions because I don't need them, but with this procedure they can be added.
Hello
Hi. I use mint13 64b on an acer aspire 4750, the graphics is intel… I connect via HDMI to a 32 ”panasonic LED and had problems with resolution. I followed all the steps and everything went well. The only thing outside of what I proposed was to update the kernel before anything else. Now new resolution options appear in the configuration of monitors 1280 × 720 offers the LED then through these steps add that option - 1280 × 720 - I place the monitor and the LED with the same resolution but the problem persists. what am I doing wrong? the other LED resolution options don't add up either. Can someone give me a hand? Thanks a lot!
In my case I applied this method and if it worked but I did not apply the resolution, that is, it gave me the option but it did not execute it and it was deleted every time I restarted, in case the xrandr command says in the console that it is impossible to adjust the frequency with a error that says "Failed to get size of gamma for output default" the solution is to install BOOT REPAIR to reinstall grub and reinstall grub, but you have to give it in advanced options an option that says GFX_MODE which is the one that repairs the grub so that Recognize the frequency of the monitor automatically and voila. After applying this method and modifying the Xorg.conf file, this was the only one that worked. I hope it serves you
in my case too and I have the perfect resolution.
ufff that bad, I mean I can not do anything? because I already looked in google and there is some improvement in a driver that I downloaded, I also saw unofficial drivers but I don't know ... well I'll keep looking but if you know of something or someone knows of something tell me xD thanks.
Is that the problem is the official drivers. SiS have no appreciation for Linux (and speaking of graphics, it already has a crime that someone can treat us worse than ATI). If someone has made an unofficial driver, it will be better ... 😉
You try, if not try with a lightweight distro or install LXDE or XCFE as a graphical environment. 😉
poof, I would love to give you a hand, but I think that SIS (and many things from VIA) are a real "christ" with Linux ... With an ATI, NVIDIA or Intel you can still fix with the proprietary driver, but SIS are a bad thing ... Anyway, with a «sis 771 ubuntu» in google there are several possible processes, I once had to deal with one of them, but I think it was of no use to me ... 🙁
Hello, yesterday I installed linux mint 14 but it is a bit slow for me, it is seen that it is from the graph that I have a SIS 771/671 rev. 10 the windows do not move smoothly and 720p movies are not smooth, if someone can me help with this problem would be very good !! Some solution must see ... and I do not want to go back to win 7 that despite everything I was doing quite well with the aero and how loaded it was with good things, greetings and see if you can give me a hand!
I have installed on a ubuntu computer and I had this problem; But the solution was this command "sudo dpkg-reconfigure gdm" and the option to choose GDM and restart appears in the terminal, since in the post installation I chose LIGTH DM and it did not let me see the maximum resolution of the monitor.
OKAY. Good date. Thanks for sharing it.
I have this problem but with an external monitor connected by VGA, and every time I use it I add the resolution manually with:
$ xrandr –newmode «1360x768_60.00» 84.75 1360 1432 1568 1776 768 771 781 798 -hsync + vsync
$ xrandr –addmode VGA1 1360 × 768
How could I edit the file provided here so that it works with the VGA output?
When you use the xrandr command, it gives you the information of all the connected monitors with their name and resolutions for each one, so I would recommend that you do this tutorial, they explain it completely there
http://abfloresn.blogspot.com/2013/01/problemas-con-la-resolucion-de-pantalla.html
I don't know what an xorg with multiple monitors looks like ... but you still have to add a section "screen" to bigger ones.
hey thank you very much :), migrated from windows to ubuntu and this was my biggest problem, thanks to you I solved it !! thank you very much brother 🙂
Hello, I am following all the steps on my laptop and it does not allow me to choose another resolution that may be wrong? I have looked at even the smallest details of the file and nothing. It is a Lenovo 3000 c200!
It worked perfectly for me, I just skipped the table-utils part. Thank you.
You are an ax. My board is a Gigabyte with built-in AMD radeon 4200. It worked. Thank you.
For that we are. Hug! Paul.
I followed the steps and I don't know if it's because I don't have an xorg driver, but I don't get the resolution that I want and before it was 1920 × 1080. I only get the 1440 × 900 one and I looked and deleted what it said in the file and replaced it and I get the 1440 × 900 resolution.
I had the same problem as you, it only showed me up to 1440 × 900, that happens because in this tutorial the Horizsync and Vertrefresh parameters have the data of a Monitor with that maximum resolution 1440 × 900, to solve this problem you have to look for Los values for your Monitor. In my case, I have a LG 21,5-inch FULLHD Monitor these are the parameters:
Horizonsync 30.0-83.0
Vertrefresh 56.0 - 75.0
With this data added to the xorg.conf I already have 1920 × 1080 which is the native resolution of my monitor.
I leave you my xorg.conf:
Section “Device”
Identifier “Configured Video Device”
EndSection
Section "Monitor"
Identifier "Configured Monitor"
Vendorname “Generic LCD Display”
Modelname «LCD Panel 1920 × 1080»
Horizonsync 30.0-83.0
Vertrefresh 56.0 - 75.0
Modeline «1920x1080_60.00» 173.00 1920 2048 2248 2576 1080 1083 1088 1120 -hsync + vsync
1.0 range
# modeline «1920x1080_60.00» 173.00 1920 2048 2248 2576 1080 1083 1088 1120 -hsync + vsync
# modeline «640 × 480 @ 60» 25.2 640 656 752 800 480 490 492 525 -vsync -hsync
# modeline «800 × 600 @ 56» 36.0 800 824 896 1024 600 601 603 625 + hsync + vsync
# modeline «800 × 600 @ 60» 40.0 800 840 968 1056 600 601 605 628 + hsync + vsync
# modeline «1024 × 768 @ 60» 65.0 1024 1048 1184 1344 768 771 777 806 -vsync -hsync
# modeline «1920 × 1080 @ 60» 173.00 1920 2048 2248 2576 1080 1083 1088 1120 -hsync + vsync
EndSection
Section “Screen”
Identifier “Default Screen”
Monitor "Configured Monitor"
Device “Configured Video Device”
DefaultDepth 24
SubSection “Display”
Depth 1
Modes «1920 × 1080»
EndSubSection
SubSection “Display”
Depth 4
Modes «1920 × 1080»
EndSubSection
SubSection “Display”
Depth 8
Modes «1920 × 1080»
EndSubSection
SubSection “Display”
Depth 15
Modes «1920 × 1080»
EndSubSection
SubSection “Display”
Depth 16
Modes «1920 × 1080»
EndSubSection
SubSection “Display”
Depth 24
Modes «1920 × 1080»
EndSubSection
EndSection
Thank you very much for telling us the solution that worked for you, surely others will also find it useful 🙂
Thanks, champion!
A hug! Paul.
something I don't understand is where I get the Horizsync and Vertrefresh parameters, I don't see them anywhere
hello, if we follow the steps to configure a monitor, it is easy
Great, this article has been very helpful to me. Thank you!!
I had the problem that the 1024 × 788 resolution did not appear in the configuration, I did what they recommend here and apart from still not showing the resolution, now the desktop icons do not appear, and the task menu bar turns black, just I can access it by clicking on the symbol of (windwos) and hovering the mouse over the strip and see the description to be able to click.
Is there a way to reverse the whole process step by step? It is preferable to have the screen in an unpleasant resolution than this with a black background.
Thanks in advance
Thank you very much, it helped me a lot, I already know a lot of screen, at least I'm not 800 × 600: s Greetings
Thank you. It helped me. I followed the recommendation of mrgm148.
Thank you very much for the contribution. Excellent tutorial. It worked for me.
In my case it didn't work, apparently the problem is in the geforce 310m driver.
same thanks!
: )
Many thanks!! It has worked almost perfect for me, when I put it, the resolution has been screwed up but I have entered the recovery of Ubuntu, and I have told him to fix the graphical errors and to put them by default, and when I started Ubuntu I already had the resolution!
Thanks crack!
Very good contribution! The problem I had was solved! It wouldn't let me put another resolution other than (4: 3)!
Thank you very much!
Regards!!!
Good! I have Xubuntu 14.04. My PC is an IBM, with integrated Intel graphics. I am interested in increasing the resolution of the monitor, since the one I have now is not adequate and the monitor I think can give more of itself.
When I run: ~ $ sudo xrandr
He answers me: Can't open display
The card is as follows:
- 00: 02.0 VGA compatible controller: Intel Corporation 82865G Integrated Graphics Controller (rev 02)
I hope your help. Thank you
First of all, thank you very much for your valuable contribution.
I explain my case, because although I did not solve it completely, thanks to you I managed to make it look pretty good.
My problem was that I could not mark the screen resolution option according to my HP Passport 1912nm monitor (http://es.engadget.com/2012/05/09/hp-passport-1912nm-internet-monitor-la-pantalla-independiente/) The resolution is as follows: 1366 × 768 60hz.
The system is:
intel pentium D processor cpu 3.00 ghz x2
intel g33 graphics
I am ubuntu 14.04 lts 64bits
The issue in question is that by doing everything you indicate, I manage to include a similar resolution: 1368 × 768 60hz
but not the one I wanted: 1366 × 768 60hz
I tried to modify the gedit thinking that it was just changing a number (8 for 6) and when restarting it gave me an error with a super rough screen and a huge warning with several reiterations, which I solved by leaving everything as it was (I had made a backup the xorg.conf and reboot.
Well, I had advanced but I still had the issue of the screen that was not fully covered by the resolution. There it occurred to me to see if there was anything to do from the monitor.
What I found is something quite acceptable, without being ideal. The monitor allows me to center the screen (it was aligned on the right and half of the launcher on the left was not visible) and narrow the sides. That is, you are left with a well distributed negligible strain.
To center it:
main menu / image control / horizontal position
to make it smaller:
main menu / osd control / horizontal position
And that's it. I hope someone else is useful to you.
Greetings from Montevideo, Uruguay
Hello, first of all congratulations for the tutorial.
I explain my case, I have an LG with D-Sub analog input. Ubuntu 14.04, I have done the test with the maximum screen resolution 1600 * 900, the screen adapts, but the problem is that the rendering of the fonts is horrible. Here are some of the specs:
Maximum Resolution 1600 x 900 @ 60Hz
Pixel Pitch 0,2712 x 0,2626mm
16,7M color support
Viewing Angle H: 90 ° / V: 50 °
Horizontal Frequency 30 ~ 83 kHz
Vertical Frequency 56 ~ 75 Hz
Could you add some kind of command to better adapt the parameters that the cvt (1600 900) command returns?
When executing that command I get this result:
# 1600 × 900 59.95 Hz (CVT 1.44M9) hsync: 55.99 kHz; pclk: 118.25 MHz
Modeline «1600x900_60.00» 118.25 1600 1696 1856 2112 900 903 908 934 -hsync + vsync
Thank you very much it worked for me! but I have a problem I cannot change the wallpaper I select it and everything is fine, but the change never takes effect. Can someone tell me what to do?
Good night mate I have problems with Linux mints 17 I do not have vga output for a tv from a vit laptop, what commands should I do or what tutor should I guide myself to do it? Thank you very much
Hello! Perhaps the following posts will be useful to you:
https://blog.desdelinux.net/xrandr-poderosa-herramienta-para-configurar-tu-monitor/
https://blog.desdelinux.net/xrandr-poderosa-herramienta-para-configurar-tu-monitor/
I also recommend that you search our blogs for articles that contain the keywords "xrandr", or its user interfaces ("arandr", "lxrandr", etc.)
Hug! Paul.
hello, I need help in my case I have a 32 ″ lcd tv ubuntu 12.4 recognizes it as 49 ″, radeon hd 5450 board, I already installed the driver but no resolution looks quite right
Maybe in some of these posts about xrandr and its different visual interfaces (arandr, lxrandr, etc.) you will find the solution:
https://blog.desdelinux.net/?s=xrandr
Cheers! Paul.
Very good post, but now I find a new problem: The resolution that I get, and, in theory, the highest that the monitor supports (LG FLATRON W1934s, OS ubuntu 14.04 32bits), does not work well, that is, the monitor eats much of the screen, quietly about 7-8 cm on each side, and forces me to return to a 4: 3 resolution, which is quite uncomfortable when browsing the web, any solution?
I wanted to see if I could drop a score or something, but I didn't see hah. I did everything step by step and it served me perfectly!
Thank you so much !
wow encerio your tutorial helped me !! now if it seems to recognize the resolution I want! on linux mint 17! only that in the option to change monitor I get the option of 1440 × 900… (which in my case works as 1920 × 1080)… I think I do something of the name in the xorg.conf…. anyway it serves me thanks
Great! It worked for me!
Thank you.
Thank you very much for your help; with your help I was able to solve the problem presented.
You're welcome, Oscar! For that we are.
A hug! Paul.
Good afternoon, your post did not work for me, I have this problem, my laptop is a Dell inspiron mini 1012 only has a resolution of 1024 × 600, but in windows modifying the registry I managed to add more supported resolutions, including the one I need 1024 × 738 (I think), I did what the post indicates but when restarting it gave me no more option, can something be done? or can I do nothing? I would greatly appreciate your help: 3 Thank you
Thanks, it worked wonders for me!
sudo gedit /etc/X11/xorg.conf
sudo:gedit:command not found
what do uu
gedit is the default text editor in GNOME. You may be using KDE or another desktop environment. In order to make sure you can edit the file no matter the environment, I suggest using nano.
The command would look like this:
sudo nano /etc/X11/xorg.conf
I followed all the steps and it worked perfect thanks for the info
Hey, thank you very much, it worked perfectly! 😀
You're welcome! Cheers! Paul.
FINALLY! It cost me but finally! And it is appreciated ... without the resolution I was saying goodbye to Linux. I had various problems from losing the graphical environment and having to reinstall the OS (I am newbie) to not using the correct quotes in the gedit, but I persisted for 2 days and was able to with a 1680x1050 monitor. I highlight the essential help of mrgm148 (comment 17) that would modify the original tutorial. Thanks and regards!!
Very well. I added an alert message clarifying what you are raising.
A hug! Paul.
You're welcome, it can be frustrating for the one who starts in Linux without something resolved like the resolution… greetings!
uufffff !! a huge woolly and honestly the woolly is so much that it already gave me mistrust that there is some mistake…. snif! once again I get discouraged from linux ... it's still in its infancy. No way I stay with windows…. Anyway, thanks friend for the contribution but I think the solution is not practical.
Hello,
I have tried these tips on a raspberry (with raspberrian), everything is very well explained. The problem is that when I restart then the startx command to enter the graphical interface does not work. I've been searching forums and the solution is to remove the xorg.conf file, thereby losing everything I had done. Do you know if there is any other solution?
Thank you
Laia
Hi Laia!
I think it would be better if you ask this question in our question and answer service called Ask DesdeLinux so that the whole community can help you with your problem.
A hug, Pablo.
Thanks handsome.
1280 × 1024 already appears as an option on both monitors but… it tells me that the hardware limit is 2048 2048… I have a choice? or is it easier to change graphics card ?.
Thanks again.
The kernel gods be praised 😉
I just installed the packages and voila !!!! 🙂
I ran the initial commands and now I can't see anything in the terminal. The other programs display fine. How do i restore?
It didn't work, I tried but sometimes I think that linux is far from the normal user, ios and windows are still the kings, the text commands are obsolete in these systems
Thank you very much for the information provided here. I used it to fix the problem on Debian and it worked perfectly ...
Thank you!
Thank you very much for the info
Hello, a query, I have a Dell Vostro 470 computer with an NVIDIA GeForce GTX 960 card, when the computer was running windows, it showed a resolution of 1280 × 1024 on the two monitors it supports, but I wanted to virtualize windows and use Linux as a host system, the Problem, is that only one of the monitors tells me that it is a DELL and it supports the resolution, in the other it says unkown and it does not exceed 1074 × 768, I have tried to follow several tutorials but the problem is that they all talk about cards with a single display, is there anything that can be done?
regards
I put all the terminals up to the step where I had to restart the pc. And when I reopened the terminal to enter the next one according to the tutorial, a black rectangle appears, and the programs that I open that I have in the launcher do not have the title bar therefore I cannot close or maximize or minimize from that window . Some programs like the scanner function of my printer also stopped working. How do I go back? That is, how do I delete those terminals that I entered?
Thank you very much, the tutorial has been very useful and well explained.
You're welcome, Javier!
I had the same problem.
The worst thing is that when I tried to execute something that required the sudo password, it did not show me the window where it is entered. After trying to restart xorg, reset it, etc. nothing worked for me. I had to reinstall from 0.
After executing this tutorial step by step and correctly, my xserver or xorg began to present errors that I could not recover. I had to reinstall my Linux.
Appalling.
Your comment is terrible given the fact that this article has been published for 2 years. Did you dedicate yourself to looking for a more updated solution?
Hello!
Thank you very much for the tutorial, it helped me a lot.
[warn] Caution: in this tutorial the Horizsync and Vertrefresh parameters have the data of a Monitor with a maximum resolution of 1440 × 900, to solve this problem you have to find the values for your Monitor. [/ warn]
HOW DO I GET THESE PARAMETERS?
I have the same doubt, where do I get those values ???
On the back of your monitor, where the serial is, there are those data.
On the back of your monitor, where you find the serial, there is that data.
works perfectly on ubuntu 16.04
I work on ubuntu mate 16.04
When I save the Gedit and close it I get this in Terminal:
(gedit: 3118): Gtk-WARNING **: Calling Inhibit failed: GDBus.Error: org.freedesktop.DBus.Error.ServiceUnknown: The name org.gnome.SessionManager was not provided by any .service files
** (gedit: 3118): WARNING **: Set document metadata failed: Setting the metadata :: gedit-spell-enabled attribute is not supported
** (gedit: 3118): WARNING **: Set document metadata failed: Setting the metadata :: gedit-encoding attribute is not supported
** (gedit: 3118): WARNING **: Set document metadata failed: Setting the metadata :: gedit-spell-enabled attribute is not supported
** (gedit: 3118): WARNING **: Set document metadata failed: Setting the metadata :: gedit-encoding attribute is not supported
** (gedit: 3118): WARNING **: Set document metadata failed: Set the metadata :: gedit-position attribute is not supported
Pana really thank you very much for the contribution it helped me a lot
Hey.
I have an Acer Aspire 3000 Aspire 3003 LMi and it installed Ubuntu 10.04.
The other time I installed ubuntu it recognized the graph, but not now. I have followed all your steps twice, in the second I have changed your resolution to 1024 × 768 in case it was too much for this laptop, but in no case do I get more options in Monitors, I only get 640 × 480 (4: 3)
Could you help me fix this?
Thanks Maria.
The canaima can't see the screen, I got into the advanced system and pressed a key and it was no longer seen how I can recover the images, please find me, thank you.
Hello I have an acer aspire 4300 and connected by hdmi to a plasma 32. » panasonic but did not recognize me well. The resolution escapes the x and y margins and I don't know how to reduce them with ubuntu. Can anybody help me??
Hello, I was doing the indicated process, but when I restart the computer the terminal comes out completely black, when I open a display menu it also comes out black. My pcnes is a hp all in one intel.
Thanks for your help
It worked perfect for me on Ubuntu 16.04 with a resolution of 1440 × 900, thank you very much!
Hello, I have followed all the steps indicated, but after restarting the pc it won't let me log in with my username. It does not show any error that the password is wrong, it just goes black for a few seconds and returns to the screen where you have to enter user and pwd. I have two screens, I don't know if that influences anything. Before following this tutorial I could enter without problems.
Any idea?
In my case, it is that my monitor (LG W1943C) when the VGA cable is disconnected and reconnected, it is not detected but in Windows only and not in Ubuntu as well, as before, but the solution that you published 5 years ago also served me well for Ubuntu 16.04 (and hopefully for 18.04 as well). Of course, when I enter my system for a few seconds the wallpaper becomes "mosaic" style but then it returns to normal. So although late, he earned his "Like" and well earned. Now I would like to force GRUUB2 to accept it as well, although at the moment it does not. I will share it with everyone via Twitter.
It served me, I was able to solve the problem.
It worked perfectly, my monitor has 1920 x 1200 resolution. I am using xubuntu 18.04.1
Thank you very much!
WORKS!!!!!!
Thanks Pana, it really is the only thing that has worked for me to see the correct resolution on my 32 ″ TV-monitor, thinking that this is why I was testing and discarding several distros. Debian 10 KDE saved, Regards
Dear me, it did not work for me, because it did not give me the way it could be VGA1 or HDM1 or another ... then I did it by editing the grub.
You enter the command window and edit the grub, it changes the graphics variable that by default is deactivated, for this reason it gives the error that when you install the screen it is small-sized or a very fine vertical line of pixels appears.
I leave you how to do it from my infosur iguazu blog, here is the url in case it works for someone, https://infosuriguazu.com/blog-post/cambiar-la-resolucion-de-pantalla-en-linux-mint-19/
Good luck and comment if you could configure it.
I don't know how to properly express the gratitude that your contribution has generated me, friend!
Dear friend.
For me it does not work.
I follow them scrupulously, several times. But nothing more than a resolution of 1024 × 768 appears to me.
I don't know if there will be any suggestions. What is true is that it gives me an error when installing sudo add-apt-repository ppa: xorg-edgers / ppa.
Tells me:
** Please use ppa-purge to remove this PPA. It is * particularly * recommended to do this before upgrading to a new ubuntu release! **
Further information: https://launchpad.net/~xorg-edgers/+archive/ubuntu/ppa
Press [ENTER] to continue or Ctrl + C to cancel the addition.
And when I press enter it tells me the following:
Err: 7 http://ppa.launchpad.net/xorg-edgers/ppa/ubuntu Focal Release
404 Not Found [IP: 91.189.95.85 80]
Obj: 8 http://es.archive.ubuntu.com/ubuntu focal-updates InRelease
Obj: 9 http://es.archive.ubuntu.com/ubuntu focal-backports InRelease
Reading package list ... Done
E: The repository "http://ppa.launchpad.net/xorg-edgers/ppa/ubuntu focal Release" does not have a Release file.
N: You cannot update from a repository like this safely and therefore it is disabled by default.
N: See the apt-secure (8) man page for details on creating repositories and configuring users.
A hug and thanks for the contributions.
This was the solution. Thank you, dear Alejandro.
regards
Hello help team, I am very grateful to you for this article. today i installed ubuntu 21.10 for the first time in the pc where i keep technical information, and i found the problem that i couldn't adjust the resolution of the monitor, after so much searching on the internet and rehearsing various posts that didn't work in my case and i finally found this and load step by step and in the end after restarting the pc the resolution is self-adjusted.
thank you very much and may God continue to bless you