Mate is a fork (derivation) emerged from the source code of Gnome 2, in its current version many obsolete packages and libraries have been replaced by the new technologies available in GLib.
The Numerous Gnome apps were renamed in Mate, an example are:
- Box - File manager (from Nautilus)
- Pen - Text Editor (from Gedit)
- Eye of Mate - Image Viewer (from Eye of GNOME)
- Lectern - Document Viewer (from Evince)
- Staple - Compression Tool (from File Roller)
- MATE Terminal - Terminal emulator (from Gnome Terminal)
You can find more information at:
http://es.wikipedia.org/wiki/MATE
http://mate-desktop.org/
Mainly I have chosen this desktop environment because it adapts well, well ... well no, very well, to computers with little resources.
I've tested it on two different laptops, one is an old 32Bit 1G RAM HP Centrino and the other is a 64Bit 2G RAM Asus Atom.
The first with Debian Testing and the second with the stable version, the truth is that they behave wonderfully and are quite fluid.
To begin we download the Debian Netinstall image with the network card firmware:
32Bits and 64Bits multi-architecture in the same file for Debian Stable:
http://ftp.acc.umu.se/cdimage/unofficial/non-free/cd-including-firmware/current/multi-arch/iso-cd/firmware-7.7.0-amd64-i386-netinst.iso
For Debian Testing the same but separate, I don't know why but it gave me a bug in multi-architecture.
To copy it to the pendrive first open terminal:
sudo fdisk -l
It will output something like this:
Disk / dev / sda: 1500.3 GB, 1500301910016 bytes 255 heads, 63 sectors / track, 182401 cylinders, 2930277168 sectors in total Units = 1 * 512 sectors = 512 bytes Sector size (logical / physical): 512 bytes / 4096 bytes I / O size (minimum / optimal): 4096 bytes / 4096 bytes Disk ID: 0x2bd2c32a Device Start Start End Block Id System / dev / sda1 * 2048 83888127 41943040 83 Linux / dev / sda3 83888128 2930276351 1423194112 5 Extended / dev / sda5 167776256 692064255 262144000 83 Linux / dev / sda6 692066304 2917693439 1112813568 83 Linux / dev / sda7 2917695488 2930276351 6290432 82 Linux swap / Solaris Disk / dev / sdh: 2004 MB, 2004877312 64 32 bytes 1912 heads, 3915776 sectors / track, 1 cylinders, 512 sectors total Units = 512 * 512 sectors = 512 bytes Sector size (logical / physical): 512 bytes / 512 bytes I / O size ( minimum / optimal): 0 bytes / 74 bytes Disk identifier: 3401x1b64f Device Start Start End Block Id System / dev / sdh581631 * 290784 83 XNUMX XNUMX Linux
You look well which is your pendrive, in my case it is / dev / sdh, the red one is the hard disk.
And in terminal from the same folder where the ISO file is located
$ sudo dd if=firmware-testing-amd64-netinst.iso of=/dev/sdh bs=4M
Another way to copy iso files to USB is with the Unetbootin utility
http://unetbootin.sourceforge.net/
If unetbootin does not copy the firmware files to the firmware folder of the pendrive, download it from
this link and the unzipped copies in the firmware folder of the usb
Testing
http://cdimage.debian.org/cdimage/unofficial/non-free/firmware/jessie/current/firmware.tar.gz
Stable
http://cdimage.debian.org/cdimage/unofficial/non-free/firmware/wheezy/current/firmware.tar.gz
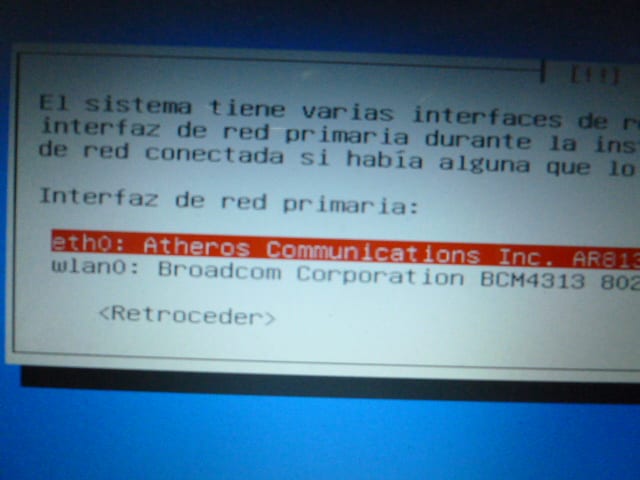
When we start the computer with the usb, I recommend that you install Debian in the version you want, do it directly to the modem with a normal rj45 network cable or rj45 crossover cable to another computer sharing the internet.
Because once the system is installed, when you restart without a graphical environment, you will be left without a connection, no signal in the debian installation of the wifi network option (usually wlan0).
After the Debian installation begins, I am not going to elaborate much more on this topic because there are many manuals, but I recommend to those who install it on a laptop that when it comes to the partitioning options you choose «Guided - use entire disk and configure encrypted LVM»


This is how it looks from graphical installation
There are a variety of manuals for installation I put some:
http://unbrutocondebian.blogspot.com.es/2012/09/instala-debian-7-para-torpes.html
https://blog.desdelinux.net/instalacion-de-debian-6-paso-a-paso/
http://usuariodebian.blogspot.com.es/2012/05/instalar-debian-gnulinux-squeeze-60.html
Installing Debian with encrypted partitions
http://perezmeyer.blogspot.com.es/2011/01/instalando-debian-squeeze-con.html
http://www.ac.usc.es/docencia/ASR/Tema_2html/node7.html
http://wiki.debianchile.org/InstalarDebianParticionCifrada#Instalar_Debian_con_partici.2BAPM-n_cifrada
http://j2sg.wordpress.com/2013/10/03/servidor-debian-montaje-e-instalacion-con-raid-luks-y-lvm/
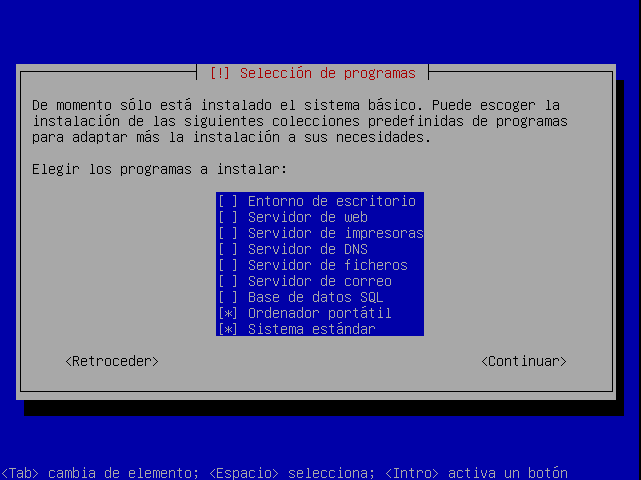
When you get to the tasksel program selection screen you have to uncheck "desktop environment" as in the photo to later install Mate from the console when we restart.
Clarifying ... The repositories in the manual are from Debian testing (jessie), if it were debian stable it would be (wheezy)
Finished the installation and restarted the computer:
We open the repositories file
# nano /etc/apt/sources.list
We add
# Mate

deb http://repo.mate-desktop.org/debian jessie main

deb http://packages.mate-desktop.org/repo/debian jessie main

deb http://mirror1.mate-desktop.org/debian jessie main
Update the repos and add mate repo key
#apt-get update

#apt-get install mate-archive-keyring

#apt-get update
If you have a dependency problem, install these libraries first
# apt-get install libmatewnck=1.6.0-1 libmatewnck-common=1.6.0-1
And then you can install all the packages of the Mate environment, the xorg server and the ligthdm graphical access manager
# apt-get install mate-core mate-desktop-environment xorg lightdm

# apt-get install mate-desktop-environment-extra
To log in automatically, edit the file
# pluma /etc/lightdm/lightdm.conf
And modify "# autologin-user =" by
autologin-user =My user
We keep
Now some necessary facilities to make Wi-Fi configurations easier and program installations among others
# apt-get install network-manager-gnome gdebi xdg-user-dirs synaptic
To create user folders: (Downloads, Documents, Music, Images, etc)
xdg-user-dirs-update
Add sudo:
# apt-get install sudo
# nano /etc/sudoers
We add the following line under "root ALL = (ALL: ALL) ALL"
mi_usuario ALL=(ALL:ALL) ALL
And we save with Ctrl + O and Ctrl + X.
Launch the Mate graphical environment
startx
Note: do not forget that you are as root, it is better that now close and restart with your user
Multi-Architecture from Debian 7 Wheezy
In AMD64 system the first thing is to add the i386 architecture:
$ sudo dpkg --add-architecture i386 && apt-get update
then install the i386 libraries:
$ sudo apt-get install ia32-libs
To remove Architectures:
$ sudo dpkg --remove-architecture i386
Add Deb-multimedia repos and install codecs
From terminal: with the keys Alt + F2 and then you type mate-terminal
$ sudo pluma /etc/apt/sources.list
# Deb-multimedia

deb http://www.deb-multimedia.org jessie main non-free
We save, then update the packages and install the deb-multimedia repository key
$ sudo apt-get update

$ sudo apt-get install deb-multimedia-keyring

$ sudo apt-get update
- The repositories have an authentication key. If when doing apt-get update they receive one or more messages of this type as an example “NO_PUBKEY D6B6DB186A68F637 "The solution is as root or with sudo:
$ sudo apt-key adv --recv-keys --keyserver keyserver.ubuntu.com D6B6DB186A68F637
Installing Codecs and others
$ sudo apt-get install libdvdcss2 faad gstreamer0.10-ffmpeg gstreamer0.10-x gstreamer0.10-fluendo-mp3 gstreamer0.10-plugins-base gstreamer0.10-plugins-good gstreamer0.10-plugins-bad gstreamer0.10-plugins-ugly ffmpeg lame twolame vorbis-tools libquicktime2 libfaac0 libmp3lame0 libxine1-all-plugins libxine2-all-plugins-libdvdread4 libdvdnav4 libmad0 libavutil51 sox libxvidcore4 libavcodec53 libavcodec54 libavdevice53 libavdevice54 libstdc++5 build-essential checkinstall make automake cmake autoconf git git-core flashplugin-nonfree x264
For 64-bit systems:
$ sudo apt-get install w64codecs
For 32-bit systems:
$ sudo apt-get install w32codecs
Free drivers:
$ sudo apt-get install firmware-linux-nonfree
OpenJDK, open source java
$ sudo apt-get install openjdk-7-jre icedtea-7-plugin
Compression / decompression tools
$ sudo apt-get install rar unrar zip unzip unace bzip2 lzop p7zip-full p7zip-rar
Typographic fonts
$ sudo apt-get install fonts-freefont-otf texlive-fonts-extra ttf-mscorefonts-installer
Micro and temperature sensors
$ sudo apt-get install lm-sensors

$ sudo sensors-detect
If you want the ones from the hard drive
$ sudo apt-get install hddtemp

$ sudo dpkg-reconfigure hddtemp
System information and tools
$ sudo apt-get install hardinfo disk-manager gparted bleachbit wine parcellite unetbootin htop xterm mc testdisk foremost cryptkeeper gtkhash fslint keepass2 gnote mat deja-dup samba
Antivirus
$ sudo apt-get install clamav clamtk
firewalls
$ sudo apt-get install ufw gufw
Multimedia
$ sudo apt-get install audacious audacious-plugins soundconverter devede audacity vlc clementine gnome-mplayer xfburn acetoneiso isomaster
Drawing and photography
$ sudo apt-get install gimp-gap gimp-resynthesizer gimp-dcraw gimp-ufraw gimp-texturize gimp-data-extras inkscape pinta
Messaging and email
$ sudo apt-get install pidgin pidgin-encryption icedove icedove-l10n-es-es
If you want a lighter email client than icedove
$ sudo apt-get install sylpheed
Internet
$ sudo apt-get install iceweasel iceweasel-l10n-es-es browser-plugin-vlc uget remmina remmina-plugin-nx qbittorrent
They are also:
- Spotify:
Download the packages of your architecture and the gnome client install it with gdebi
http://repository.spotify.com/pool/non-free/s/spotify/
You need the libssl0.9.8 library, download it according to architecture.
http://ftp.us.debian.org/debian/pool/main/o/openssl/libssl0.9.8_0.9.8o-4squeeze14_amd64.deb
http://ftp.us.debian.org/debian/pool/main/o/openssl/libssl0.9.8_0.9.8o-4squeeze14_i386.deb
In case I need a library I look for it in http://www.debian.org/distrib/packages#search_packages
- Skype:
http://www.skype.com/es/download-skype/skype-for-linux/downloading/?type=debian32
- Teamviewer:
http://www.teamviewer.com/es/download/linux.aspx
- Wuala:
https://www.wuala.com/es/download/linux
- Dropbox:
https://www.dropbox.com/install?os=lnx
- Sopcast:
https://sopcast-player.googlecode.com/files/sopcast-player-0.8.5.tar.gz
http://download.easetuner.com/download/sp-auth.tgz
http://www.sopcast.com/download/libstdcpp5.tgz
In the folders where they are and from the terminal unzip the files
$ tar -zxvf sopcast-player-0.8.5.tar.gz

$ tar -zxvf sp-auth.tgz

$ tar -zxvf libstdcpp5.tgz
Copy the libraries to / usr / bin and install gettext python-glade2
$ sudo cp ./sp-auth/sp-sc-auth /usr/bin/

$ sudo cp -a ./usr/lib/libstdc++.so.5* /usr/bin/

$ sudo apt-get install gettext python-glade2
Compila e instala desde la carpeta sopcast-player
$ cd sopcast-player/

$ sudo make && sudo make install
- Jdownloader:
Download the file (MULTIOS ZIP)
http://jdownloader.org/download/index
You unzip in the home folder, it is updated when you start and you make a direct link in the menu, in the command box:
java -jar '/home/username/Jdownloader/JDownloader.jar'
- Wifiguard:
http://www.softperfect.com/products/wifiguard/
If the wifi does not work for you because you need the firmwares, remember that you have them in the package firmare.tar.gz mentioned above in the manual.
You pass it to a folder, unzip it and install the package you need with gdebi graphically or from the console.
To see which wireless card you have on your computer use from the terminal:
$ lspci | grep -w Wireless

ó

$ lsusb | grep -w Wireless
You install it with the command
$ sudo dpkg -i xxx-paquete-xxx.deb
Ati and nvidia drivers (why repeat it, you can read it here)
http://usuariodebian.blogspot.com.es/2007/06/instalar-driver-libre-ati-aceleracin-3d.html
http://usuariodebian.blogspot.com.es/2012/07/ati-radeon-hd-3200-series.html
http://usuariodebian.blogspot.com.es/2012/08/nouveau-con-aceleracion-3d.html
http://usuariodebian.blogspot.com.es/2007/06/instalar-driver-de-nvidia-aceleracin-3d.html
http://usuariodebian.blogspot.com.es/2011/01/nvidia-driver-privado-oficial.html
http://usuariodebian.blogspot.com.es/2012/07/debian-squeeze-instalar-driver-nvidia.html
The truth is that this environment with Debian borders on perfection.
Surely I have left something behind, as I remember I will add it.
http://foro.desdelinux.net/viewtopic.php?id=3001
We apologize to the author of the post and to all users. We had not realized that comments were disabled.
Debian Testing + MATE = what the Canaima Linux people should have done if they wanted to be more up-to-date ... I live saying it. Thanks for the HowTo, I'll leave it in favorites 🙂
A very good combination, an inheriting desktop from Gnome 2 and Debian Testing. Highly recommended guide to have a system for a while. When I switched to KDE, I was missing more updated packages, but otherwise it is almost perfect.
Excellent post is appreciated. for newbies who want a Debian with matte I recommend Point Linux. Thank you for these excellent pages. Cheers
This post is a vile plagiarism from two sources:
https://blog.desdelinux.net/manual-que-hacer-despues-de-instalar-debian/
And of
http://m.youtube.com/watch?v=m-W8xo3TPrg
Y
http://m.youtube.com/watch?v=4DuC9P4AJJY
It is not a plagiarism of the sources that you mention Nebuchadnezzar king of Babylon, it is a summary as a reminder of the different ways to install debian and to install the programs that can be useful, the sources are in the different manuals and tutorials that I have read in years and found in the Oracle = >> https://www.google.es/
Here you can find many manuals that I have been collecting. (By the way, in the coming weeks I will update that I have it abandoned)
https://www.dropbox.com/sh/rmkkip7t4baob8p/vSlapwfcb-
excellent tutorial, just looking for a tutorial like this. i have lmde installed but i want to install debian testing directly