This is an up-to-date guide to how to install and configure XAMPP on GNU / Linux, with a detailed step-by-step.
What is XAMPP?
XAMPP is a completely free and easy to install Apache distribution that contains MariaDB, PHP, and Perl. The XAMPP installation package has been designed to be incredibly easy to install and use. Completely free and easy to install Apache distribution containing MariaDB, PHP, and Perl.
How to install and configure XAMPP?
Installing Xampp
1.- Download XAMPP for Linux from https://www.apachefriends.org/es/index.html

2.- At the end of the download we have a archive .run, which we must install in the following way:
- We open a Terminal with Control + T, or from our menu.
- We log in as root:

- We proceed to give execution permissions to the .run and to install XAMPP
$ sudo su $ chmod + x xampp-linux-x64-5.6.28-0-installer.run $ ./xampp-linux-x64-5.6.28-0-installer.run


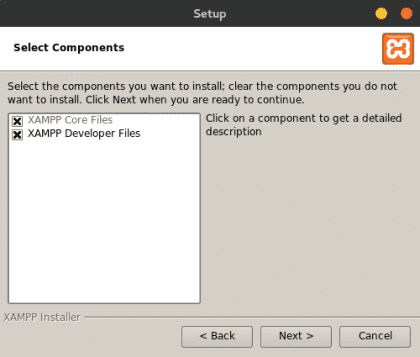
- We accept everything and wait for the installation to finish.
Setting up XAMPP
3.- We proceed to configure XAMPP
- MySQL Configuration (MariaDB)
$ ln -s / opt / lampp / bin / mysql / usr / bin / $ which mysql $ type mysql $ ls -lart / usr / bin / mysql


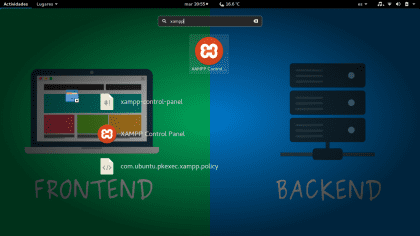
- Setting up the rule com.ubuntu.pkexec.xampp.policy for the graphical panel to run with administrator permissions this will generate a bash file that runs xampp-linux-x64-5.6.28-0-installer.run. For this we go to the route / usr / share / polkit-1 / actions and we execute:
$ touch com.ubuntu.pkexec.xampp.policy $ nano com.ubuntu.pkexec.xampp.policy


Inside the file com.ubuntu.pkexec.xampp.policy we paste the following code:


Authentication is required to run XAMP Control Panel xampp auth_admin auth_admin auth_admin /opt/lampp/manager-linux-x1.0.run true
- Creating the script responsible for executing the graphical panel of XAMPP in the path / usr / bin / . We must create the script with name xampp-control-panel:
touch xampp-control-panel nano xampp-control-panel


#! / bin / bash $ (pkexec /opt/lampp/manager-linux-x64.run);
- Setting up a .desktop to launch the XAMPP graphical service manager, run the following commands, in the path / usr / share / applications:
touch xampp-control-panel nano xampp-control-panel

- After running nano application.desktop enter the following code


[Desktop Entry] Comment = Start / Stop XAMPP Name = XAMPP Control Panel Exec = xampp-control-panel Icon = xampp Encoding = UTF-8 Terminal = false Type = Application
- Now we have an icon that when pressed will execute the PKEXEC, which asks us for a login to assign execution permissions to the XAMPP graphical panel. It should look something like this:


- To use mysql, if you did the previous configuration you no longer need to go to the directory / opt / lampp / bin / mysql -u root -p to log in now you just need to open a terminal and run
mysql -u root -p.


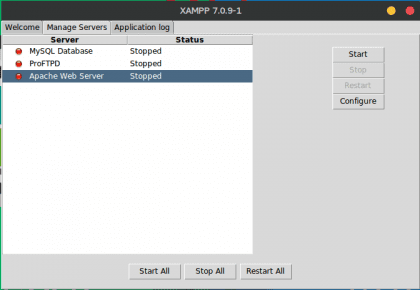

Now we can graphically manage our XAMPP and access mysql normally without going to the / opt / lampp / bin directory.
This is all the guide, I hope you liked it and do not forget to leave your comments.
These are the articles that are most appreciated, for the detailed and precise content of their content. He had helped colleagues who prefer Windows install versions of the XAMPP software. I was unaware of the existence of an installer for Linux, used to installing and configuring a LAMP, manually. I am convinced that it will be a great help for those who want to have a server with these features, and will convince many programmers and administrators who prefer to install it on Windows, to do it on a server with Linux. Thank you Nexcoyotl for such an excellent article!
Thank you very much, Federico, your comment is appreciated, I hope this small and simple manual has been useful. This is the first I hope to do many more.
Very good guide
But I have a question, why do you touch? I understand that it is to create the blank file, but with just nano, you can create and edit the file ...
touch is a command used to update the access and modification dates of one or more files, to the current date.
touch [OPTINO]… FILE…
If the argument FILE or file name does not exist, then an empty file of the same name as FILE is created.
It is more direct - and very common - this way to create empty files, than through the editor dwarf
Run hand touch .
Hello yerko in advance thanks for commenting, the reason why I use touch is because for me it is customary hehe. And if, as comrade Federico said, its function goes beyond the creation of files. If you want to find out more, launch $ man touch, regards friend
But, after the touch you are modifying the file, so it is an extra step to what you do.
I know what the touch does, I just wanted to know why you were doing it: P, since with nano it was more than enough 😉
Very good documentation, good work.
What do you use to configure the prompt, I really liked its configuration.
regards
Hello friend, thanks for stopping by and commenting 😀, I use powerline shell it is an open-source project you can find it on github. It's easy to configure I use bash and powerline shell, although you can also configure it for zsh.
Very good tutorial. The config of the terminal catches my attention, could you share the config?
Hello Koratsuki, check out this tutorial that I do, I hope it will be useful for you to configure the prompt. https://blog.desdelinux.net/configurar-bash-prompt-powerline-shell-master/
Very good your contribution Brother, how sad that I have hardly seen this publication, a few weeks ago they left me the task of installing a LAMP environment on my computer, but from what I see it is easier to install XAMPP. Anyway thanks for your contribution, greetings.
Great, very well explained and in a simple way.
Thank you very much.
Everything worked fine.
Regards!!
Hello, everything that is explained in images, is it also explained in text? That is, the images are for illustrative purposes only? Or there are steps you have to do that are in pictures. I'm asking because I'm blind, and I'm not very adept at linux yet, so I don't want to make a mess haha. On the other hand, I have ubuntu mate 18. Can this tutorial be applied? From already thank you very much. Cheers!
Excellent material with illustrative content, this makes it easier to guide others
- one side is shown twice
touch xampp-control-panel
nano xampp-control-panel
- one on the route
/ usr / bin /
- and another on the route:
/ usr / share / applications
- I guess actually in this second path it should be xampp-control-panel.desktop.
- On the other hand, to do most of the steps, I didn't have permissions, so I ended up preceeding the commands with «sudo«, so that I could already create them.
- But in the end when I access the icon it gives me an error message:
The command "xampp-control-panel" could not be executed.
Failed to run child process "xampp-control-panel" (Permission denied)
- I have already made it work and I have put the execution permission on the / usr / bin / xampp-control-panel file.
sudo chmod + x / usr / bin / xampp-control-panel
Thanks this was what I was missing for the permission denied problem.
2020 this post still works great!
Thanks, it worked for me, although I don't see the xampp icon but a white box but it doesn't matter, I just have a problem that when I use a code editor like sublime it denies me the permissions to create files in htdocs projects. I managed to make sublime by giving permissions I can read and edit the files but I can't make it create new files.
Thanks a million Nexcoyotl for the article!!!, and to all those who blog.desdelinux.net a place where the information we need is found!!
Thanks thanks!!
Very good explanation
I use linux mint and I could use one explained with the accesses since I perform the steps and they do not appear in any graphic part
in advance thank you very much
Hello, thanks for all the manual.
But it's not working. I already checked the permissions, the paths, the text to paste and nothing; I enter the password and it does nothing else.
Could you tell me if it works for Opensuse 15.3 Leap.
I am attentive, thank you.
Greetings, Leo. We recommend you explore this post that is much more current called: XAMPP: A development environment with PHP easy to install on GNU/Linux – https://blog.desdelinux.net/xampp-entorno-desarrollo-php-facil-instalar-gnu-linux/
2022 and it still works. I am using Debian 11!!