En my previous article I told you a little about the changes that Arch Linux has with respect to what I am used to doing in Debian, which we will see below because what we have to do is show them how to install Arch without dying in the attempt.
I think it is very good to clarify that if I have come this far it has been because the excellent guide which Gregory Swords He has written on his blog and from which I take much of his content for this article. All credit goes to him.
Tips prior to installation
To install Arch, the 1st thing I advise is to test in a virtual machine, in this way once we are sure of what we are going to do, we can proceed to execute the steps learned on our computer.
The 2nd thing I would recommend is to save all our files in case something happens, and if possible, do an installation with an empty hard drive. Just in case.
And finally my 3rd tip when installing Arch is to have another computer with Internet access in case a problem arises or, failing that, print the installation guide which we can find on the Arch Linux Wiki.
Arch Linux installation step by step
Well, I guess we already have an updated image of the iso of Arch Linux. Like GEspadas, I recommend using those corresponding to the dates: 2013.07.01, 2013.01.04, 2012.12.01, 2012.11.01, 2012.10.06, 2012.09.07, 2012.08.04, or higher, as they use the same installation method which we will describe below.
You can download the latest compilation of the iso image from this link:
The first thing is to transfer our image to a USB memory, or burn it on a CD-ROM «–Really, in the 21st century? ¬_¬
Once we have put the memory in the USB port, we proceed to know what its name is, for this we can use the command:
dmesg |tail
Which will return something like this:
[14403.197153] sd 7: 0: 0: 0: [sdc] Write Protect is off [14403.197157] sd 7: 0: 0: 0: [sdc] Mode Sense: 23 00 00 00 [14403.197299] sd 7: 0: 0 : 0: [sdc] No Caching mode page present [14403.197303] sd 7: 0: 0: 0: [sdc] Assuming drive cache: write through [14403.198325] sd 7: 0: 0: 0: [sdc] No Caching mode page present [14403.198329] sd 7: 0: 0: 0: [sdc] Assuming drive cache: write through [14403.198726] sdc: [14403.199372] sd 7: 0: 0: 0: [sdc] No Caching mode page present [14403.199376 ] sd 7: 0: 0: 0: [sdc] Assuming drive cache: write through [14403.199379] sd 7: 0: 0: 0: [sdc] Attached SCSI removable disk
As you can see, in this case my memory is sdc. Knowing this, we can proceed to pass the .iso image to memory, which must be unmounted:
$ dd if=archlinux-2013.07.01-dual.iso of=/dev/sdc
This takes a while, but when it is finished we restart our computer and make sure it boots from the USB device.
Once the PC boots we will find this screen, and in my case, I select the first option (64 bits).

1. Configuring the keyboard.
When we load the prompt we will see something like this:
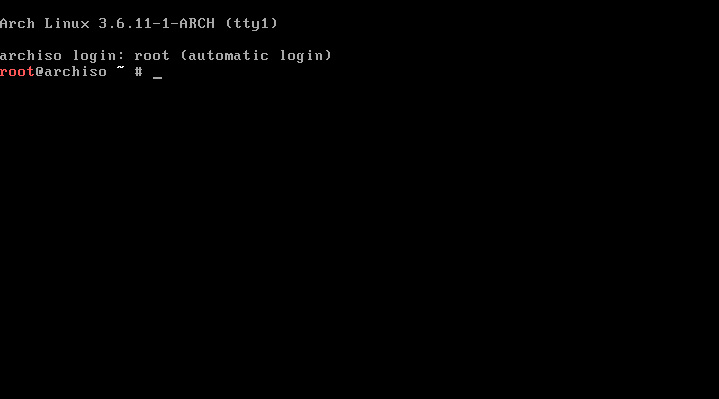
The first thing we must do is select the keyboard layout we are using. In my case:
# loadkeys us
Yes, I speak Spanish but my keyboard is in English .. so I use us, but if your keyboard is in Spanish, then it would be:
# loadkeys es
We can see all the available layouts for the keyboard with the following command:
# ls /usr/share/kbd/keymaps/i386/qwerty
2. Partitioning the disk
Now comes the most critical part of the installation. To partition the disk we use a tool a bit complex to handle, called cfdisk. So we type:
# cfdisk
And something like this appears if we have the hard drive without partitioning:
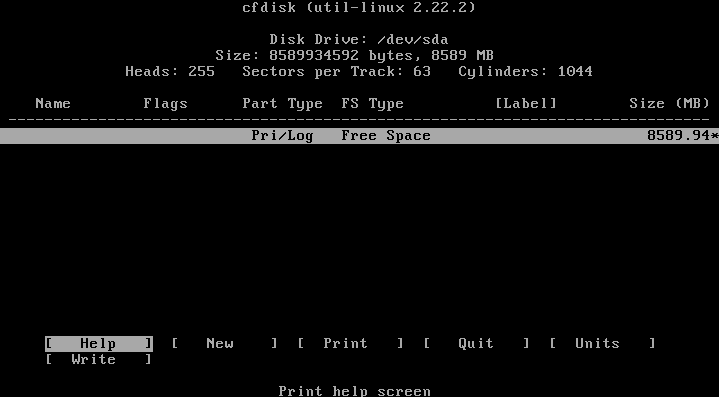
With cfdisk what we will do is configure our partition table. In general, the normal thing in Arch Linux is to configure 4 partitions, as GEspadas explains:
- The first, / Boot, is where the essential files to boot ArchLinux will be stored (such as the kernel, ramdisk images, the bootloader, etc). A size of 100 MiB is recommended (no need to give it more space).
- The second is partition / (root), where the operating system and applications will be installed (among many other things). Its size depends on how you want to use ArchLinux. About 10 GiB should be more than enough for a traditional system; If you think that you will install many applications (games, among them), it is better to think about 20 or 30 GiB.
- The third is partition / Home, where our personal settings, application settings (and your profiles in them), and traditionally our data (documents, photos, videos, etc.) will be stored, so it is recommended to allocate a considerable hard disk space.
- Finally, choose the size of the partition swap, place where information from the RAM memory is temporarily stored (when it is full) on the hard disk. What size to choose for the swap?
Now, if we have an unpartitioned disk, we have to create the partitions by placing ourselves on the free space (Free Space). What we do is give Enter about New and it doesn't get something like this:

We give enter and we have to put the size we want to use. In this case, the first partition as explained above is / boot and it doesn't need more than 100 MB of space, so we can put something like this:

And finally, once this partition has been created, we have to set it as Bootable.
For the rest of the partitions the process is the same, except when we get to the partition for the Swap, because once created, we go over it and give Enter on Type and we get something like this:
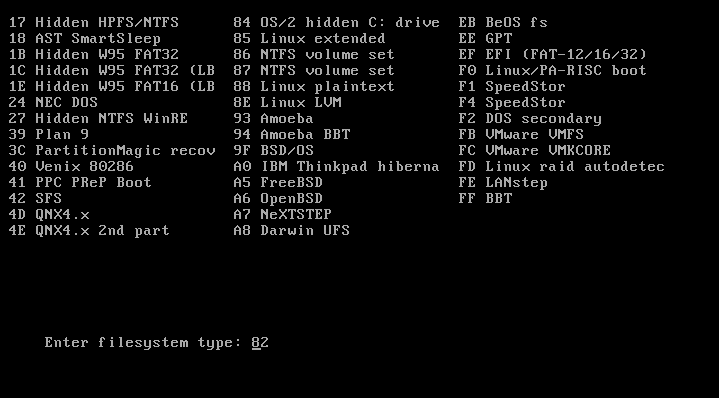
And we have to make sure that we have option 82 selected.
3. Formatting the created partitions
Now we have to format the partitions that we configure with cfdisk. I do not think it is necessary to say again that this should be done under your full and complete responsibility.
For this we use mkfs in the following way:
# mkfs -t ext2 /dev/sda1
This partition is formatted in Ext2 that does not have Journaling and therefore the boot is much faster, among other things.
Now we format the partitions corresponding to / and / home, both in ext4. I am assuming that we have left the Swap partition as sda4.
# mkfs -t ext4 / dev / sda2 # mkfs -t ext4 / dev / sda3
Now we go on to format the Swap with the mkswap command and then activate it with swapon:
# mkswap / dev / sda4 # swapon / dev / sda4
4. Mounting the hard drive partitions
We are going to mount the partitions that we have created and formatted in / mnt. We start with the partition for / and we must bear in mind that it is not sda1, but sda2. Be careful with that.
# mount /dev/sda2 /mnt
Once this partition is mounted, we have to create the / boot and / home directories in it.
# mkdir / mnt / boot # mkdir / mnt / home
And we proceed to mount the corresponding partitions:
# mount / dev / sda1 / mnt / boot # mount / dev / sda3 / mnt / home
5. Are we connected to the Internet?
Before proceeding to the next step we have to make sure that we have an Internet connection.
I honestly don't understand. Why can't the system's "base" packages be installed from the CD-ROM itself as in previous versions? If anyone knows, let me know.
Well, we ping any IP or address that we know will return a response, for example:
# ping www.google.com
And if everything works fine, we move on to the next step. If it doesn't (something weird unless you use iso 2012.07.15), first we have to know what the name of our card is, so we execute:
# ip link
Which will return something like this:
1: what: mtu 65536 qdisc noqueue state UNKNOWN mode DEFAULT link / loopback 00: 00: 00: 00: 00: 00 brd 00: 00: 00: 00: 00: 00 2: enp5s0: mtu 1500 qdisc pfifo_fast state DOWN mode DEFAULT qlen 1000 link / ether 18: 03: 73: a3: f3: e1 brd ff: ff: ff: ff: ff: ff 3: wlp9s0: mtu 1500 qdisc noop state DOWN mode DEFAULT qlen 1000 link / ether 4c: 80: 93: 19: da: 02 brd ff: ff: ff: ff: ff: ff
In my case, the card I'm going to use is the wired one, which is enp5s0. We activate the network with the following command:
# ip link set enp5s0 up
and it is assigned a dynamic IP via DHCP:
# dhclient enp5s0
In the case that you are going to connect via WiFi, please read this link.
6. Installing the Base System
Well, we have Internet and now what we have to do is run:
# pacstrap /mnt base base-devel
pacstrap is the new Arch Linux install script. When we run it, it will start downloading and installing the necessary packages for Arch to work.
And let's take another pause over here. If like me, they have the repositories on a local server, we have to edit the file /etc/pacman.d/mirrorlist and add the path of our repo. For example, in my case I only added in front of the mirrors that are configured:
Server = http://192.168.26.1/archlinux/$repo/os/$arch
And ready.
If we have a wired connection, we install:
# pacstrap /mnt ifplugd
If our connection is wifi:
# pacstrap /mnt wireless_tools wpa_supplicant wpa_actiond dialog
Finally we install sudo
# pacstrap /mnt sudo
7. Installing GRUB
Now we proceed to install the Boot Manager, in this case Grub2. For this we execute:
# pacstrap /mnt grub-bios
It is valid to clarify that as the name indicates, this package is intended for those of us who use BIOS. If what you have is UEFI, please read the official documentation about it and if you are interested in using syslinuxBecause GSpades leaves us an excellent guide for it.
8. Generating the fstab file
Now we are going to tell fstab how we have our partitions established .. for this we execute:
# genfstab -p /mnt >> /mnt/etc/fstab
9. Setting up the rest of the system
To configure the rest of the system things, we must do it through a chroot. For this we put:
# arch-chroot /mnt
The next step is to establish what will be the name of our computer. Mine is called Vostro so I just run:
# echo vostro >> /etc/hostname
Now, we create a symbolic link from / etc / localtime to / usr / share / zoneinfo // (replaces and based on your geographic location). For example, for Cuba:
# ln -s /usr/share/zoneinfo/America/Havana /etc/localtime
Later we must configure the file that corresponds to the premises, located in /etc/locale.gen.
We open it with a text editor (nano in this case) and uncomment the locales to use. In my case I uncommented es_ES.UTF-8 UTF-8, but I could have uncommented es_CU.UTF-8 UTF-8. It looked like this:
#es_EC ISO-8859-1 en_ES.UTF-8 UTF-8 #es_ES ISO-8859-1
Then we execute:
# echo LANG="es_ES.UTF-8" >> /etc/locale.conf
And finally, for all this to take effect (and I say this from my own experience), you must execute the command:
# locale-gen
To generate our location as is obvious.
Now we have to set the default keyboard layout. What we did in the first step was just set it for the current session.
# echo KEYMAP=us >> /etc/vconsole.conf
What are we left with? Very little. In a step above we installed GRUB but did not configure it. And that's what we will do now:
# grub-install /dev/sda
And we create the grub.cfg file with the following command:
# grub-mkconfig -o /boot/grub/grub.cfg
Our friend GEspadas, after repeating the installation process several times, noticed an annoying bug in GRUB (not an ArchLinux bug), which shows for a fraction of a second an error message when starting the system:
Welcome to Grub! error: file '/boot/grub/locale/en.mo.gz' not found
Anyway, the solution that GEspadas proposes is to execute:
# cp /boot/grub/locale/en@quot.mo /boot/grub/locale/en_US.mo
Now we proceed to create the initial RAM disk:
# mkinitcpio -p linux
And we are almost done ... we only have to do something very important: Change, or rather, set the password for root. So we run:
# passwd
Exiting the chroot, we unmount the partitions and reboot:
# exit # umount / mnt / {boot, home,} # reboot
10. Creating our user
To add my user, I used the following command:
# useradd -m -G audio,lp,optical,storage,video,wheel,games,power,scanner -s /bin/bash elav
The groups are as follows:
audio - Tasks involving the sound card and related applications.
lp - Printer management.
optical - Handling of optical devices (CD, DVD, etc).
storage - Handling of various storage devices.
video lesson - Tasks involving the video card and hardware acceleration.
wheel - Very important! So that the user can use sudo.
games - Needed for write permissions for games.
- Necessary to be able to shutdown and restart the system.
scanner - Administration and use of digitizers (scanners).
We access the / etc / sudoers file and uncomment the line:
# %wheel ALL=(ALL) ALL
11. Activating Network-Manager
I don't know about you but I use NetworkManager to manage my network connections and interfaces.
First, we stop the network daemon:
# systemctl stop net-auto-wireless.service
Next, we deactivate the network daemons that are running.
# systemctl disable net-auto-wireless.service
Lastly, we stop our network cards. If we don't know what they are, we just have to type:
# ip link
In my case it would be:
# ip link set enp5s0 down # ip link set wlp9s0 down
We activate NetworkManager so that it starts at startup with the following command:
# systemctl enable NetworkManager
You can start the NetworkManager daemon immediately with the following command:
# systemctl start NetworkManager
In my case that I use KDE, I only have to install the kdeplasma-applets-networkmanagement package once I have installed my Desktop Environment, but we will see this in the next article.
- Activate the network without NetworkManager
If we connect by DHCP and we don't need to manage the network manually, we just have to execute:
# systemctl enable dhcpcd@enp5s0.service # systemctl start dhcpcd@enp5s0.service
Sure, they have to replace enp5s0 with the name of your network interface.
And that's it .. We already have Arch Linux installed, configured and running. In the next article we will see how to install KDE without dying in the attempt 😛
Just say thank you, thank you very much for the article. Although it is almost the same as what is posted in English on the web, everything you comment in a personal way is priceless, and what to say about the translation.
Regards!
Have a nice day 😉
TooManySecrets
You're welcome .. thanks to you for the comment, although much of what you see has already been explained (and has been taken) from the GEspadas guide.
Hello ,,, many congratulations on your publication, it is very well structured and very clean in design, something that many forget and is very important for us end users ,, I want to share that I try to install ArchLinux with LVM I was looking for documentation besides that I continued the wiki manual but all failed to boot and I got the horrible message: "It is not possible to find the partition / dev / mapper / lvarch0-lvraiz" and I got tired of trying several alternatives, my machine is not advanced at all, it is an HP With petium 4 HT and a 160 GB SATA disk, do all the configuration in the mkinitpio with everything that the wiki said, well seeing that it was a resounding failure, I preferred to install Debian 7 and I was surprised how I detected the LVM partitioning that already It existed on the disk (resulting from attempts to install ArchLinux) and now I'm comfortable because I even installed the Gnome with its Gnome Shell; now I am taking the part of Networkmanager to finish with the basic installation of my Debian since it seems very concrete and clear to me ,,, please in any free time you have can you help us with some document just as mop but that talks about a method infallible archlinux installation with LVM and SATA disks ,,,, I also came across the Gespadas manual but it only talks about a properly inspired manual on installation of hard partitions, in advance thank you very much for your time invested in all of us ,,, 🙂
I would also take the opportunity to ask why they removed the installer that Arch had
For freedom I believe, since in the old one a series of steps were followed ... correct me if I am wrong.
Due to lack of maintenance, from what I heard. Anyway, I would have liked Arch to have an installer like the one OpenBSD has.
The article is excellent, I hope one day to encourage me and put this article into practice.
Thank you very much for the tutorial, Arch Linux is a distro in which I still have a debt to install, I was able to install FreeBSD and OpenBSD, and also Slackware 😀 Thank you!
sorry, pending is, ah! and gentoo I also have a debt with this distro, the other day I downloaded calculate linux and I liked it a lot.
I tried Slackware following the DMoZ guide that I had published in these parts, and the truth is that I was impressed by how easy it is to install.
Slackware has the coolest console I've tried so far.
Well, elav colleague .. Very good guide similar to Gregorio ..
I really feel very comfortable installing ArchLinux, I just love it.
Greetings ..
Good article!!
The grub message has been around for quite some time, to fix it:
mkdir -p / boot / grub / locale
cp /usr/share/locale/en\@quot/LC_MESSAGES/grub.mo /boot/grub/locale/en.mo
export LANG = es_ES.UTF-8
mkinitcpio -p linux
In the arch wiki it was somewhere, in issue 1 of HDMagazine you can also see the solution to that message.
The mkinitcpio -p is not necessary, I lost the clamp with the copy / paste XDD
More than a solution, it looks like a patch to trick Grub into stopping throwing that bug.
The export LANG = es_ES.UTF-8 thing doesn't make much sense either. You simply change the value of the LANG console variable to that value in that session. It has nothing to do with grub.
regards
@Elav: Thanks for considering my humble tutorial! Good to know that it is still valid. I hope to get your update soon. A hug brother!
You're welcome, thanks to you because if your guide would have been more difficult for me to have installed Arch.
Great tutorials of yours: P. With one of yours update to systemd
Excellent article, I'm going to print it to have it on hand.
With so many archers around (not a derogatory comment, I love Arch) it's amazing that there is still no graphical installer.
Install Antergos, if it is not with Gnome it is practically like installing Arch with graphical installer and Yaourt included
Perhaps it is obvious but we can make the partitions with a live-cd of any distribution in graphic mode and save ourselves the suffering of cfdisk.
In the last installation isos, in case of having wired internet, it is no longer necessary to raise the network with any command to install the system. And we must not forget that the best installation tutorial is the guide for beginners on the official website.
In my opinion, the CFDisk is quite simple and the graphic versions take their time to load their interface.
With cfdisk it is much faster and easier. It is just giving the size of the partitions and the type of file system.
Even in Slackware, the CFDisk is the same as Arch's. The rest of the formatting is handled by Slackware's KISS wizard.
Your contribution is appreciated, I currently use Manjaro and I am very happy with the distro, but several times it has crossed my mind to try the mother distro, to enjoy bleeding edge in its maximum expression 🙂
Although previously I have already tried to install it virtually, and when I finished executing the tutorial to the letter nothing appeared to me, which suggests that to install it it takes a lot of time and desire to do so.
Good tuto. What's more, you encouraged me to do a brief Slackware tutorial without dying in the attempt (reaching the level of leaving Slackware with KDE in Spanish, of course).
Anyway, I'll keep an eye on Arch if they've fixed Iceweasel's Spanish language pack.
I was looking for some information like this to see if I try this distro of which many praise, but if it looks tiresome and is like archaic, I wonder is not wasting time is time I would use it to customize my desktop to my liking.
The best thing that Arch has is Yaourt (he gives PPAs for the ****), when I was looking at everything available they have I put this face: http://i1215.photobucket.com/albums/cc502/sch19/Host-Series/surprised-rainbow-face-l.png
I think you mean AUR, since yaourt is an AurHelper, and that's true. AUR (Arch User Repository) is the best there is.
There are many of them, I currently use packer, which seems to me to be at the same level as yaourt, I am looking for what programming language they are written in but I cannot find it
THAT THAT THAT 😀
I've been in Arch Linux for almost two years, I started seriously in the GNU / Linux world, through the big door and I'm not sorry. That Arch Linux is not stable every time I believe it less, it is true that sometimes there are strong changes, but nothing that is not resolved in the Arch wiki, in the forums, or by part of the official announcements ... and if You don't want to be angry, you just don't update that part of the change, and leave it for when it's absolutely necessary ... once Arch is configured, you forget everything.
I'm so comfortable with Arch that I'm not tempted to switch from Distro. I feel like anything you can get from any other Distro you can custom build at Arch.
Note: I am not an expert user.
Practically all steps are identical to a gentoo (the difference is in points 6 and 11), I am not surprised that the installer has been removed, because some precision is needed with the configuration files of both distros.
Great!.
Let's give Arch a chance to see how it goes.
very good, but how could you make a tutorial of the local repositories
Excellent tuto, I had not been encouraged to try it, I just did it in Virtual Box and I think that in a short time I will be installing it as the base system of my Alienware M11x, some extra recommendation for my Wireles card
Network controller: Broadcom Corporation BCM43224 802.11a / b / g / n (rev 01)
regards
Good,
I was impressed when I read the article on how the installation in Arch has changed, before it seemed much simpler than now, you didn't even have to raise the network interface "at least that I remember." In the installation, a series of steps were followed to install the base system and then the typical thing to do is to put the kde, the sound and others ... .. as in a debian netinstall.
Now it is still more manual perhaps more than the account, I know for the times it seems to me a delay to have to carry out an installation that way.
Support for systems that simplify our lives and not vice versa.
Hello, how are you? Your article is very good, I am new to arch, and I would like you to tell me, because after setting the password for root, I exit the chroot, I unmount the partitions and restart the system, but after restarting it asks me for a user and a pass that obviously, does not create according to the steps of the tutorial, since it is in step 10 where I am instructed to perform this action, did I do something wrong? Should this not happen? When restarting after installing, should the prompt appear as at the beginning of the installation? or how do I do to perform this action. Since, as I indicate, I cannot access the system by asking me for a username and a pass. first of all, Thanks.
login:root
Password: the one you put above.
Uyyy thanks to GEspadas 🙂 who takes the time to write these articles, thanks to him I met Manjaro 🙂
How do I put the password to the created user? I don't know how to access it.
passwd user
obvious changing "user" by account name
Everything was fine until I read, you need a network connection to install WTF !! … I will finish installing Archbang on my notebook, finally… I have a 10 GB disk, is it necessary to create all the partitions?
Very good guide !! One question, why do you use ifplugd instead of systemctl enable dhcpcd@yourcard.service? Any specific reason?
Hi @elav, I have installed Arch Linux many times with the old installation system (without systemd), and although the new method is much more practical and attractive for me, I had decided to wait for the period of turbulence to pass (migration to the new installer ) to which this phenomenal Distro was subjected, now seems to be a good time to install it, but first a couple of questions.
How stable is it?
When installing a package, in some cases, pacman suggests editing certain configuration files (at least in the previous installer), but many times, being a long installation, I lose the reading, since I'm in a tty and I can't return to reread.
What are the .log files of the pacman installations, if any?
Luckily there are several experienced Arch and derivative users here, so it will be easier for me to maintain this Distro in case of xD difficulties.
Excellent contribution @elav.
Greetings.
What is a real mess is installing Arch with UEFI. For when a guide? 😀
If you find one let me know.
A query, @elav:
When I run the command:
# pacstrap /mnt ifplugdDoes it definitively establish the connection of the repos or the network itself?
Excuse me elav, but your tutorial to install Arch Linux worked wonders for me, and I no longer have any complaints about Arch. I am now a debian + slacker + archer.
LOL XD! - Both physically or virtualize them to be "On" in all those systems?
I usually just use a base "stable" distro and then everything virtualized: D! - How do you do it?
I just have a question, the other day I downloaded some series and when I wanted to pass it to my external it told me access denied, then it showed me an error that said that it could not mount in the RUN folder ………. But if he copied or cut to a pendrive if it happened, has someone else happened to him?
Hello, it is: echo LANG = »en_ES.UTF-8 ″ >> /etc/locale.conf
I say it because otherwise it gives me an error when logging in
That's right .. thanks for the tip.