Hello friends!. We did not want to publish this article as it is contained in the compendium in PDF format that many readers have requested. Yes, we will write a summary with interesting additions. And as a preview of this compendium, we transcribe the Introduction:
Many people in charge of the services in the enterprise networks, when they take charge of a network whose services are based on Microsoft products, if they want to migrate to Linux they consider the migration of the Domain Controllers among other services.
If they do not choose a third-party product such as ClearOS or Zentyal, or if for other reasons they wish to become independent, then they undertake the painstaking task of becoming their own Domain Controller, or from Samba 4 -or other- their own Active Directory.
Then the problems begin and some other disappointments. Operating errors. They do not find the location of the problems to be able to solve them. Repeated installation attempts. Partial operations of the services. And a long list of problems.
If we look closely, most of the Internet does not use Microsoft-type networks. However, in our business environment we do, a lot.
With this compendium we try to show that we can make a business network without the Microsoft philosophy. Services based on authenticating users against an OpenLDAP Directory such as: E-Mail, FTP, SFTP, Business Cloud based on Owncloud, etc.
We aspire to offer a different approach based on 100% Free Software, and that does not use or emulate -which for the case is the same- the philosophy of Microsoft networks, either with Microsoft Software, or with OpenLDAP and Samba as main ones.
All solutions that use the free software Openldap + Samba, necessarily go through the basic knowledge of what is an LDAP server, how is it installed, how is it configured and administered, etc. Later they integrate Samba and possibly Kerberos, and in the end they offer us to "emulate" a Domain Controller in the style of Microsoft's NT 4, or an Active Directory.
Hard task indeed when we implement and configure it from the repository packages. Those who have studied and applied the extensive Samba documentation know very well what we mean. Samba 4 even proposes the administration of your Active Directory by using the classic administration console that we find in a Microsoft Active Directory, be it 2003 or another more advanced one.
Recommended reading.
Excellent manual that, El Maestro, Joel Barrios Dueñas gives us and that serves Debian players very well, although it is oriented to CentOS and Red Hat.
What services and software do we plan to install and configure?
- Independent NTP, DNS and DHCP, that is, the last two are not integrated into the Directory
- Directory Service or «Directory Services»Based on OpenLDAP
- E-Mail, "Citadel" Group Work Suite, FTP and SFTP,
- Business Cloud «Owncloud«
- Independent file server based on Samba.
In all cases, the process of authenticating the credentials of the users will be carried out against the Directory directly, or through libnss-ldap y PAM depending on the characteristics of the software in question.
And without further ado, let's get down to business.
Ldap Account Manager
Before continuing, we must read:
- Directory Service with LDAP. Introduction
- Directory Service with LDAP [2]: NTP and dnsmasq
- Directory Service with LDAP [3]: Isc-DHCP-Server and Bind9
- Directory Service with LDAP [4]: OpenLDAP (I)
- Directory Service with LDAP [5]: OpenLDAP (II)
- Directory Service with LDAP [6]: Certificates in Debian 7 "Wheezy"
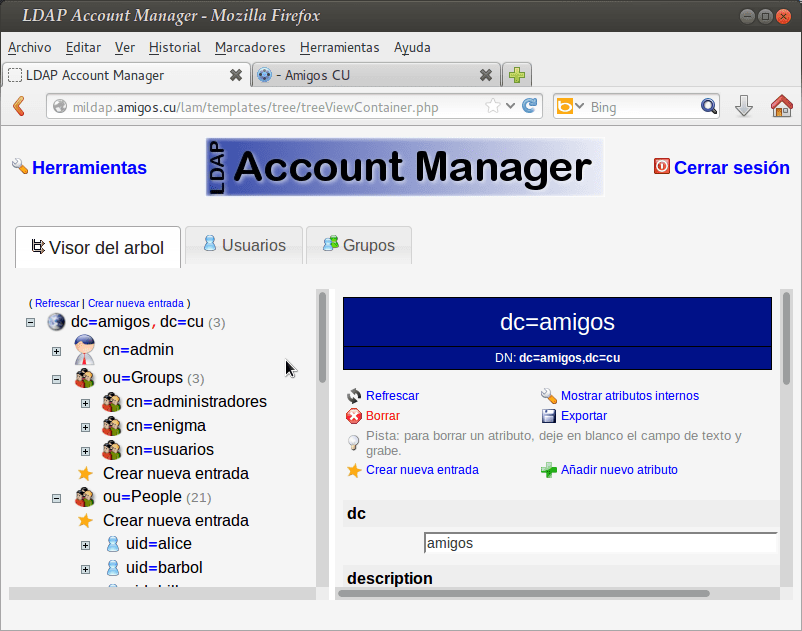
Those who have followed the series of previous articles will have noticed that we ALREADY have a Directory to manage. We can achieve this in many ways, either through the console utilities grouped in the package ldapscripts, the web interfaces phpLDAPadmin, Ldap Account Manager, etc., which are in the repository.
There is also the possibility of doing it through the Apache Directory Studio, which we must download from the Internet. It weighs about 142 megabytes.
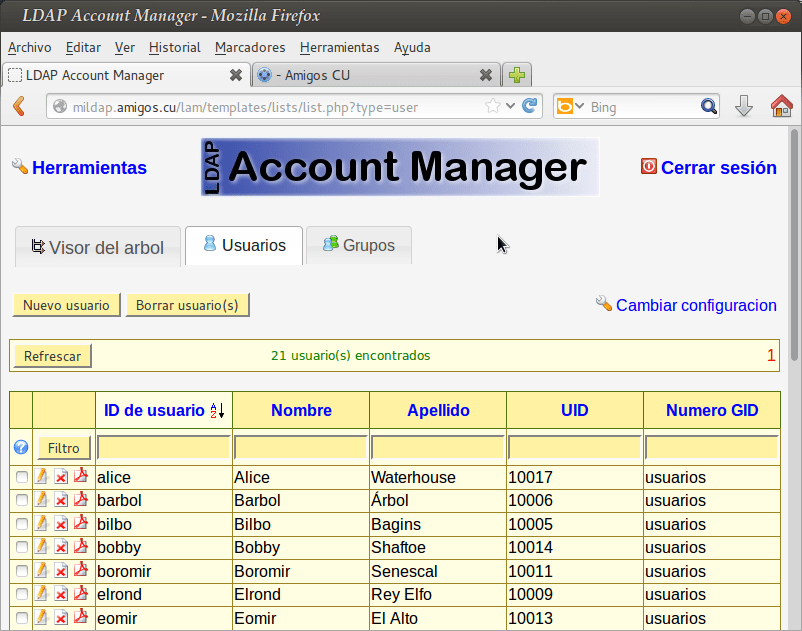
To administer our Directory, we strongly recommend the use of the Ldap Account Manager. And the first thing we will say about it, is that after its installation, we can access its documentation which is located in the folder / usr / share / doc / ldap-account-manager / docs.
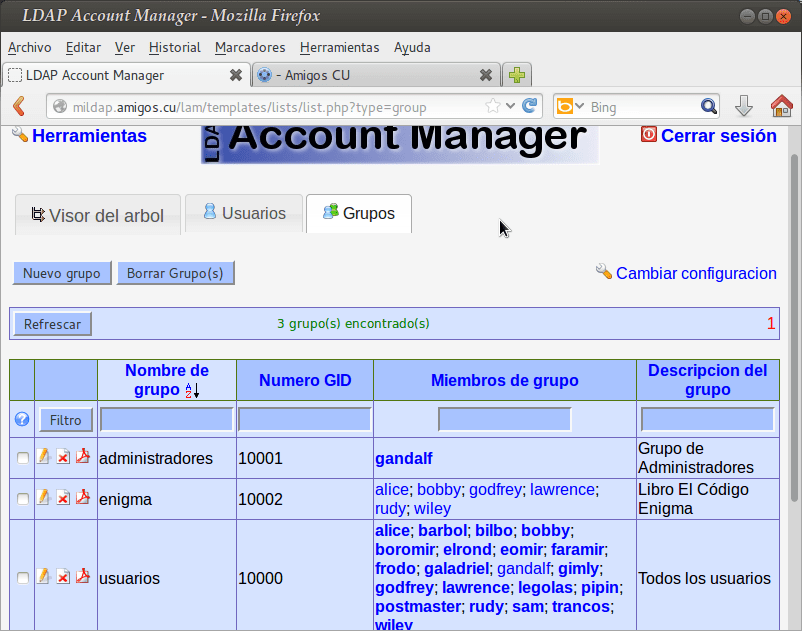
Through the Ldap Account Manager, henceforth LAM, we can manage user and group accounts stored in our Directory. The LAM runs on any web page server that supports PHP5, and we can connect to it through an unencrypted channel, or through StartTLS, which is the form we will use in our example.
Initial installation and configuration:
: ~ # aptitude install ldap-account-manager
After the installation of the Apache2 -apache2-mpm-prefork-, from PHP5 and other dependencies, and from the package itself ldap-account-manager, the first thing we must do is create a symbolic link from the LAM documentation folder to the root folder of the documents on our web server. Example:
: ~ # ln -s / usr / share / doc / ldap-account-manager / docs / manual / / var / www / lam-docs
In this way we guarantee access to the LAM manual through a web browser, if we point to the address http://mildap.amigos.cu/lam-docs.
Next, let's start configuring the LAM itself. In a browser we point to http://mildap.amigos.cu/lam.
- We click on the link "LAM configuration".
- Click on the link "Edit server profiles".
- We type the password 'The m' without the quotes.
In the LAM configuration pages, we can modify many parameters according to our preferences and needs. As I have always recommended going from Simple to Complex, and not the other way around, we will only touch what is strictly necessary to use the powerful tool that is LAM. If after we become Masters in its use, we want to modify or add functionalities, then welcome.
- Activate TLS: Yes -Recommended-.
- tree-suffix: dc = friends, dc = cu
- default-language: Spanish (Spain)
- List of valid users *: cn = admin, dc = friends, dc = cu
- New password: different password from lam
- Reenter password: different password from lam
Note: He ' * 'means that it is a required entry.
Bottom left are the buttons ^ save y ^ Cancel. If we save the changes now, it will return us to the initial page and we can see that the language has already changed and that the user's name is now admin. Before was Managers. However, let's go back to edit the -now in Spanish- "Setting. of the LAM ». After we are back on the configuration page, we will do the following:
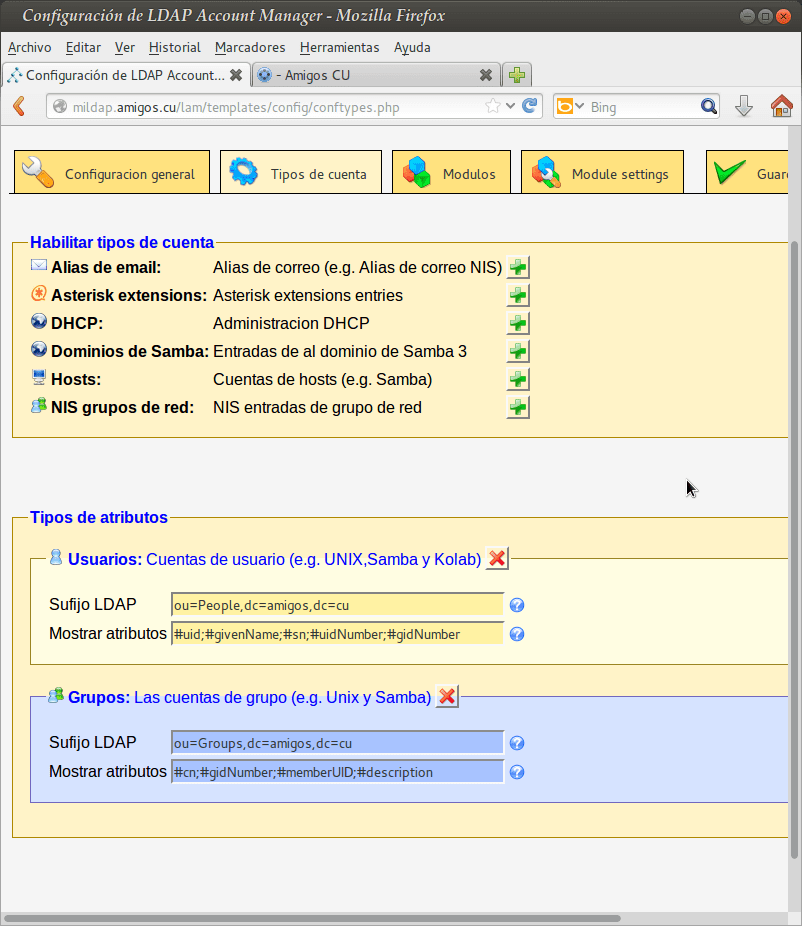
- We select the tab 'Types of accounts'.
- In the section 'Active account types' -> 'Users' -> 'LDAP suffix', we wrote: ou = People, dc = friends, dc = cu.
- In the section 'Active account types' -> 'Groups' -> 'LDAP suffix', we wrote: ou = Groups, dc = friends, dc = cu.
- Using the buttons titled '^ Remove this type of account', we eliminate those corresponding to 'Teams' y 'Samba domains', which we will not use.
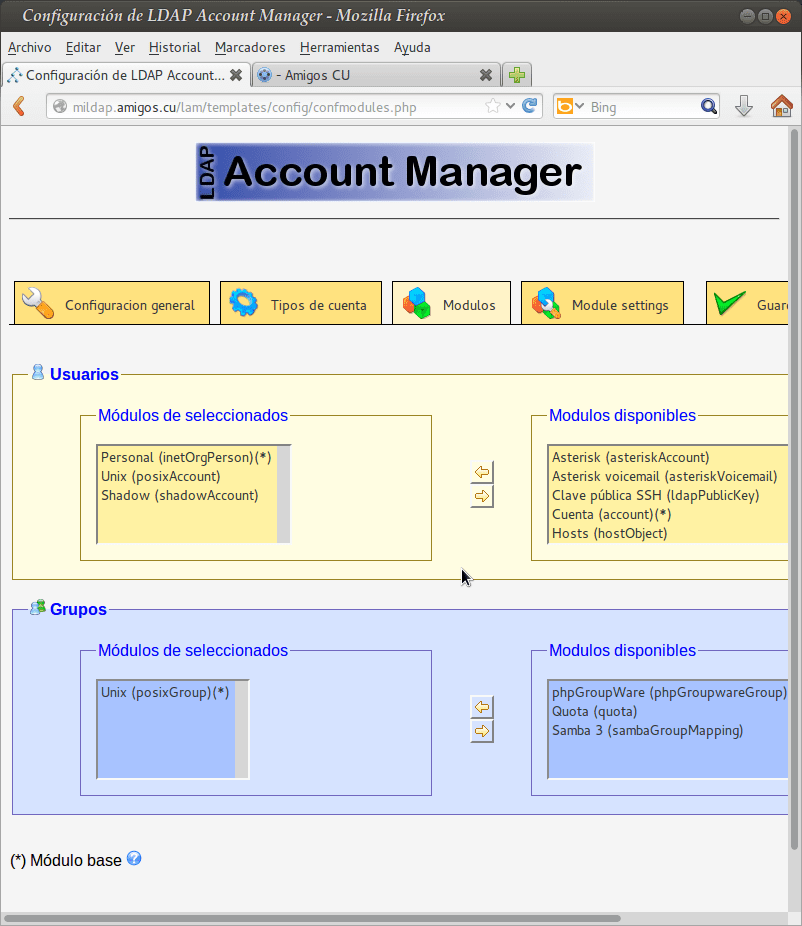
- We select the tab 'Modules'.
- En 'Users', on the list 'Selected modules', we move the module 'Samba 3 (sambaSamAccount)' to the list of 'Available Modules'.
- En 'Groups', on the list 'Selected modules', we move the module 'Samba 3 (sambaGroupMapping)' to the list of 'Available Modules'.
For now, and until we become familiar with the LAM configuration, we will leave it at that.
We save the changes and return to the initial page, where we must type the user's password admin (cn = admin, dc = friends, dc = cu), declared during the installation of the slap. If you return an error, check that the /etc/ldap/ldap.conf it is correctly configured on the server itself. You may have the wrong path to the TLS certificate or another error. Remember it should look like this:
BASE dc = friends, dc = cu URI ldap: //mildap.amigos.cu # TLS certificates (needed for GnuTLS) TLS_CACERT /etc/ssl/certs/cacert.pem
Once inside the LAM, we must spend some time studying it BEFORE changing any configuration. Its interface is very intuitive and easy to use. Use it and check.
Comment: In the document http://mildap.amigos.cu/lam-docs/ch02s02.html#confTypicalScenarios, we can read at the end:
Single LDAP directory with lots of users (> 10 000)
LAM was tested to work with 10 users. If you have a lot more users then you have basically two options.
- Divide your LDAP tree in organizational units: This is usually the best performing option. Put your accounts in several organizational units and setup LAM as in the advanced scenario above.
- Increase memory limit: Increase the memory_limit parameter in your php.ini. This will allow LAM to read more entries. But this will slow down the response times of LAM.
Let's be Creative and Orderly in the Administration of our Directory.
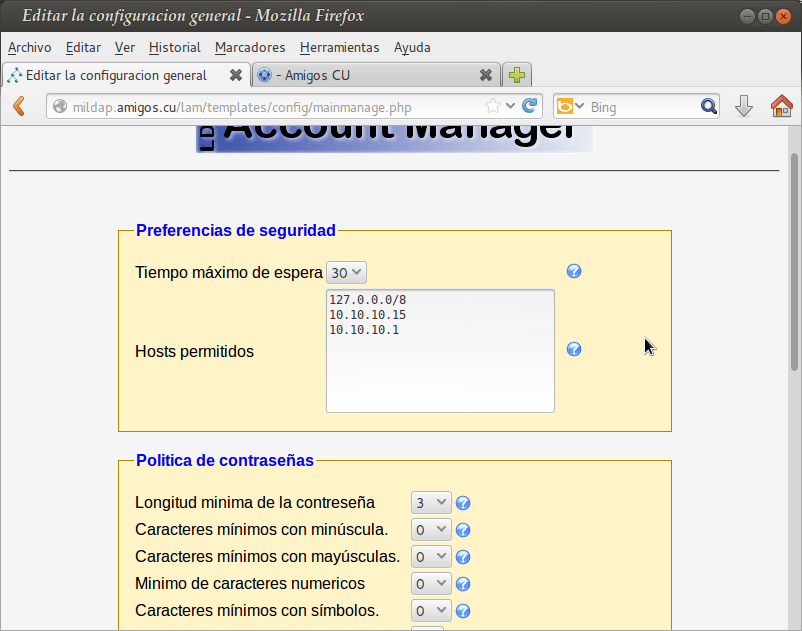
Password security policies, and other aspects through LAM
- We click on the link «LAM configuration».
- Click on the link "Edit general settings".
- We type the password 'The m' without the quotes.
And on that page we find the Password Policies, Security Preferences, Allowed Hosts, and others.
Note: The LAM configuration is saved in /usr/share/ldap-account-manager/config/lam.conf.
We enable https to connect to the LAM safely:
: ~ # a2ensite default-ssl
: ~ # a2enmod ssl
: ~ # /etc/init.d/apache2 restart
When we enable https in the previous way, we are working with the certificates that Apache generates by default, and reflects them in the definition of its virtual host default-ssl. If we want to use other certificates generated by ourselves, please and let us consult /usr/share/doc/apache2.2-common/README.Debian.gz. The certificates in question are called "Snake Oil" o Snake Oil, and they are found in:
/etc/ssl/certs/ssl-cert-snakeoil.pem
/etc/ssl/private/ssl-cert-snakeoil.key
Let's point the browser to https://mildap.amigos.cu, and we accept the certificate. Then we point to https://mildap.amigos.cu/lam and we can already work through https the LAM.
Important: if during the server startup process, the Exim takes a long time to start, install the lightweight substitute ssmtp.
: ~ # aptitude install ssmtp
 The following NEW packages will be installed: ssmtp {b} 0 updated packages, 1 new installed, 0 to remove and 0 not updated. I need to download 52,7 kB of files. After unpacking 8192 B will be used. Dependencies of the following packages are not satisfied: exim4-config: Conflicts: ssmtp but 2.64-4 will be installed. exim4-daemon-light: Conflicts: mail-transport-agent which is a virtual package. ssmtp: Conflicts: mail-transport-agent which is a virtual package. The following actions will resolve these dependencies Remove the following packages: 1) exim4 2) exim4-base 3) exim4-config 4) exim4-daemon-light Do you accept this solution? [Y / n / q /?] And
Then we execute:
: ~ # aptitude purge ~ c: ~ # aptitude clean: ~ # aptitude autoclean: ~ # reboot
If you are working with virtual servers, this would be a great time to do a good backup of the entire main server… just in case. 🙂
Replication. Save and restore the Directory database.
In the excellent guide -which we recommend everyone to read and study- «Ubuntu ServerGuide»From Ubuntu Server 12.04« Precise », there is a detailed explanation of parts of the code that we have written about OpenLDAP and the generation of TLS certificates, and in addition, Directory Replication is discussed in great detail, and how to do the Save and Restore of the databases.
However, here is a procedure for restoring the entire database in the event of a disaster.
Very important:
We must ALWAYS have the exported file at hand through the Ldap Account Manager as a backup of our data. Of course, the file cn = amigos.ldif must correspond to our own installation. We can also obtain it through the slapcat command as we will see later.
1.- We eliminate the slapd installation only.
: ~ # aptitude purge slpad
2.- We clean the package system
: ~ # aptitude install -f: ~ # aptitude purge ~ c: ~ # aptitude clean: ~ # aptitude autoclean
3.- We completely delete the Directory database
: ~ # rm -r / var / lib / ldap / *
4.- We reinstall the slapd daemon and its dependencies
: ~ # aptitude install slapd
5.- We check
: ~ # ldapsearch -Q -LLL -Y EXTERNAL -H ldapi: /// -b cn = config dn: ~ # ldapsearch -x -LLL -H ldap: /// -b dc = friends, dc = cu dn
6.- Add the same index file olcDbIndex.ldif
: ~ # ldapmodify -Y EXTERNAL -H ldapi: /// -f ./olcDbIndex.ldif
7.- We check the added indices
: ~ # ldapsearch -Q -LLL -Y EXTERNAL -H ldapi: /// \ -b cn = config '(olcDatabase = {1} hdb)' olcDbIndex
8.- We add the same Access Control Rule
: ~ # ldapmodify -Y EXTERNAL -H ldapi: /// -f ./olcAccess.ldif
9.- We check the Access Control Rules
: ~ # ldapsearch -Q -LLL -Y EXTERNAL -H ldapi: /// \ -b cn = config '(olcAccess = *)' olcAccess olcSuffix
10.- We add the TLS Certificates. No need to rebuild or fix permissions. They already exist in the filesystem, but are not declared in the database.
: ~ # ldapmodify -Y EXTERNAL -H ldapi: /// -f /etc/ssl/certinfo.ldif
11.- We add the content according to our own backup
: ~ # ldapadd -x -D cn = admin, dc = friends, dc = cu -W -f dc = friends.ldif
DO NOT restart the slapd because it is indexing the database and it can be corrupted !!! ALWAYS edit your backup file BEFORE adding it, to avoid entering existing entries.
We point in a browser to https://mildap.amigos.cu/lam and we check.
The slapcat command
The command slapcat It is mostly used to generate in LDIF format, the content of the database that handles the slap. The command opens the database determined by its number or suffix, and writes the corresponding file in LDIF format on the screen. The databases configured as subordinate are also shown, unless we specify the option -g.
The most important limitation of the use of this command is that it should not be executed when the slap, at least in write mode, to ensure data consistency.
For example, if we want to make a backup copy of the Directory database, to a file named backup-slapd.ldif, we execute:
: ~ # service slapd stop: ~ # slapcat -l backup-slapd.ldif: ~ # service slapd start
LAM images
Great contribution, I loved it, and also the recommended readings.
He had been looking for a similar article without much success.
I give you a 10 😉
Thank you for commenting and evaluating my articles !!!
Interesting! Once again, excellent contribution, Fico!
Hug! Paul.
Thank you very much for your comment and praise, friend Pablo !!! I hope it is useful to those who need it.
Excellent content! Thanks again for sharing.
regards
Thanks for comment !!!
Homerun Fico !! And the official pdf for when will it be ready?
Greetings dhunter !!!. Imagine that in addition to containing the 7 posts published so far, I will include how to integrate a basic mail server based on CITADEL; FTP, SFTP services; a Business Cloud based on OwnCloud; a Standalone Samba server with system users via libnss-ldap and PAM, and so on. Draw your own conclusions. 🙂 I think by the end of March or the beginning of April.
Hello Federico, thanks for the contribution, we will be looking forward to it. with the update ..
I will make an effort to finish it by the end of this month. It is not easy at all to write a book even if it is only a few pages.
I can only say that of the contributors to this blog, you seem to me to be the most interesting, the best explained and the closest of ALL.
Thank you very much for your review. In every article I write, I do my best, because I know that there are always readers like you, despite many who do not comment.
Greetings Nexus6 !!!
Good afternoon, whenever I consult the network about ldap I find you giving recommendations, which I congratulate for your intention, now I am new to this and like everyone wanting to learn
This is the question
My friends tell me that when the network is disconnected, the operating system already authenticated with ldap changes my language to English that you can tell me about where I should check what file to check so that it is in Spanish that my user is initialized again added in LDAP in advance thanks for helping
Federico excellent post as usual. I was reading that you were commenting on something related to a PDF with the configuration of most of the telematic services used in a business network. You said that by the end of March or the beginning of April of last year it would be ready. My question is if at that time you managed to finish it and upload it? Thanks in advance, in the end I'm going to try Openfire, I see that it even has a web interface for the 9090.
Thanks for your comments, Pedro Pablo. Instead of answering you extensively, I wrote an article that you will read today or tomorrow. Thankful readers like you deserve an answer. Thanks again.